Last week we discussed how one could easily customize a form by adding a new field and doing some simple validation, illustrating our integration with Visual Studio and ease of customizing forms. This week, we are going to take customization to a new level by taking the out of the box product and completely changing the look and feel that ISVs can leverage to white label their Acumatica implementation.
Basic Screen Customizations – Application Look & Feel
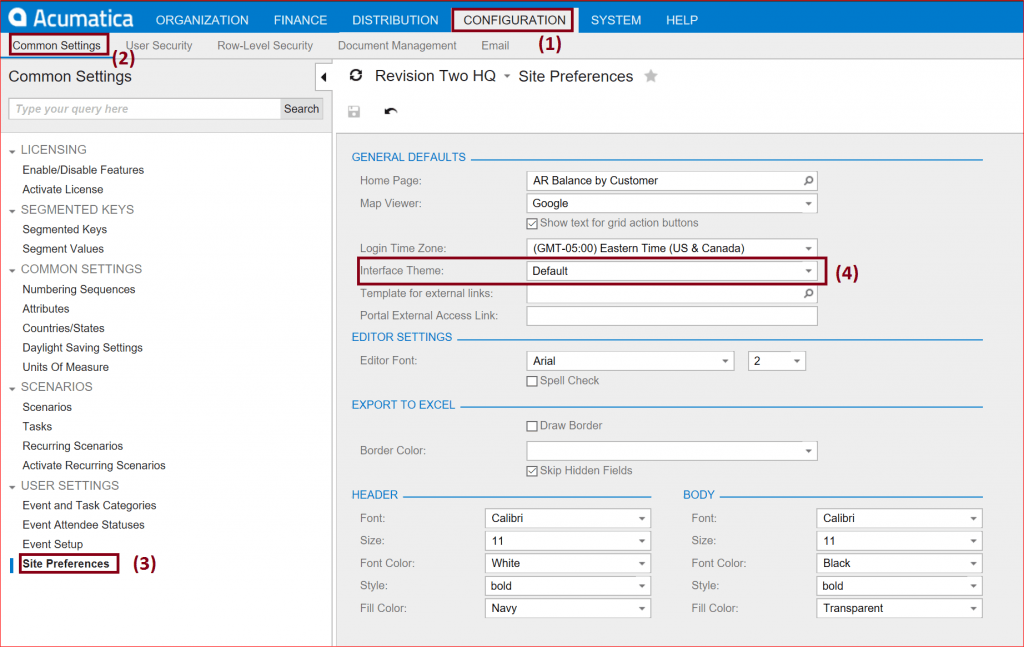
The first thing I am going to show you is how to change the color scheme of the product. Select the Configuration tab (1) and the submenu, Common Settings (2). Then choose Site Preferences (3) at the bottom of the left pane under USER SETTINGS. Under the GENERAL DEFAULTS section of the form, you will see a setting for the Interface Theme is set to Default (4) – Figure 1 below:
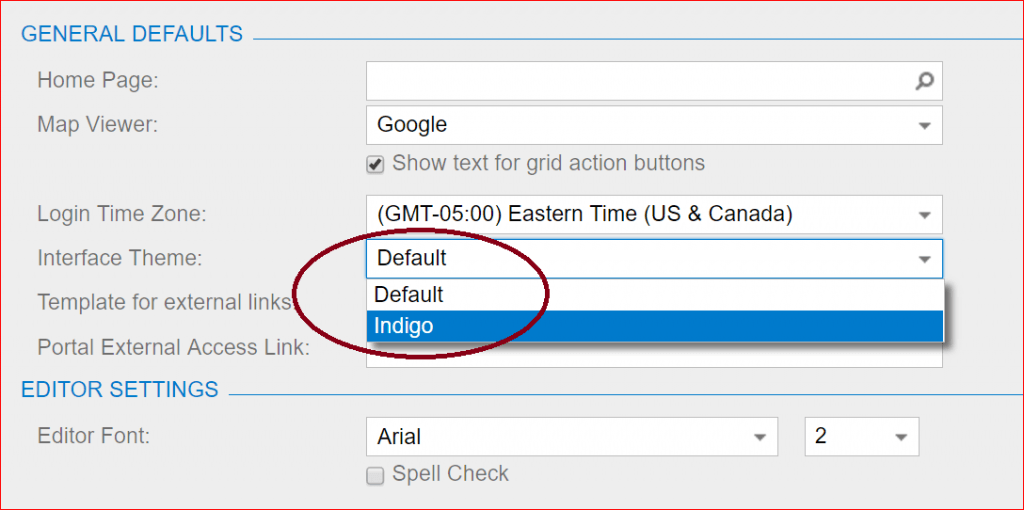
When you click on the dropdown box (4) you will see two choices out of the box: Default and Indigo – Figure 2.
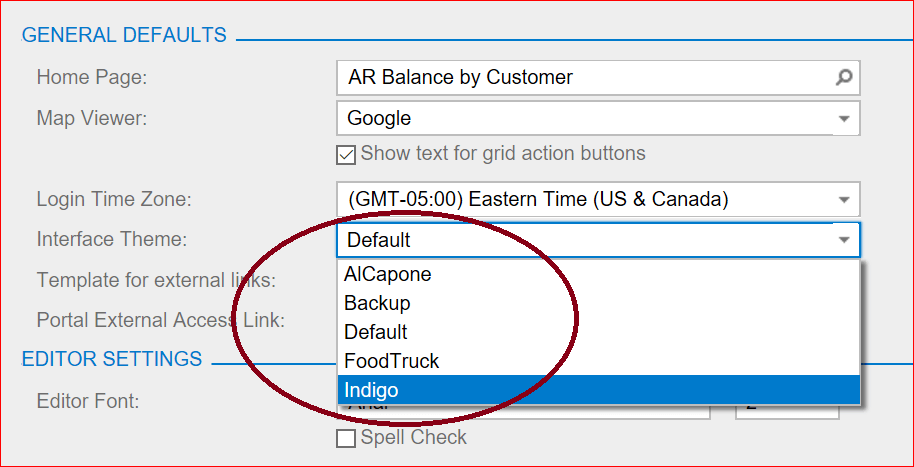
However, you can create your own customizations and install them yourself so they show up as a choice in the dropdown list box as you can see in the next screenshot below in Figure 3
Creating your own theme, you can start with the default theme and make specific changes to the Cascading Style Sheets (.css) and Skins (.skin) files found in the AppThemes folder as illustrated below in Figure 3.
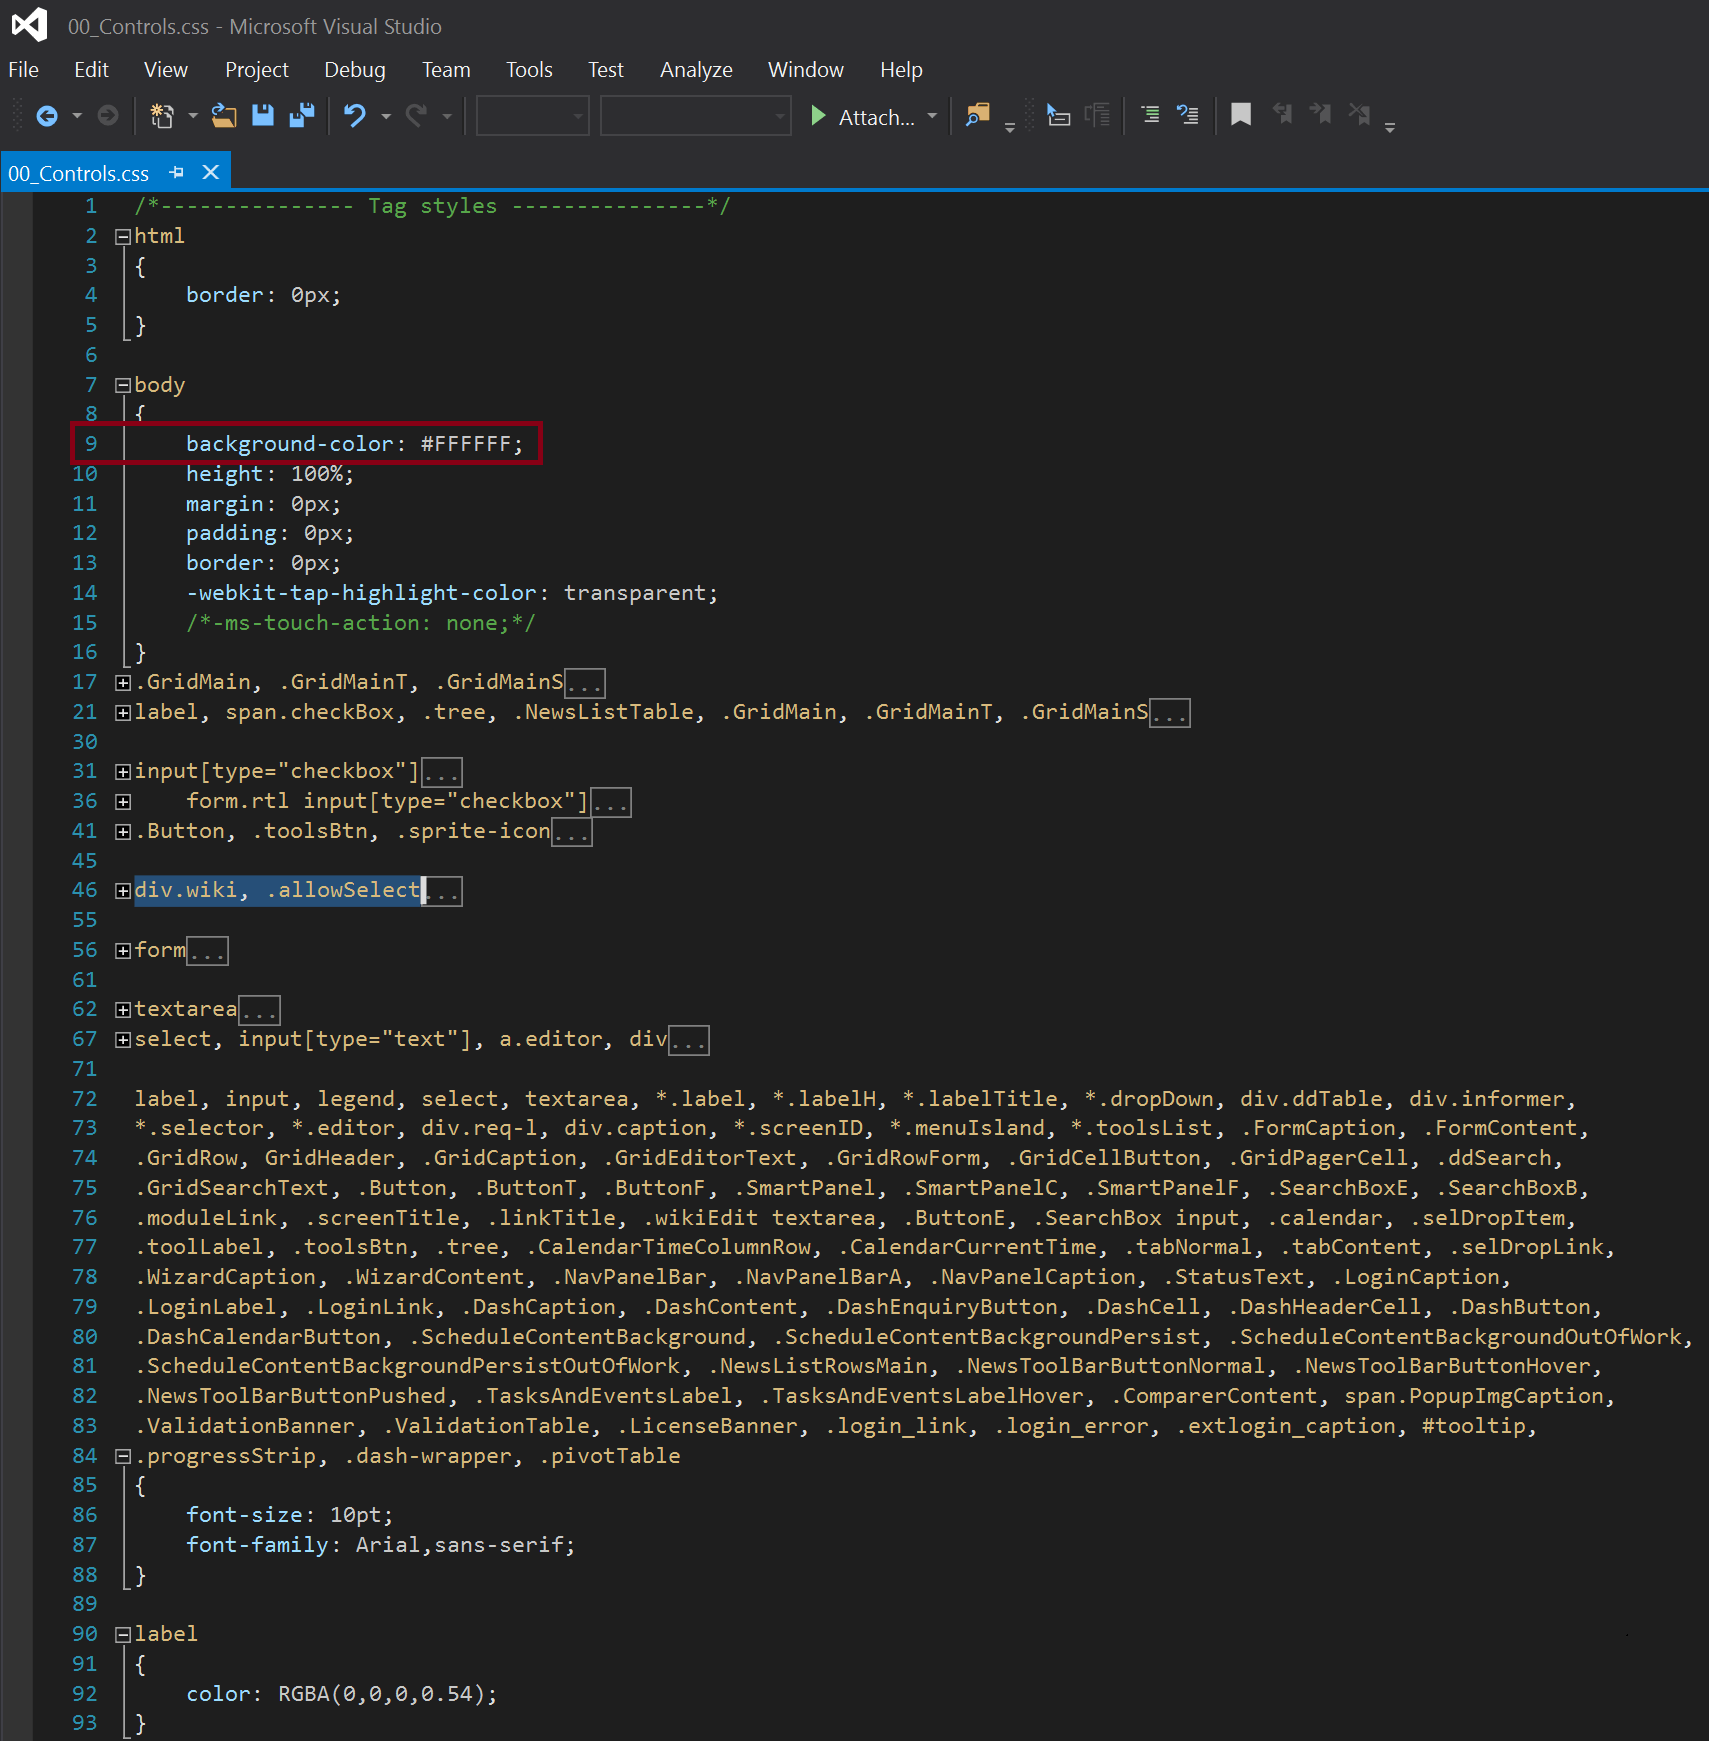
For example, you can open the 00_Controls.css file in Visual Studio and make a simple change to the background color and other elements found in the .css file. Just double-click on the file found under App_Themes\Default folder of your Acumatica instance of the software. The file will open up in Notepad by default where you can edit the file – or as I prefer, I right-click on the file and open it with Visual Studio and make my changes there.
Here you will notice, that the Default theme’s 00_Control.css file has a white background-color represented by the #FFFFFF hex code for white. See the screenshot (Figure 4) below. To change the background color to black, you would simply change the setting to #000000. By having experience with cascading style sheets and skins, you will be able to create various themes to suite you and your company’s style and branding.
One nice resource you can leverage is the W3Schools.com site’s tutorials and references – especially, if you are new to the technology or need a refresher.
Okay, let’s go with the AlCapone theme as an example of a stark change in the look and feel of the system to show the degree to which you can change the look of the system. First let’s look at the changes this theme has on the Acumatica overall look and feel:

Observe the following from the screen-shot above in Figure 5 that that background color changed to black and the main menutabs, submenu, background form color changed to dark grey, etc. Further you might notice that that the selected Module field outline has changed to yellow. And lastly, you might notice that the logo in the upper-right of the screen was changed to the Al Capone branding. Now contrast this to the default below:

There were essentially three steps that I took to employ the enumerated changes.
- I changed the Default theme to AlCapone by selecting the Configuration tab, Common Settings (submenu), Site Preferences. Then USER SETTINGS, GENERAL DEFAULTS. And lastly, the Interface Theme as outlined in the beginning of this post.
- I saved my changes and refreshed the screen.
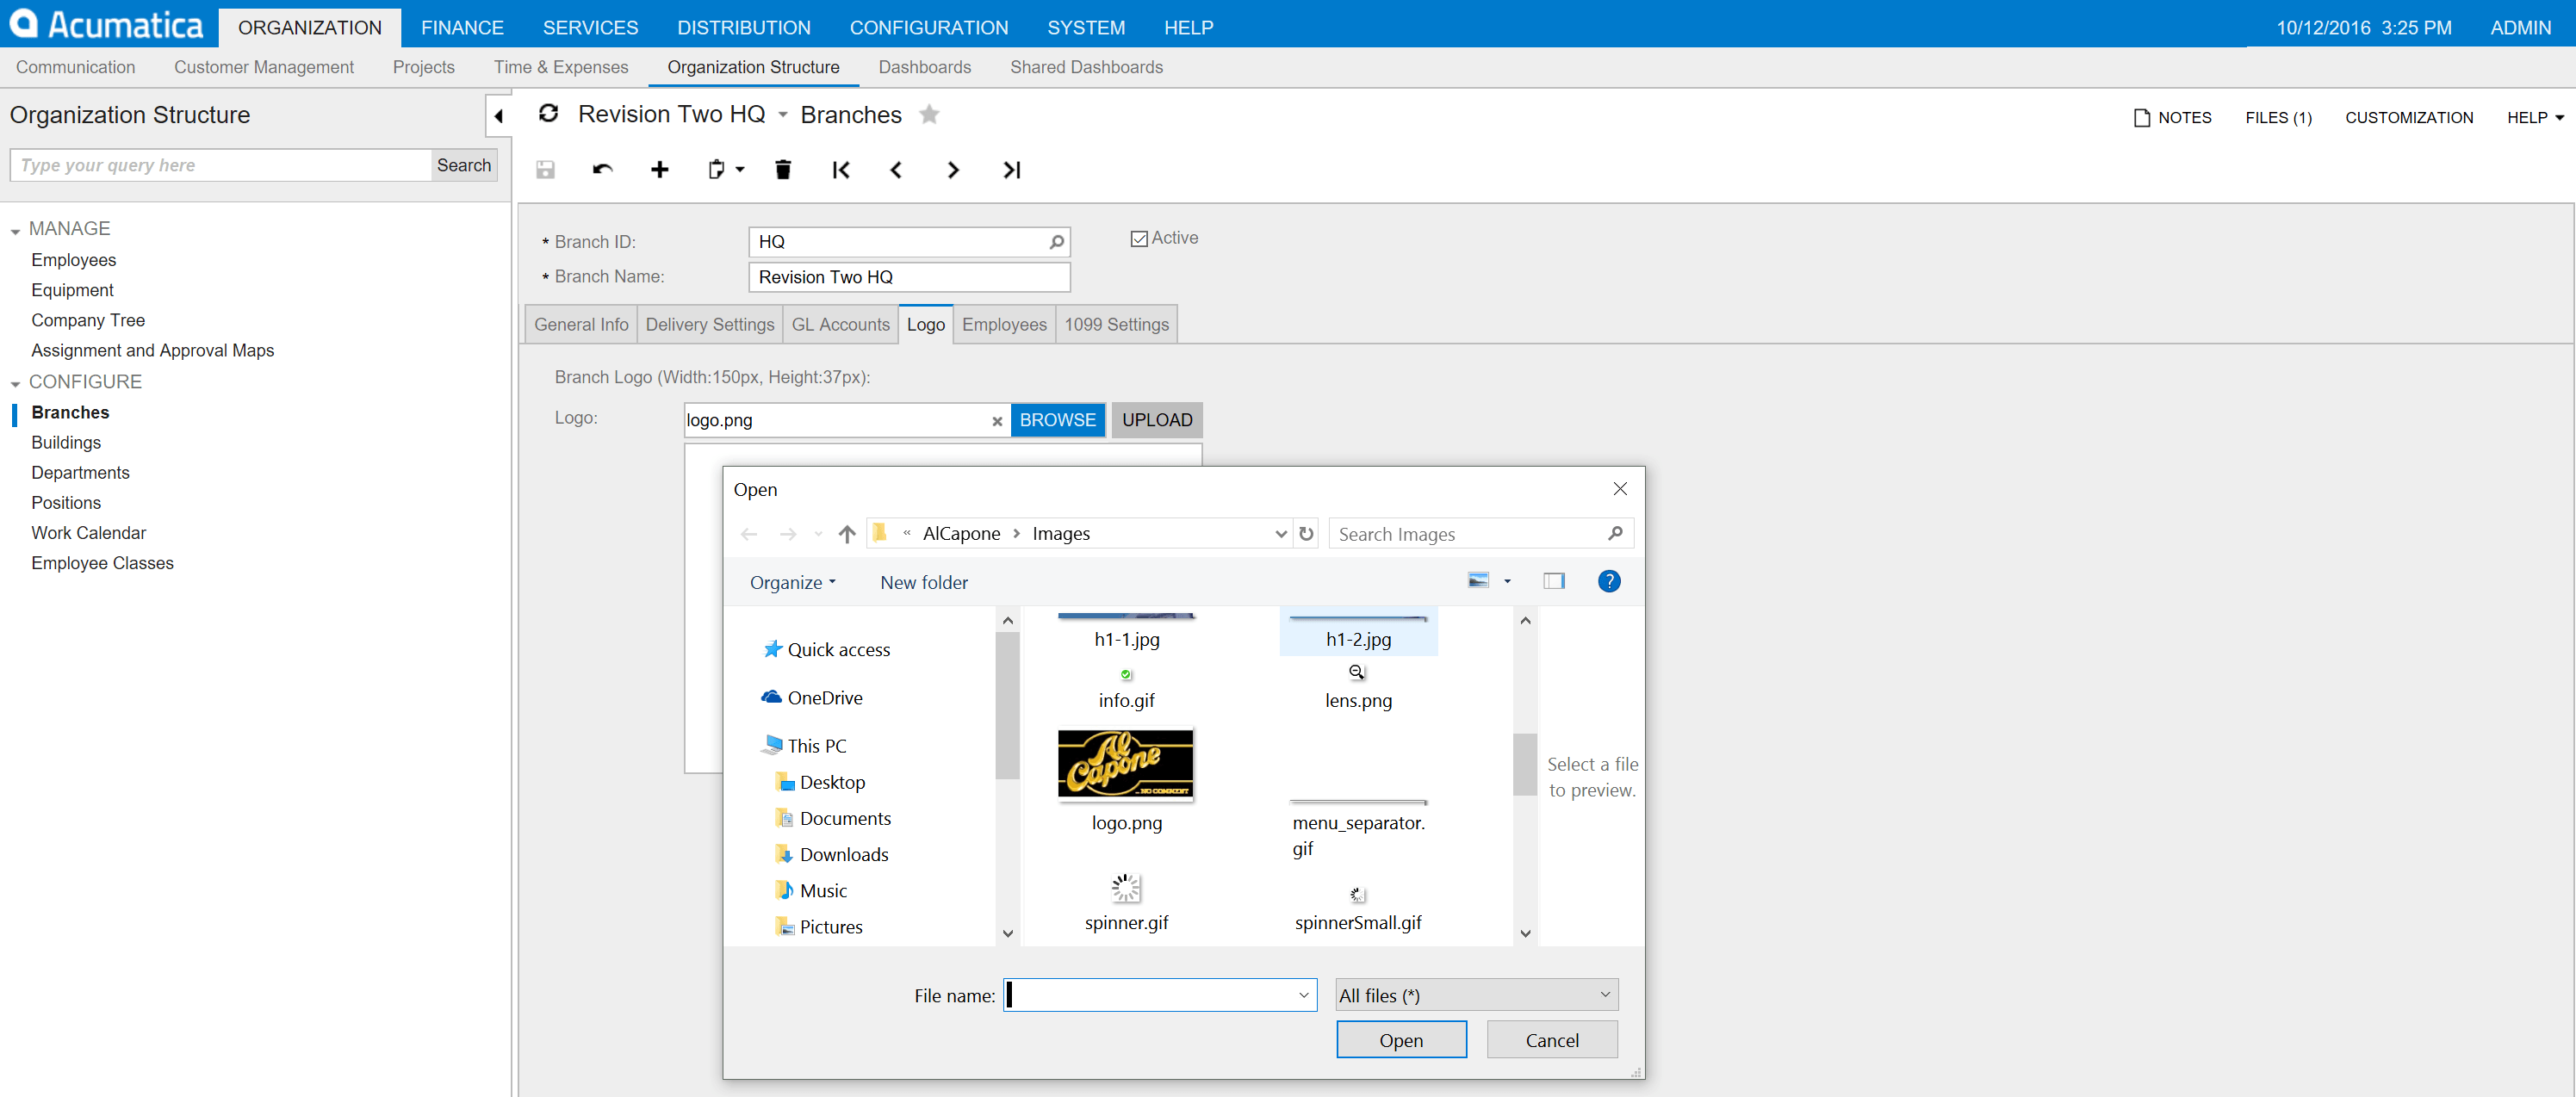
- Then I changed the logo by selecting the ORGANIZATION tab (main menu), Organization Structure (submenu), Branches, and Logo (tab) as shown below in Figure 7.
White Labeling
Until now, I have shown you how to make simple changes to the system’s look and feel and branding and even replacing the Acumatica logo with your own logo – stepping into the White Labeling domain. White Labeling is a term that denotes the use of generic products – including software packages that may be sold by 3rd parties (ISVs & OEMs) as their very own products. ISVs and OEMs customize the look and feel to match their organization theme and branding plus customization the application functionality (fields, business logic, taxonomy etc.) to meet the particular vertical needs. In our case, a common scenario is for ISVs to take our core Financials, Distribution, Service Management, and Customer Management modules – individual or combinations thereof – and package them with their vertical product offerings and offer a complete business solution to their customers.
Now let’s get back to another step in the process of White Labeling the Acumatica Application by changing the Login Screen.
To do this is quite simple. First, you need to have some image files to use. In keeping with the Al Capone theme, I was able to locate some historical pictures of Al Capone we’ll use here to illustrate this. The default login screen out the box is captured below in Figure 8. As you refresh the login screen you can cycle through image files – this is just one of five that ship with the product.

You may change not only the image but also the background color (showing white here) and the logo displayed in the upper-right of the screen. The first item we’ll change is the image. Then the background, and finally the logo.
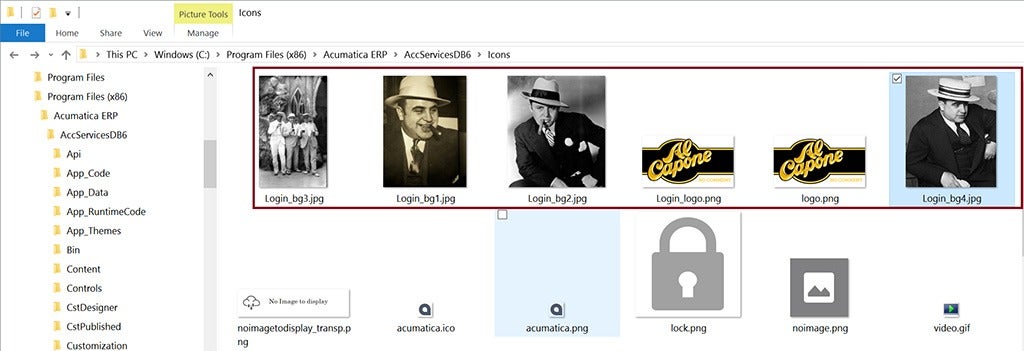
Below in Figure 9, you see the image rendered above in Figure 8 with the file name login_bg2.jpg (1). Each of these files – login_bg1.jpg, login_bg2.jpg, login_bg3.jpg, etc. are cycled through with each login or refresh of the login in webpage. To change the images, we simply copy new images into the …Acumatica ERP > AcumaticaDB6*>Icons directory and name them as above.
To replace the logo in the upper right, with our new logo, we replace the login_logo.png file (2).
![]()
After doing this, you see we have the Al Capone theme-based login image files and the Al Capone Logo as seen below in Figure 10.
After replacing the Acumatica images with the Al Capone images, the result of rendering the login page is as follows in Figure 11 below.
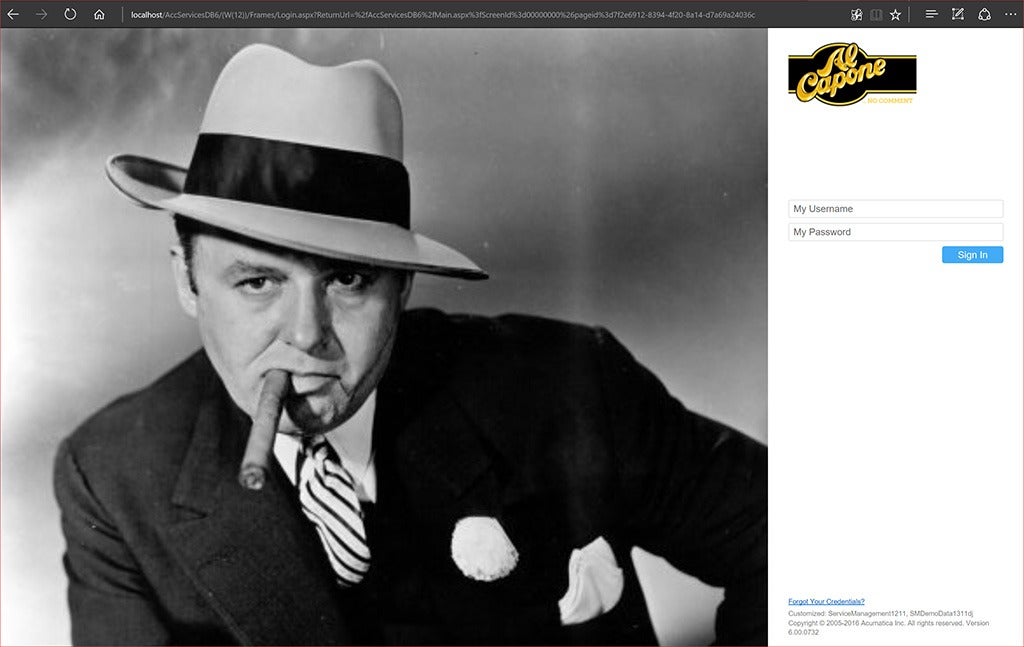
But wait, we’re not done yet… Something just doesn’t look right. Maybe it’s the designer in me. But we need to make one more change to put the “finishing touch” to the login screen. To take advantage of the color for the background, we need to make a small change to the web.config file.
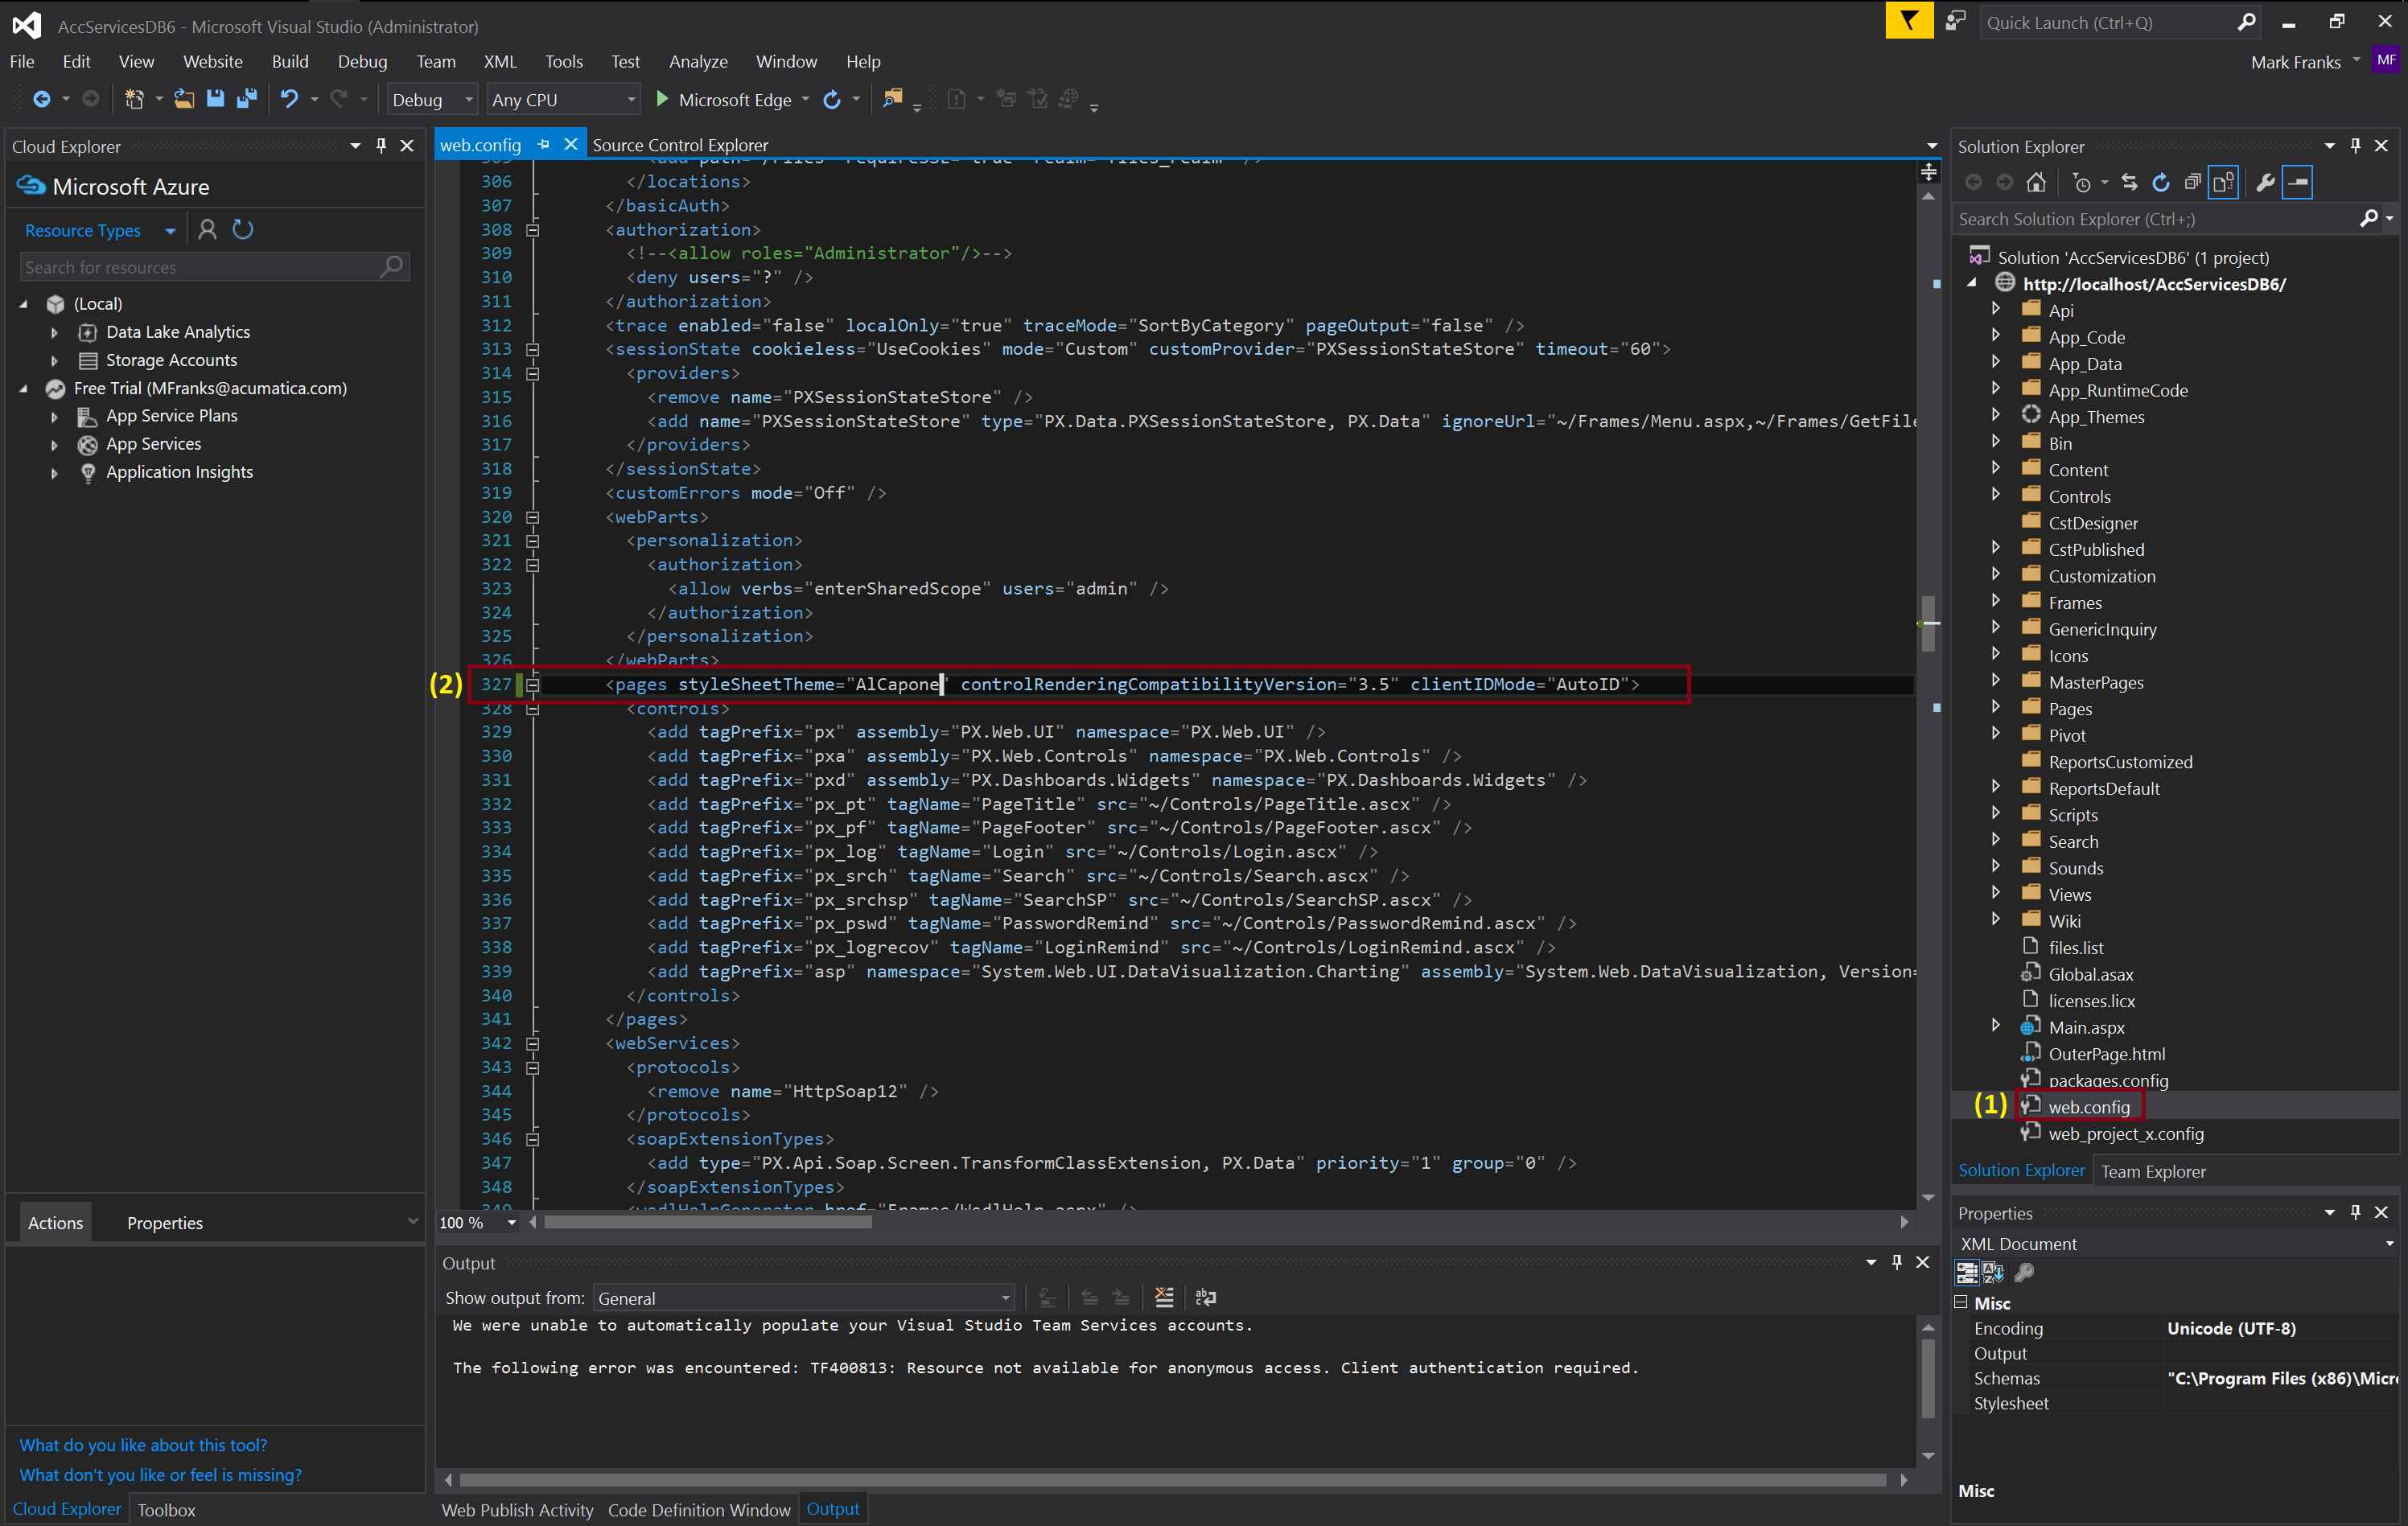
Open Visual Studio and make sure you open by right-clicking on it and selecting Run as administrator. Once it is loaded open up the Acumatica Website instance by selecting File>Open>Web Site and choose the Acumatica Instance you have running. Then open the web.config file which is located at the very bottom of the Solution pane on the right of the screen (1). Do a search for styleSheetTheme (line 327) – (2) and change the setting from “default” to “AlCapone” and save your change. See Figure 12 below.
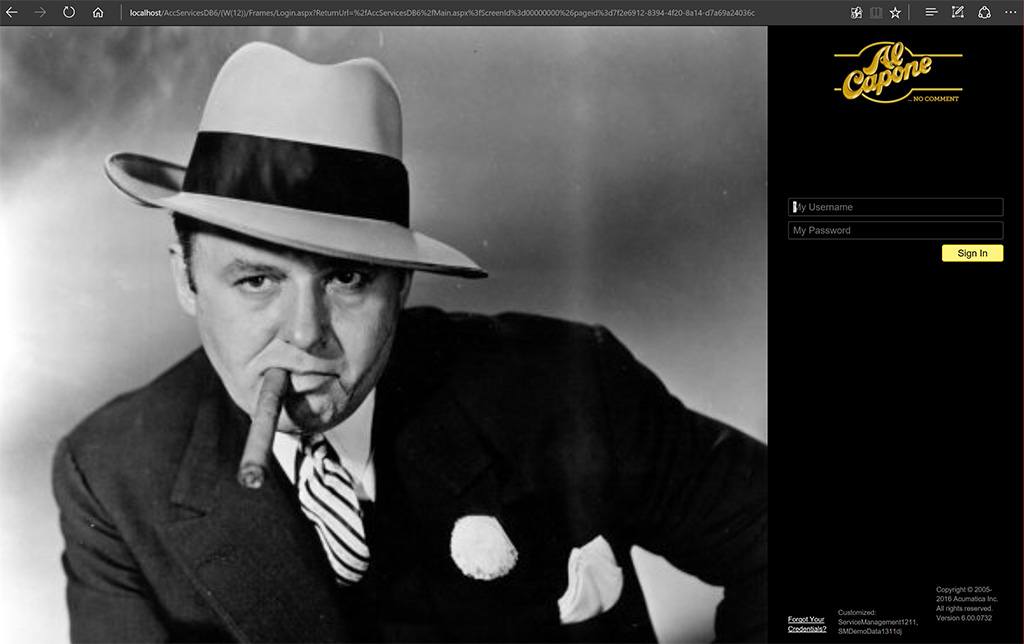
Now we refresh the Acumatica login screen and we have the following rendering (Figure 13) – which, you will have to agree, looks rather sharp and complete. Wouldn’t you agree?
Summary
We have now just completely changed the look and feel of the product – from the vanilla, out-of-the-box “default” Acumatica product to a complete rebranding of the product to the Al Capone theme – White Labeling the product ready for reselling as your very own offering with our great core platform modules – Financials, Distribution, Customer Management, and Service Management, etc.
We have demonstrated how truly simple it is to make these changes by creating our own theme to represent the branding we were looking to project – in this particular case, an old school gangster theme if you will.
So let’s review the steps in summary fashion and add a couple of items:
- Make a backup of the default items in the App_Themes directory of the Acumatica application.
- Modify the .css files – making changes of the colors of the different elements – such as the background. The easiest way is to find/replace all #007acc with your new background color.
- Within the Acumatica application, select the interface theme that you created in the Site Preferences – found under CONFIGURATION > Common Settings > Site Preferences.
- Save and refresh the webpage.
- Replace the images on the login screen by modifying images in the icons directory of the Acumatica application.
- Change the logo in the icons directory.
- Change the upper left logo of the application by uploading a new logo in the branches screen on the logo tab – found under ORGANIZAITON > Organization Structure > Branches > Logo
- Open the Acumatica Website and modify the web.config file’s styleSheetTheme setting as outlined above in order to implement the background color’s theme to the login webpage for the final touch.
As needed, you can modify the Cascading Style Sheets (.css) and Skins more extensively to further modify the look in feel of the product.
We have a very flexible and customizable platform, which I hope we have been able to convey here and in previous posts. We are very excited about the power this enables for our partners & customers and why we are so passionate about getting the news out to you the reader to consider the possibilities for your own offerings – whether you wish to integrate your existing solutions via web services and do some simple data exchange to producing a full-blown, deep integration offering by writing applications using our Acumatica Cloud Xrp Platform API objects. Whatever the case may be, we hope you will spend some time exploring the power of our platform and think about how you can leverage it and offer compelling solutions to your customers.
Please visit our Acumatica Developer Network site (ADN) for more information and if you haven’t read our previous blog posts and videos, please consider doing so. Lastly we recorded, recently, a webinar where we demonstrate these customizations and others and talk about white labeling in more detail – Integrate and Embed ERP in Business Applications.
Consider watching these recently related post:
 Canada (English)
 Colombia
 Caribbean and Puerto Rico
 Ecuador
 India
India
 Indonesia
 Ireland
 Malaysia
 Mexico
 Panama
 Peru
Peru
 Philippines
 Singapore
 South Africa
 Sri Lanka
 Thailand
 United Kingdom
 United States


