Intro
Updated: August 2025
The Acumatica Cloud ERP platform was built and architected from the ground up as a cloud-based computing native platform. It offers flexibility in deploying instances on both Microsoft’s Azure or Amazon’s AWS platforms – or on-premise. Additionally, developers can easily install an instance for development on their local machine which many developers prefer or have their developer instance hosted in the cloud. This flexibility allows you to manage your application development, staging, and production environments where and how you prefer.

Although our existing Acumatica ERP installation guide is very comprehensive, it targets mostly VARs and is IT centric as it describes in detail the deployment of an Acumatica instance in a live production environment.
Admittedly, this guide may miss certain important points that could potentially save a lot of time and effort for developers who intend to build solutions on the xRP Platform – such as ISVs. This is especially true if they are unfamiliar with Acumatica and a number of the technical nuances involved in any complex and fully featured ERP platform.
In order to fill the void and provide some guidance to our developer community, we offer this Quick-Start Developer Guide, focusing on what developers – especially ISVs – need to do to successfully get started.
Please note that now, as part of our ADN Program, Acumatica offers SaaS instances for ISV’s at the annual subscription price of $5,160. Such instances hosted & maintained by Acumatica and mirror the production environment of a majority our customers. This supports the full-cycle development process of a connected solution and is ideal for testing and demo purposes of various solutions.
Requirements
Whatever the application solution that interacts with Acumatica you are planning to implement, the first step is to deploy a developer instance of Acumatica. For this purpose, your development environment would require Microsoft IIS, preferably installed locally, or somewhere you would have full control over IIS and the file system. Additionally, you will require a database server – a version of Microsoft SQL Server or MySQL Server, where you have administrative rights. Please refer to Preparing for Installing Acumatica ERP section of the installation guide for details.
Download the Acumatica Configuration Wizard
After all the base system requirements are met, you will need to install the configuration wizard. At this point, it is important to have knowledge of the various Acumatica versions and their release schedules.
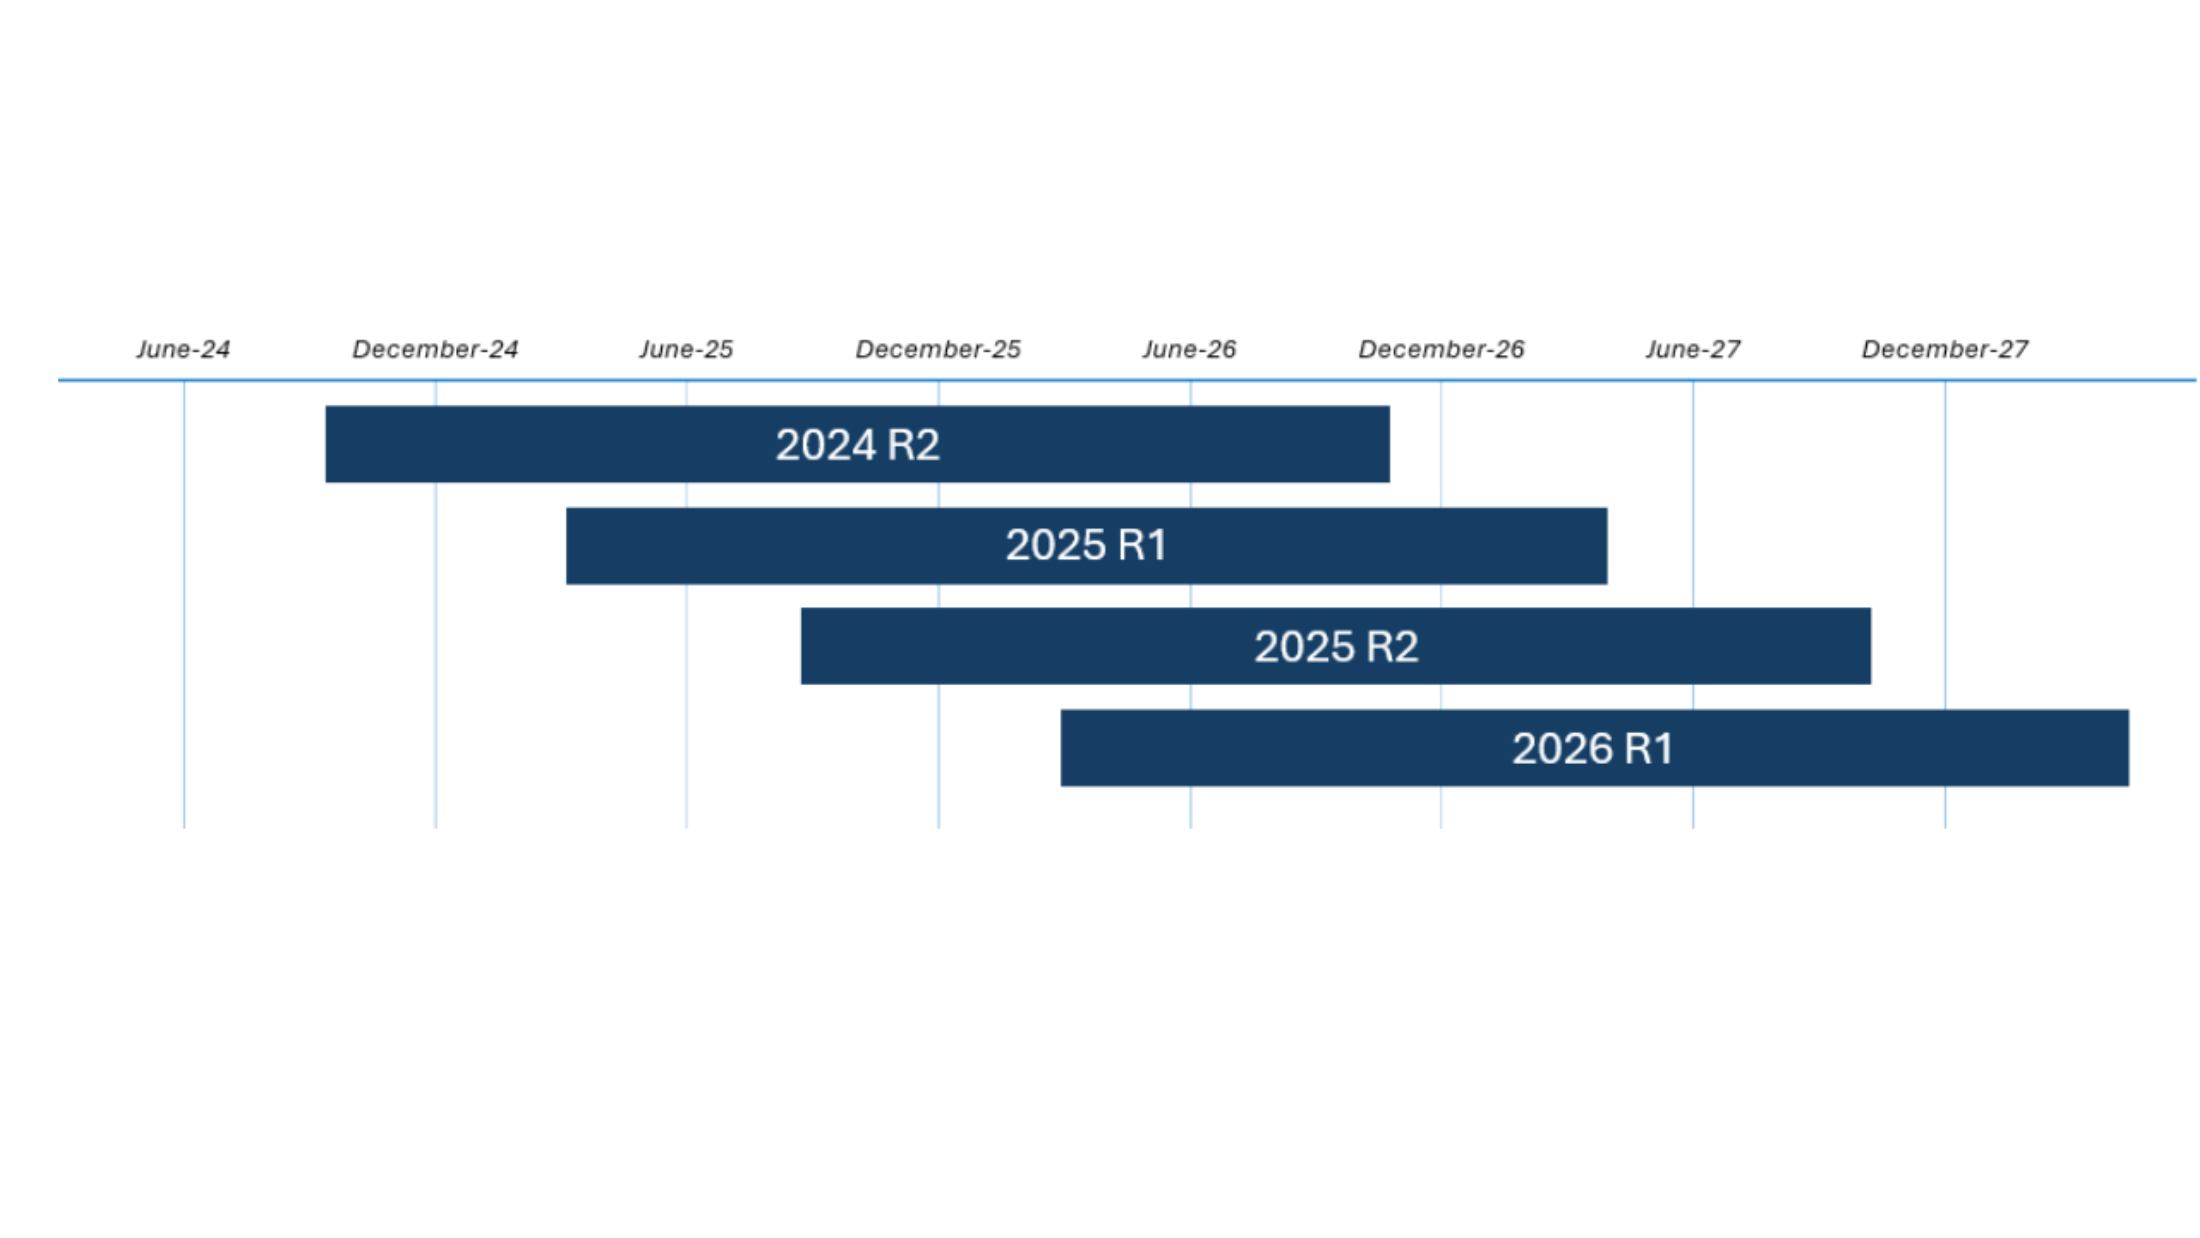
New Acumatica features and enhancements are bundled into major releases twice a year – March (R1) and September (R2). These releases potentially contain changes that could impact existing integrations and customizations – so-called breaking changes. Below are the major release schedules you should be aware of at this point in time.

Each Acumatica major version is supplied with updates until its retirement. During this time, our Acumatica engineering & development teams avoid making any breaking changes. Integrated Solutions and Customizations will work the same on any build of specific Major Version of Acumatica.
The scheduling and pattern of update releases process has been changed starting with 2025 R1. Previously all supported versions were receiving regular updates on a schedule depending on the Major Version age. This way new builds were released bi-weekly for most recent Major Version and versions that are closer to the retirement, receives an update once in 8 weeks.
Starting from 2025 R1 the release of updates for Acumatica is different, and instead of Minor Release/Minor Version two new terms are introduced: Patch and Service Pack.
Patch is a lightweight hotfix with very limited set of changes it may include, but it’s application does not require large maintenance timeslot, as it does not replace and recompile the entire site.
Service Pack is released once per Acumatica Major version after 3-4 months from its launch and it comprises fixes from Patches, bugfixes and might include features that have no or minimal impact on backward compatibility.
More about new update release cycle you can learn from the community article:
https://community.acumatica.com/independent-software-vendors-304/changes-to-acumatica-s-release-cycle-in-2025-30456
Now, when we understand the versioning, we can move forward and download an Acumatica Installer. I will describe two common ways: using community portal and via AWS S3 service.
First, let’s navigate to https://community.acumatica.com/ and if you are not registered yet, register and login on the site.

Then select the desired major version (2) in the Product menu (1):

This will redirect you to the sticky post with all some valuable information about Major Release, and we need to look for the list of available builds. After clicking to the build we need (if you are not sure, always take the latest), we are redirected to the post for this specific release:

Among the information about this build, we should find the Downloads section (marked blue) and click on the Acumatica ERP link (1), which will trigger the downloading of an MSI file with Acumatica Configuration Wizard.
You also can download the Acumatica installer using Amazon S3 Service hosted on https://builds.acumatica.com
This is where you will find all the available public Acumatica builds. Open the folder with the name formatted as XX.X – where its matched with the desired version to see the list with all minor releases.
At this point, you shall see a list such as this:

In the AcumaticaERP folder, you’ll find the AcumaticaERPInstall.msi file that you can download.
Configuration Wizard Installation Tips
Again, there at least two ways you can go with the MSI file acquired in the previous steps.
First option is to open the file and proceed with installation.
During the process, after you’ve agreed with the licensing terms, be sure not to miss the Main Software Configuration step.

This is where you choose the debugger and other useful items. For example, you will likely want to choose Install Debugger Tools (1) check box. Additionally, if you are planning to interact with network devices (e. g. Printer) from your solution, you should choose the Install DeviceHub (2) checkbox. Afterwards, continue the installation.
This is the most straightforward way, but if you need to install and then manage different versions of Acumatica ERP on the same machine, you may need to remove one version of Acumatica Configuration Wizard in order to install another one, which is time consuming. As an alternative you can “unpack” the MSI file and use Acumatica Configuration Wizard without installation of it on the system. This could be performed with msiexec built-in tool in command prompt:
msiexec /a C:\Downloads\AcumaticaERPInstall.msi /qb TARGETDIR=C:\AcumaticaInstallers\2025R1
This command will extract the content of the MSI file into the specified target directory. The Acumatica ERP Configuration Wizard executable will be placed in:
{TargetDirectory}\Acumatica ERP\Data\AcumaticaConfig.exe
Deployment
Launch Acumatica ERP Configuration Wizard and click deploy new Application Instance. Follow the Wizard guides until the Tennant setup step.

Typically, this screen is used to setup other tenants. At this point, if you just continue by clicking next, the Wizard will create an empty instance, which you most likely need to populate first to do any developing/testing activities. To avoid this, choose in the Insert Data dropdown (marked red) and choose the Sales Demo option. This will populate the database with various valid dummy data and save a lot of time on setting up the instance before you start the developing process.

On the Instance Configuration step, consider moving the Local Path for the Instance (1) outside of Program Files, as any change on the Site will require administrator rights.
Do not choose the Create Portal radio button (2) if you are just creating an ERP Instance. If you would like to have a portal as well, first install Acumatica ERP, and then repeat the process with this radio button set to install a portal as an addition to it. For that iteration, you would need to specify the same database as the ERP Instance.

On the Web Site Configuration screen, notice the Virtual Directory Name (1). This will be the part of the path name of your Acumatica instance. You may wish to change it to something more meaningful to remember it by. However, we suggest you keep it consistent with the Instance Name itself for easier navigation.
After the installation is complete, enter it in your browser as http://localhost/*virtual directory name* to see the login screen of your new Acumatica ERP instance.
To initially set the password, login to the instance with the following credentials:
username: admin
password: setup
Please note that Developer instances allow you to use 3 symbol passwords, while Production instances require something more complex.
At this point, you should have a fully functional Acumatica ERP instance with the only limitation being 2 concurrent users.
One more important note: We highly recommend installing the Acuminator – the popular Visual Studio Extension our Engineering team developed for developers building solutions on the Acumatica Platform.
Acuminator is a static code analysis and colorizer add-in tool for Visual Studio that simplifies development with the Acumatica Framework. Acuminator provides diagnostics and code fixes for common developer challenges related to Acumatica Framework. Also, Acuminator can colorize and format BQL statements, and can collapse attributes and parts of BQL queries. To learn more about Acuminator and how to install it, go here.
You are now ready to explore and start your developer journey on the Acumatica xRP Platform! Enjoy, have fun!
 Canada (English)
 Colombia
 Caribbean and Puerto Rico
 Ecuador
 India
India
 Indonesia
 Ireland
 Malaysia
 Mexico
 Panama
 Peru
Peru
 Philippines
 Singapore
 South Africa
 Sri Lanka
 Thailand
 United Kingdom
 United States


