Reviewed: Aug, 2023
Introduction
The Acumatica Contract-based API’s are very powerful in selecting data from the various business entities within the Acumatica XRP platform. Out of the box, Acumatica provides a Web Services Endpoint definition for most of the entities used within the system. However, there are times when data is needed that is not formatted as an existing defined entity. To solve this need, you can create Generic Inquiries (GI’s) to pull together data from multiple tables formatted in a way that is useful. If this data is needed for integration, it is possible to extend the Web Services Endpoint to add a definition for these Generic Inquiries (GI’s). This blog post explains how to accomplish this goal for both the SOAP-based and REST-based API models.
I’ll proceed to explain this by way of creating a use-case and the solution steps to meet the need of that use-case.
Use-Case
In my external application, I need to get the current inventory quantities for all items in the WHOLESALE warehouse.
Solution using Default Web Services Endpoint: Use the Inventory Summary entity. Loop through each Stock Item number and call the API for the InventorySummary entity once for each item. This is extremely slow and high on resource usage because it requires so many multiple calls to the API and therefore to the database.
Better solution: Create a Generic Inquiry to show the data needed for all items in a list form. Then use the API to select records from this GI. This is better for performance because we can get hundreds (or thousands) of rows returned in one call.
Step #1 – Create the Generic Inquiry
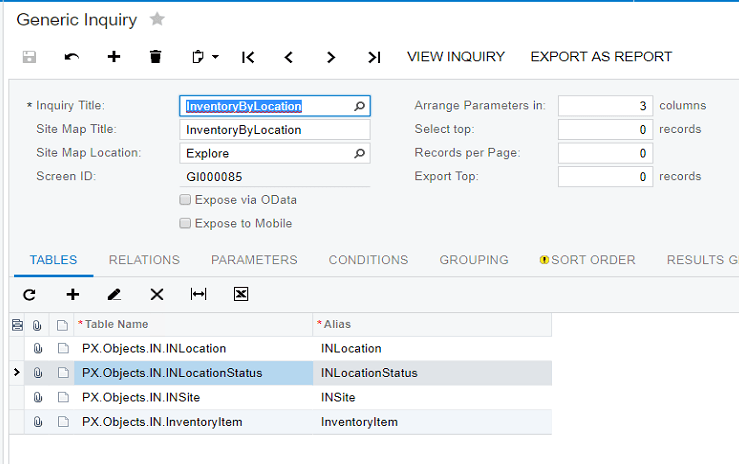
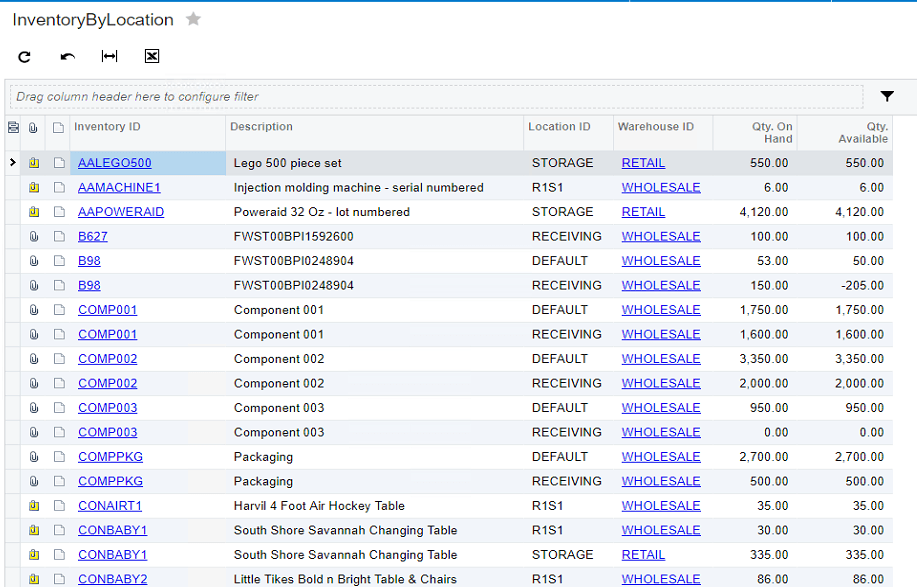
In this example, I’ve created a GI called InventoryByLocation. It will show the Quantity on Hand in inventory for every Item by WarehouseID and LocationID. The following 2 screen shots show the definition of the GI, and the results of the inquiry.
Step #2 – Extend the default Web Service Endpoint to add the GI fields
This is where you must be careful. Setting up the endpoint correctly will make the process of calling it with the API much easier.
First, you need to extend the Default Endpoint. Go to the Integration Menu, Preferences section, and choose the Web Service Endpoints menu. Select the Default endpoint for the latest version. In 2019 R1, the latest version is 18.200.001.
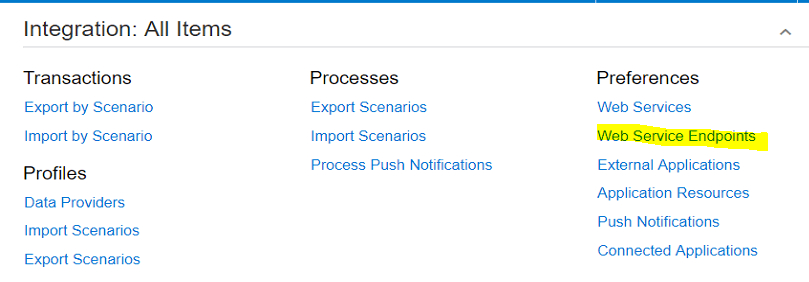

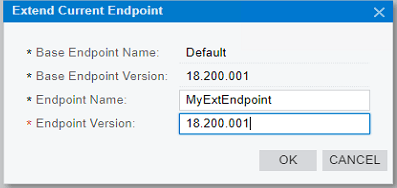
Next, click on EXTEND ENDPOINT from the actions at the top of the screen. You will be asked to rename your extended endpoint, and give it a version. For this example, I am using MyExtEndpoint and version 18.200.001 (same as the default endpoint version).
When the screen shows, click on INSERT. This will allow you to create a new entity definition for the GO that was created. You will need to then specify the screen ID – which was part of creating the GI in the first step.
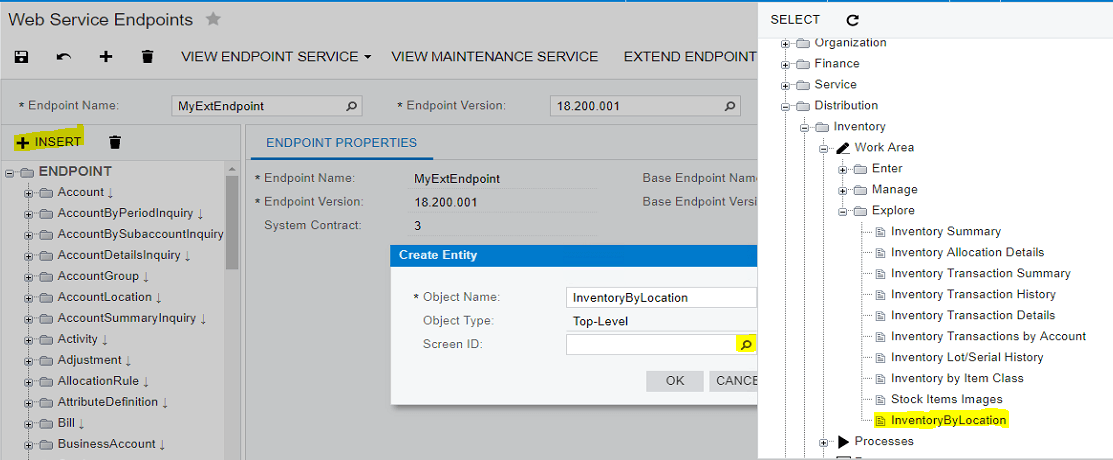
Next, you need to add the fields to the endpoint – which means that you will need to populate all of the columns being shown on the GI. This way, they will be available for use in the API.
Be careful with this step. Your first inclination will be to populate all of the fields as is shown in the below picture. This will create the fields at the top level of the InventoryByLocation entity.
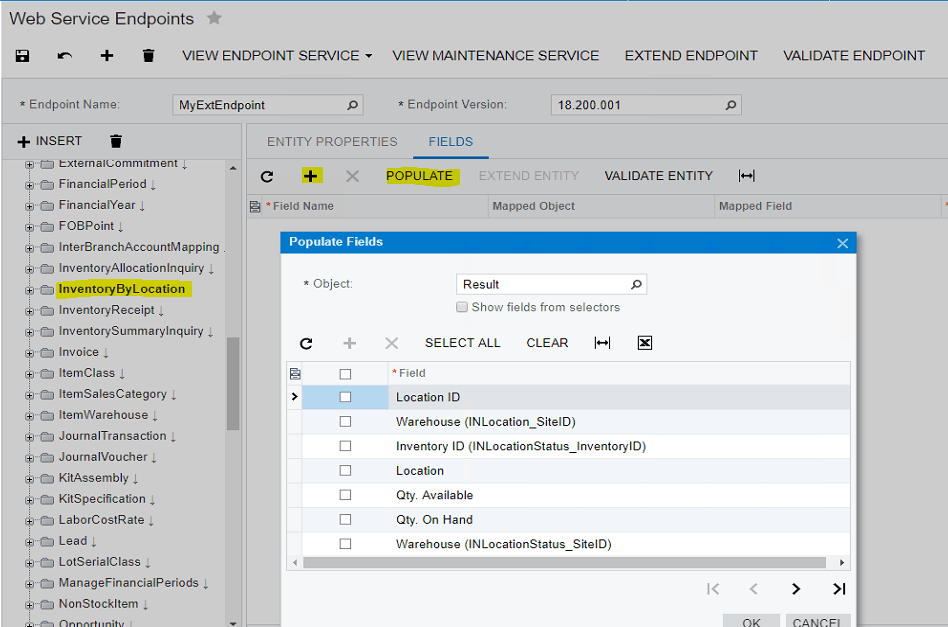
If you setup the endpoint this way, you will not be able to select any data from the underlying GI.
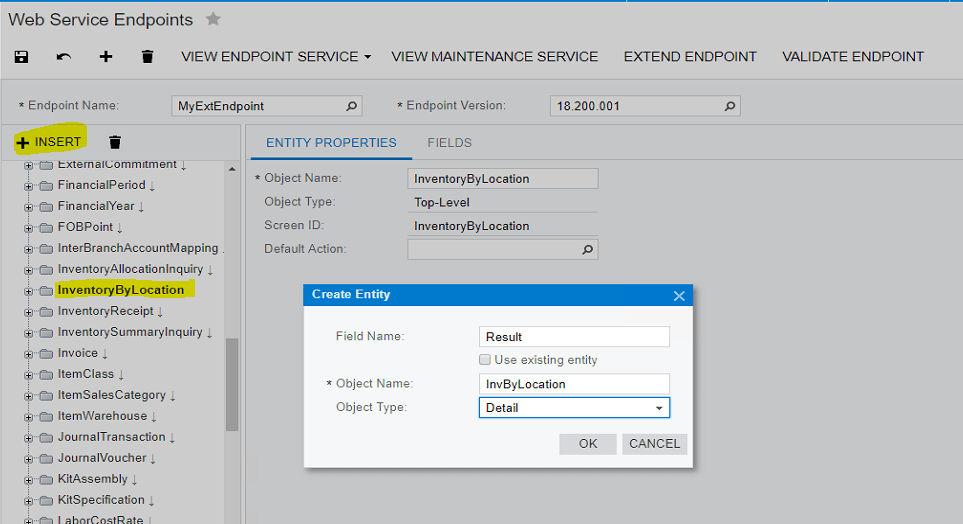
Instead – the way to do this properly is to first create a Results level under the top level of the entity, and then populate that with the fields. This is because the Results are what gets populated on the GI when it is executed.
Insert at the InventoryByLocation entity level, and then Create another entity beneath it called Result. Make the ObjectName something unique. In this case – InvByLocation is what I chose.
And finally – after this Result is created, it can be populated with the fields of the GI. This example is shown below.
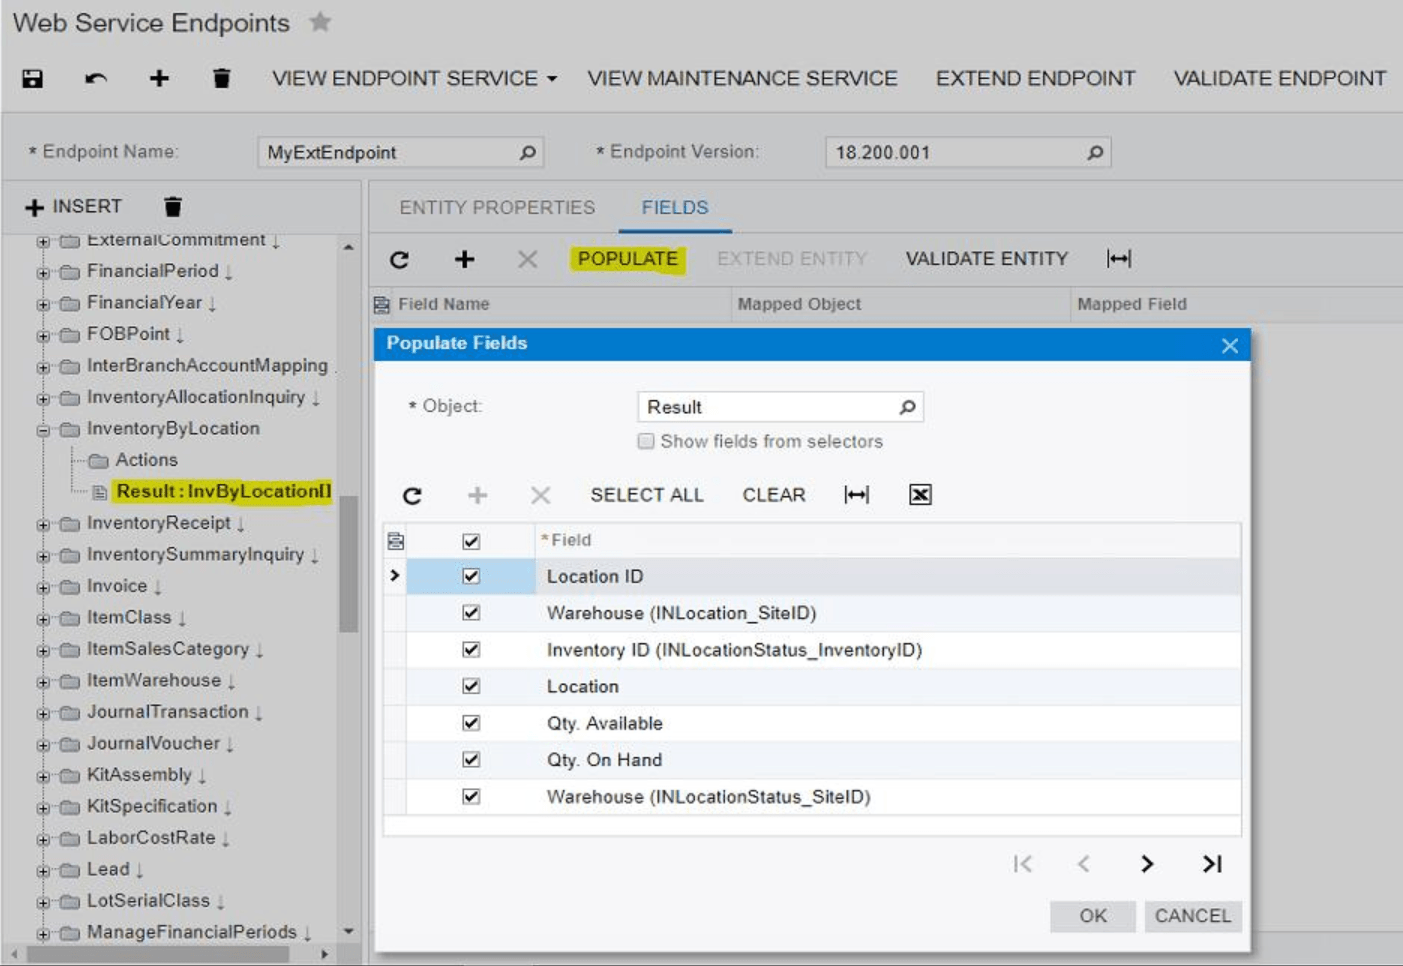
Step #3 – Access the Endpoint and Entity in your integration code.
Using SOAP
Now, in the code, it’s a simple task to select the data from the GI.
Below is a short example using the SOAP-based API and selecting all of the rows from the result of the GI. Notice that the standard Get call is what works with the SOAP methodology. Notice how you request the Result, which is the details level defined in the Endpoint.
  InventoryByLocation ToBeFound = new InventoryByLocation
   {
     Result = new InvByLocation[]
    {
       new InvByLocation { ReturnBehavior = ReturnBehavior.All }
    }
   };

   InventoryByLocation invByLoc = (InventoryByLocation)soapClient.Get(ToBeFound);

   foreach (InvByLocation InvRow in InvByLoc.Result)
   {
       ...process the results here…
   }
Using REST
Now, let’s look at the REST-based option. There is a little difference with this option. I will use Postman to show how to make the calls.
First, if you try to send a GET request if will not work. Notice the example below – you will get a BQL Delegate error.
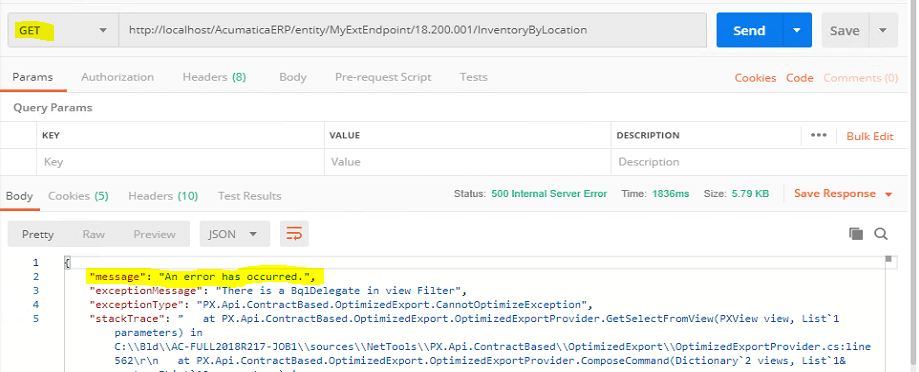
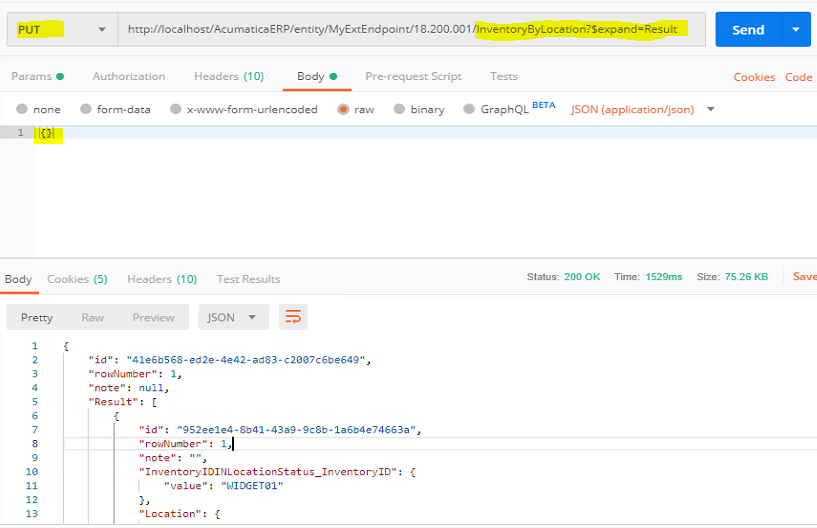
Instead, you need to use a PUT request. To do this request, you specify the endpoint, followed by the name of the GI (InventoryByLocation). Because the GI has only Details – as explained in the SOAP-based section above, you will also have to add a query parameter “$expand=Result”.
The PUT request requires something to be in the “Body” of the request. This needs to be empty – so you’ll specify that with { } as shown in the example below.
When you execute the “SEND” on this PUT request, you will get JSON results showing all of the details of the GI.
For additional information on creating GI’s and using the SOAP and REST API’s please refer to the Acumatica help documentation for Generic Inquiries and the Acumatica Contract-Based API Reference help documentation.
Summary
When it comes to synchronizing the data between Acumatica and external software systems, there are often several ways to accomplish the task. But as developers, we like our solutions to be efficient, scalable/performant, and easy to maintain. Acumatica’s Generic Inquiry functionality allows us to build specific database queries that can help us reach these performance goals. The Contract API model allows extension of the Web Service Endpoints so that we can use these Generic Inquiries to build an unlimited number of entities that can then be accessed using the latest software patterns and techniques. Acumatica provides the tools and all we have to do is build the solutions.
 Canada (English)
 Columbia
 Caribbean and Puerto Rico
 Ecuador
 India
India
 Indonesia
 Ireland
 Malasya
 Mexico
 Panama
 Peru
Peru
 Philippines
 Singapore
 South Africa
 Sri-Lanka
 Thailand
 United Kingdom
 United States


