Introduction
In this post, we are going to explore XML file manipulation. Our primary use case is going to be to automate compiling an Extension Library to different versions of Acumatica. We will build off of Part one and come up with a script that will allow you automatically loop through multiple target versions of Acumatica and then automatically build the .dll files using the MSBuild command line tool.
Working with XML files and MSBuild command line
Let’s start by getting the target versions of Acumatica installed. What would be really slick is to have some automated script that will do this for you. For now, we are going to take it one step at a time and do this part manually. I a future part of this series, I do plan to cover some dynamics that will allow you to automatically install a net new instance of Acumatica with either demo data or a target snapshot. So, for now, I just want to focus on aspects of XML manipulation. As you might already know, you can get any build of Acumatica at https://Builds.Acumatica.com I have downloaded and installed the most recent builds of each of the last major versions of Acumatica and installed them using the following names. PSH21_128_0009, PSH21_221_0019, PSH22_117_0016, PSH22_207_0013. I generally like to use a three-letter prefix that will connote what the instance is for and then the Acumatica versions. In this case, I have used PSH as a short version of PowerShell.
All right, so now that we have multiple instances of Acumatica installed and ready for this next step let’s discuss our target. What we are after is to iteratively make changes to the .csprog file. csproj is obviously not an XML extension, but if you inspect the file in notepad, you will indeed see that it is XML. This file contains configuration information about the project and where it’s going to send the .dll file, among many other configuration settings that are used for the project. Let’s try and identify the elements that we need to update. The easiest way to help ID these elements is to make the changes manually, then inspect the file and look for the deltas. I’m going to make a copy of this file. Next, I will manually make the changes, then finally, I will use a PowerShell CMDLET called Compare-Objects to investigate what changed.
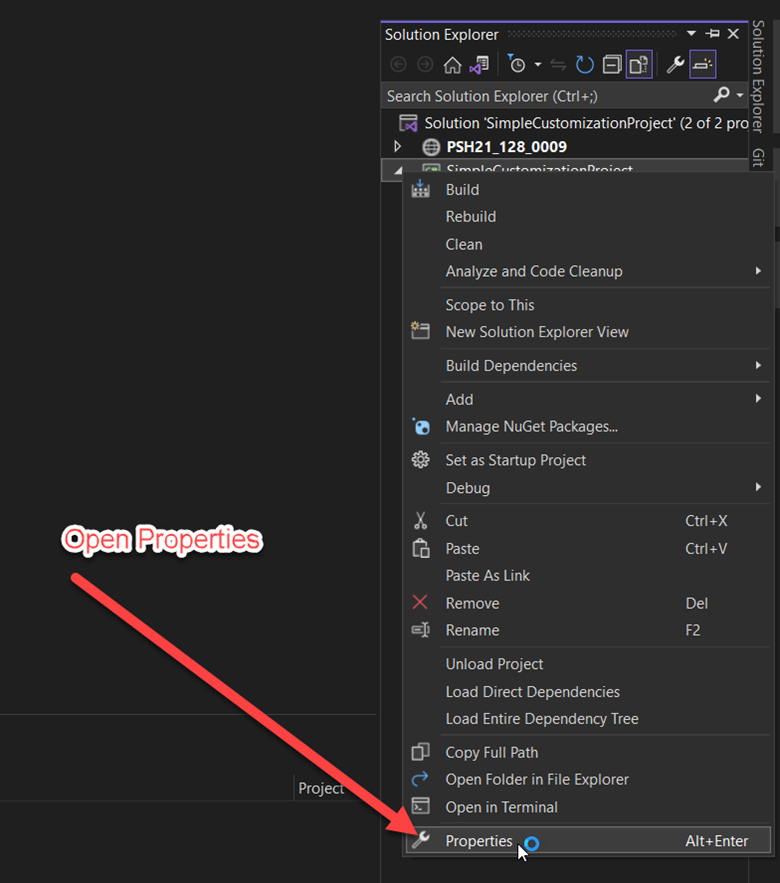
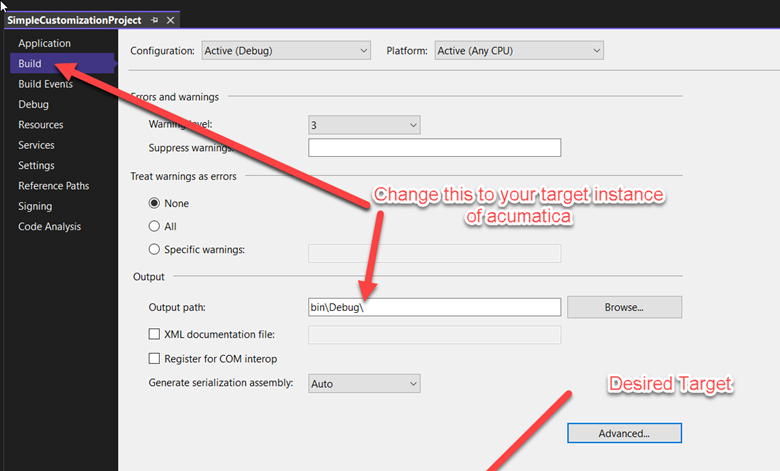
I like to use conditional compilation tags, particularly when the base Acumatica code has changed in a way that requires a different version of code for different versions of Acumatica. You can use pragma statements to tell the compiler what version of code you want to use. This is useful because you get to maintain all versions of Acumatica within a single source control branch. Another super useful way to use conditional compilation is if you want to add some debugging code and you would like to keep that debugging code. You can tell the compiler to completely ignore any debug code in the production build. This is a topic I intend to elaborate on in the future, but for now, we will stick to what we are looking to accomplish. In most of my cases, I do need to set these symbols whenever I am doing builds for different versions.

One last piece of information I like to set is the build number. It’s a pet peeve of mine to see build numbers like 1.0.0.0 in this configuration. I generally like to match the Acumaticas build number and then use something unique for the last number, such as a month and day. This embeds temporal information that is useful in getting a sense of when the .dll was built. Trust me, it’s a handy piece of information to know when a .dll is built. Another benefit of doing this practice is you can confirm the desired build actually gets to its destination within an integration test. I’m sure a bunch of you have hit the problem where you go to deploy a package, and your changes don’t get into place. After sinking a bunch of troubleshooting time into you, realize the updates you just made never made it into a package. If you get into the habit of always updating this value along with writing a test script to assert it gets to its final destination. You will eventually save time as you will prevent regression issues in the first place.
Save your changes and then run this PowerShell command:

You will get the elements that have changed in the file as a result:

There are some more elegant tools to do the same objective, such as Beyond compare. But that requires an install, and Compare-Objects will always be readily available if you need it. Just another benefit of having the PowerShell prompt nearby.
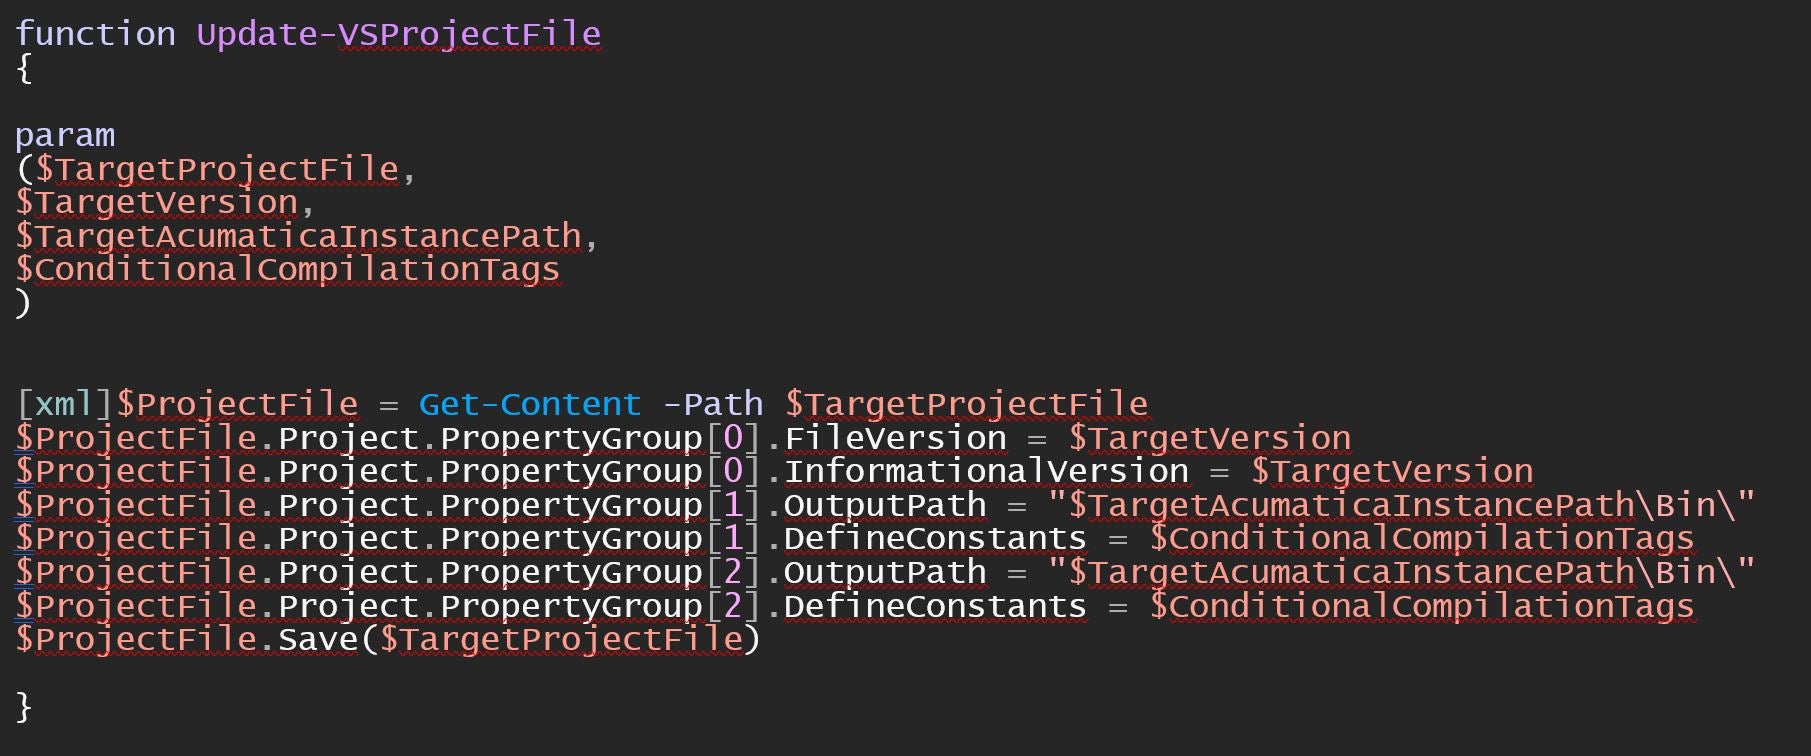
Now that we know what elements we need to change let’s get into how to do that using the XML tools available in PowerShell. What we are going to tap into is actually a .NET XML namespace as opposed to a dedicated PowerShell CMDLET. So chances are, if you are a .NET developer, you can read and understand this with little explanation. The way we access the XML is as follows. Simply cast the content of the file into an XML object. The main difference is that C# uses closing parenthesis (xml) for your object, and PowerShell uses square brackets [xml]. The rest is identical to what you would do with C#.

Now that we have a script that will automatically update the project files, we can now look into auto-building and compiling the extension library. To do this, we will use the MSBuild.exe command line prompt. We can do so with the following PowerShell script.

A really neat thing we can do is we can load the results of the build process into a variable and examine them for any indicators that would let us know if things have gone awry. So we could add the following to the script to prompt a user for instruction to Manually build the package if it fails. I have in fact used this for a short period of time as pointing to the C:\Windows\Microsoft.NET\Framework\v4.0.30319\MSBuild.exe location of the MSBuild.exe resulted in errors. So, we ended up with a script that wasn’t perfect but still automated a good chunk of the work. This is the power of being able to load results into a variable and check for any indicators of success or failure. The Read-Host prompt to call for some manual process is yet again another helpful dynamic to semi-automate your process.
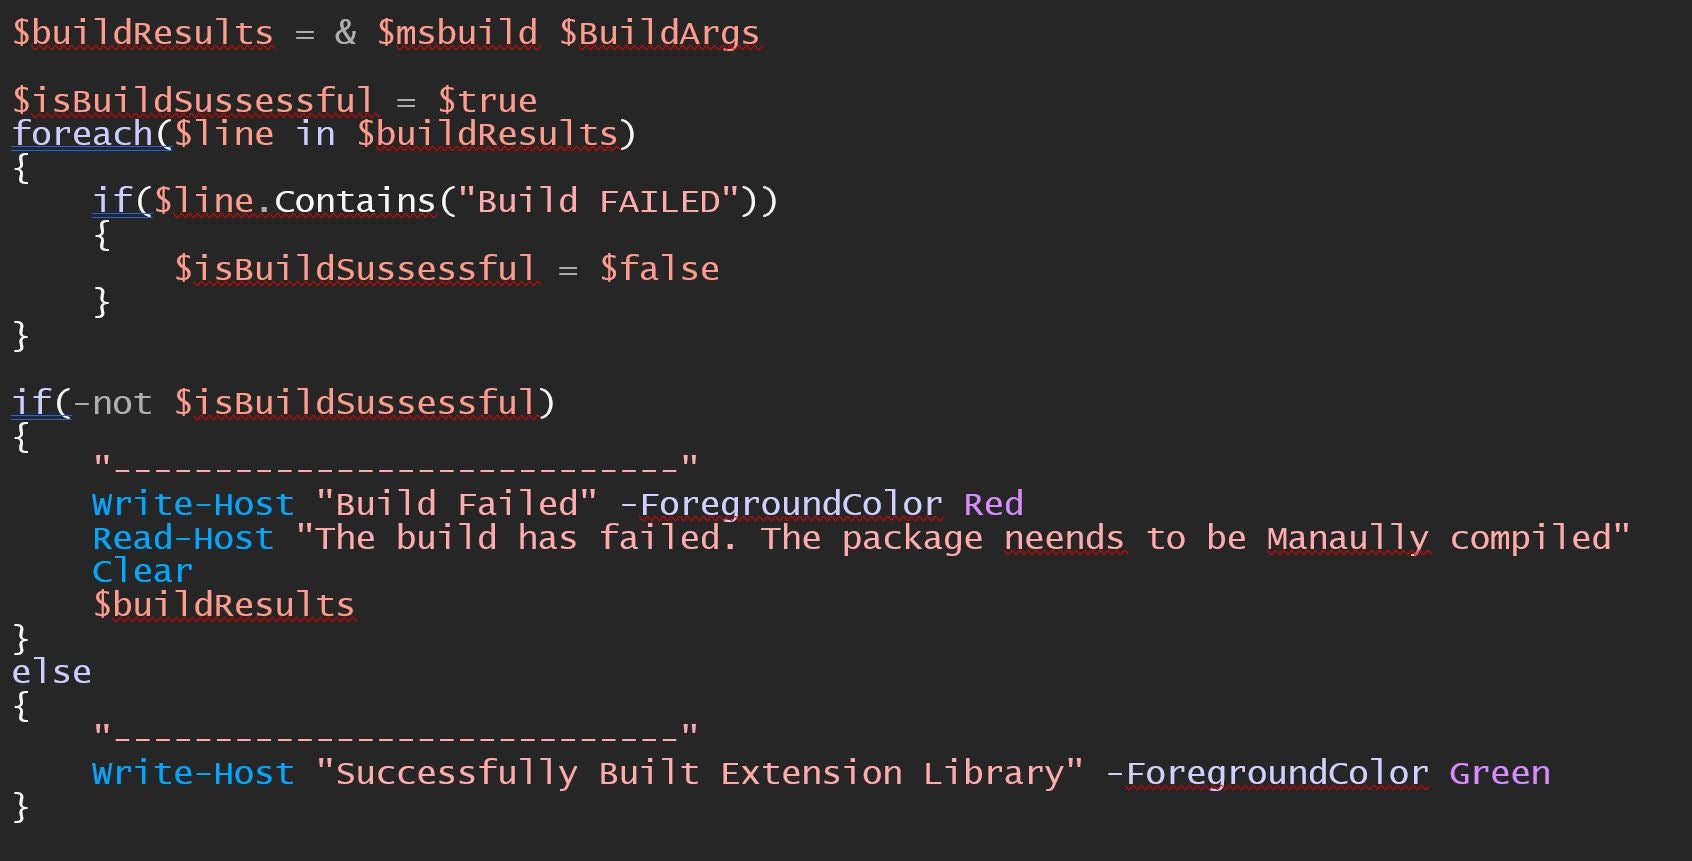
Eventually, we figured out that we don’t get the error if we use the executable found at this path C:\Program Files\Microsoft Visual Studio\2022\Professional\MSBuild\Current\Bin\amd64\MSBuild.exe
And then all was well with the world. Another noteworthy item is the usage of Write-Host along with the -Foreground Color parameter. It is a great way to give you quick visual feedback if things are going as planned. Red is a great color to use to let you know things went wrong. It’s information that you can process far quicker than reading the results.
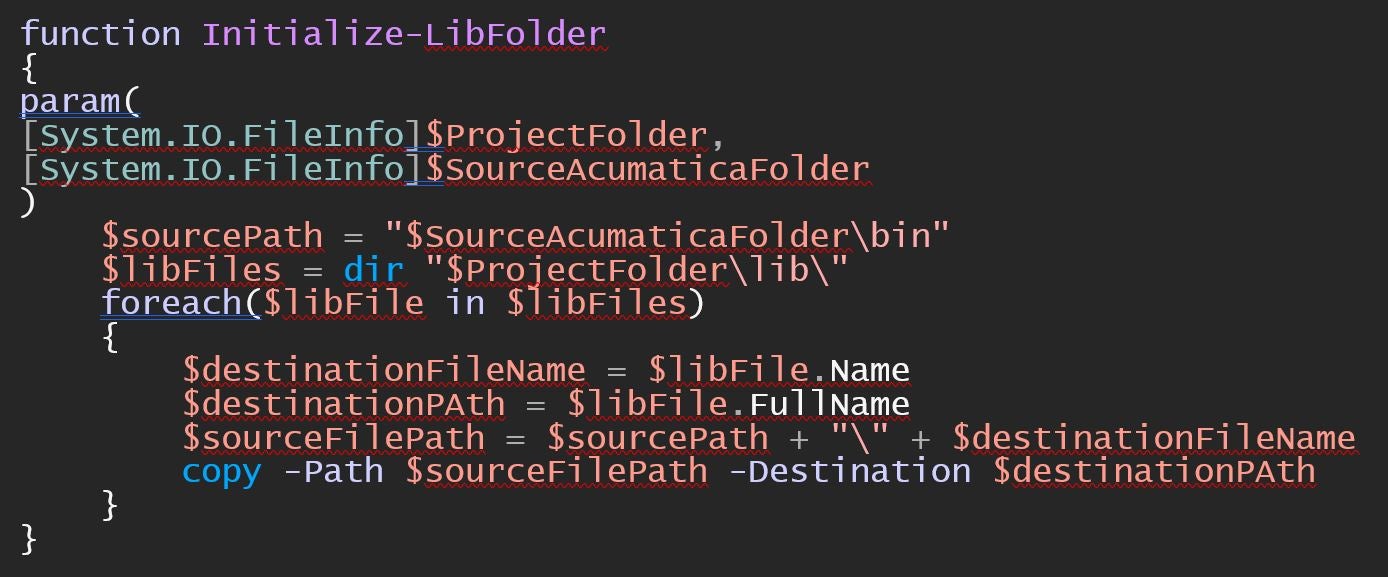
The next step is to get things into functions so that it will be easier to call this stuff from a loop. So We have the following functions.
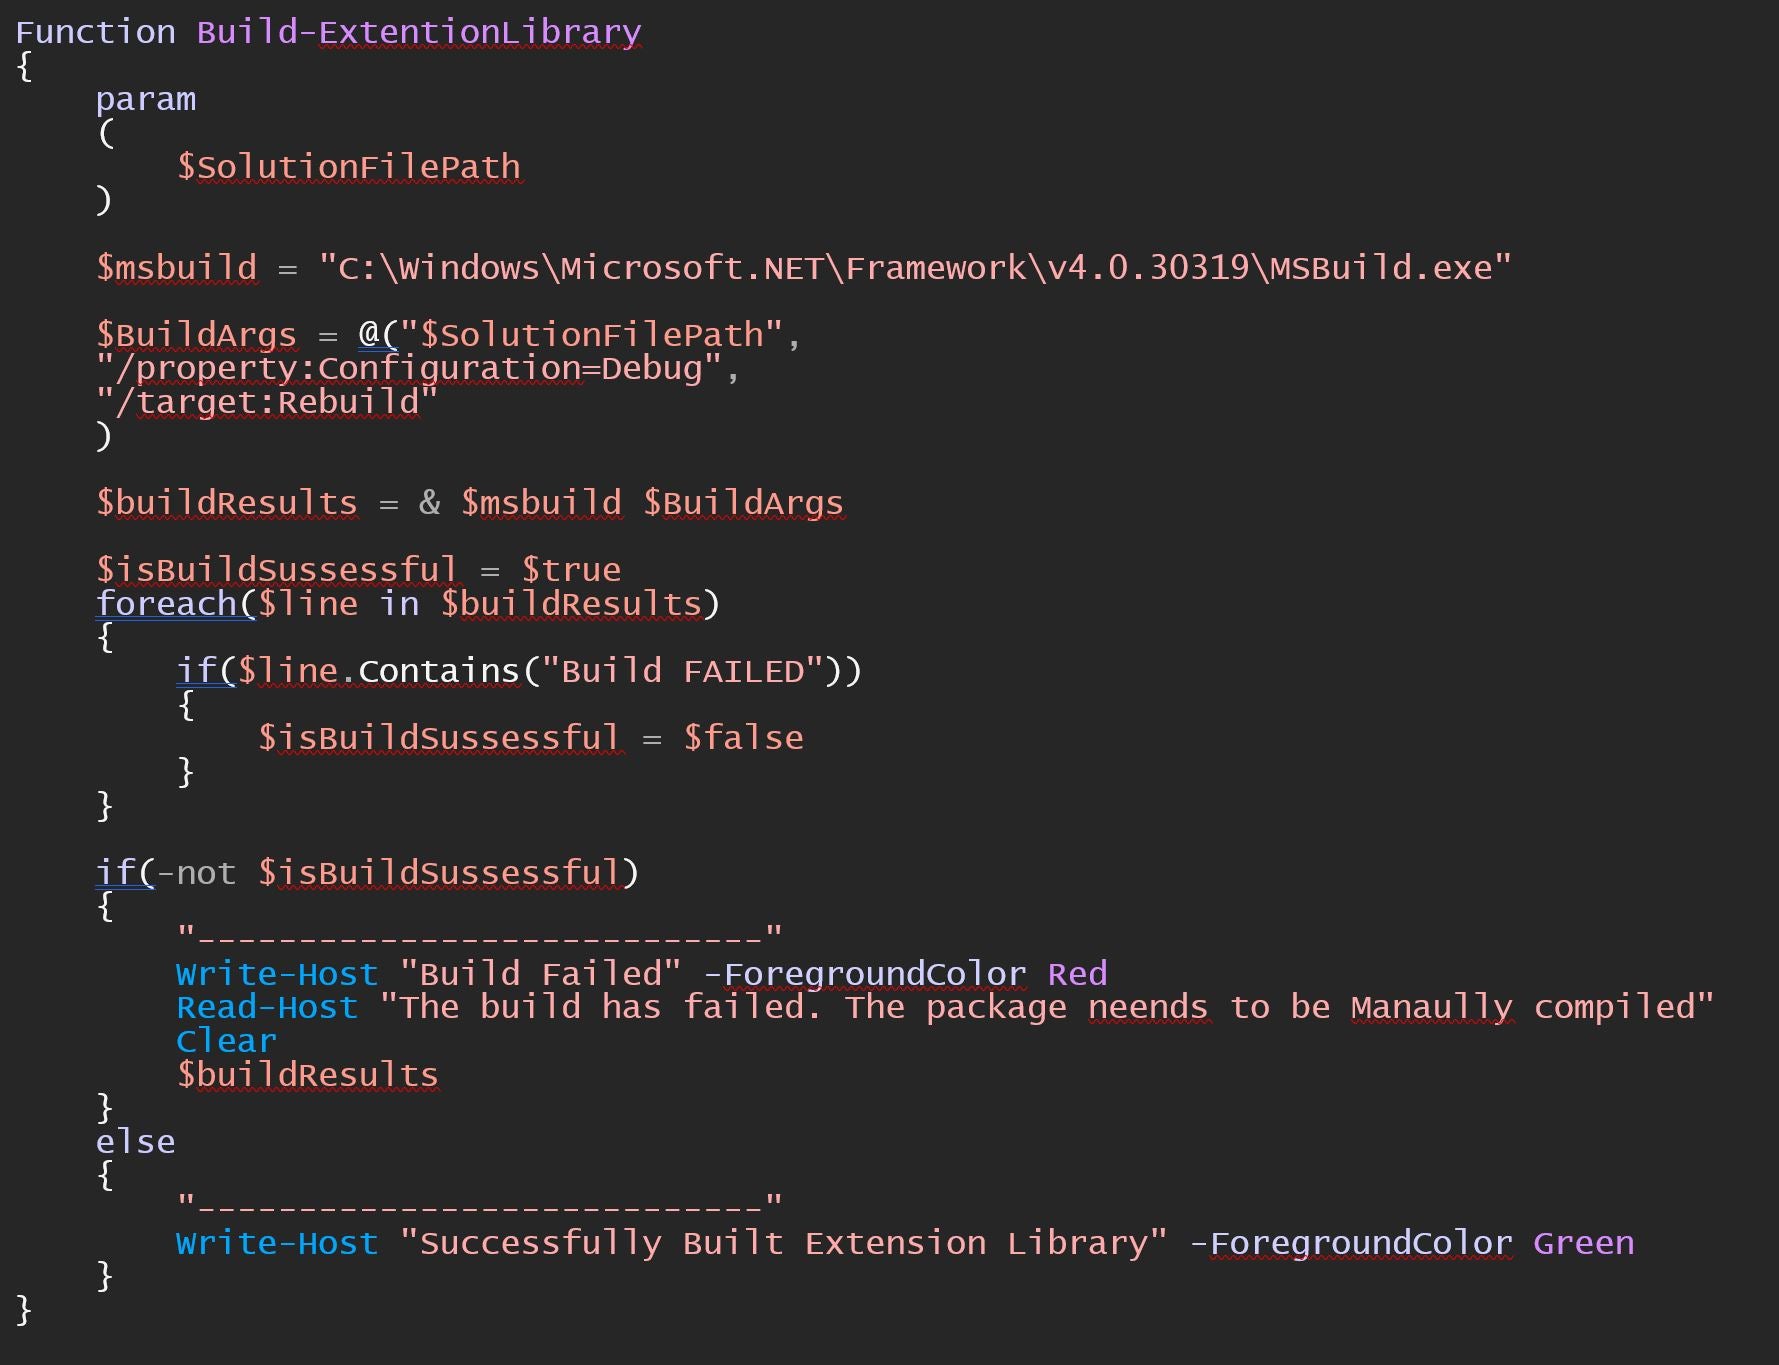
We will use the work we did to update the VS Project file as
We will also bring in our script from part 1 and we can finally combine all these steps into one:
Now we can build a loop with the following script. We could run all of this as a single script file, or you can split your functions into separate files. The latter is the most ideal, but the former can keep everything into one gist for easier reading processing. If you do split the files out, you use the Import-Module {Path Of Script} call.
With Scripting, you generally declare your variables at the top. These are the variables that will need to change as you compile different projects and point to different versions. The first 4 variables are common variables that will be used in each iteration. The fifth variable $BuildConfigArray, is the information that will change on each iteration.
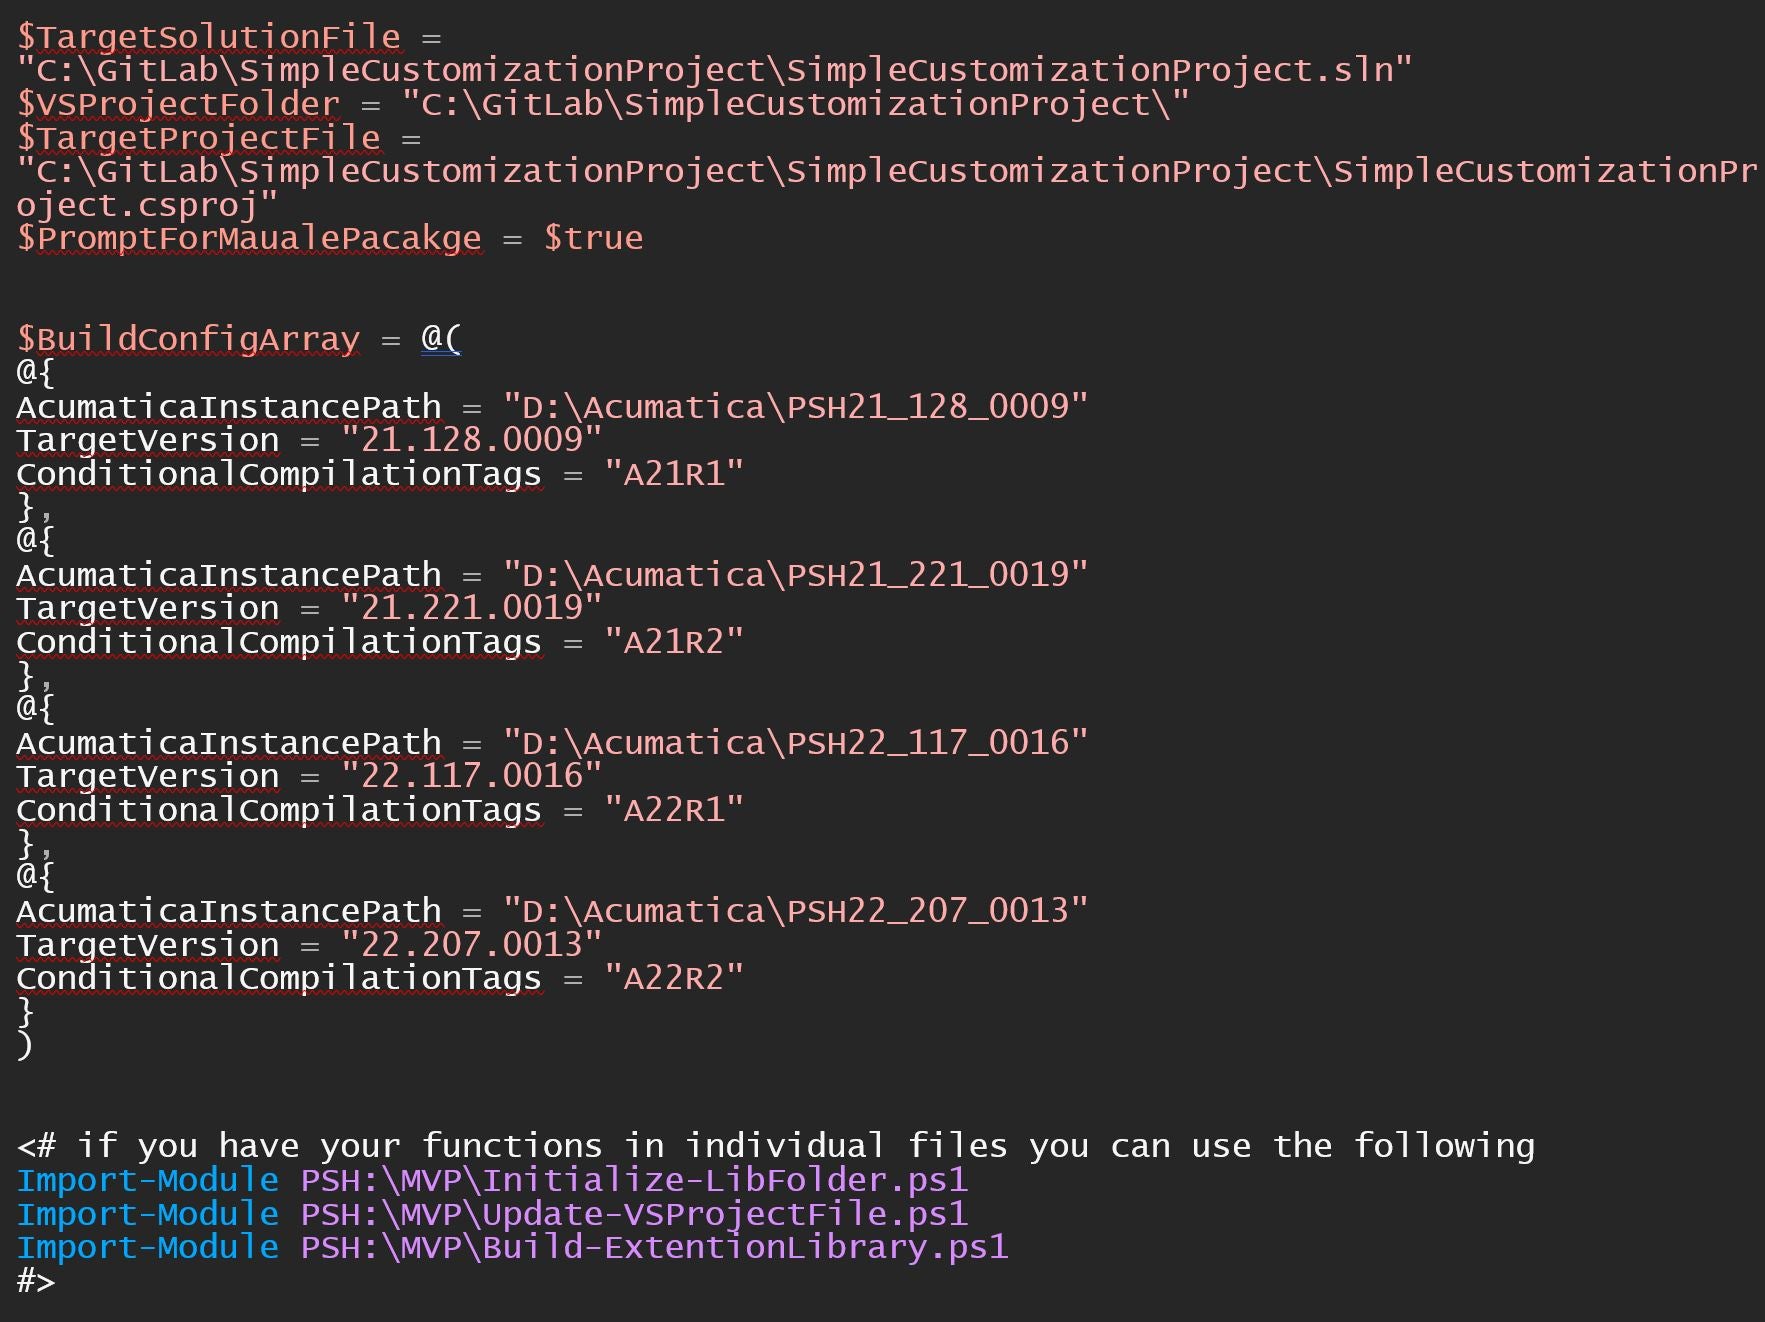
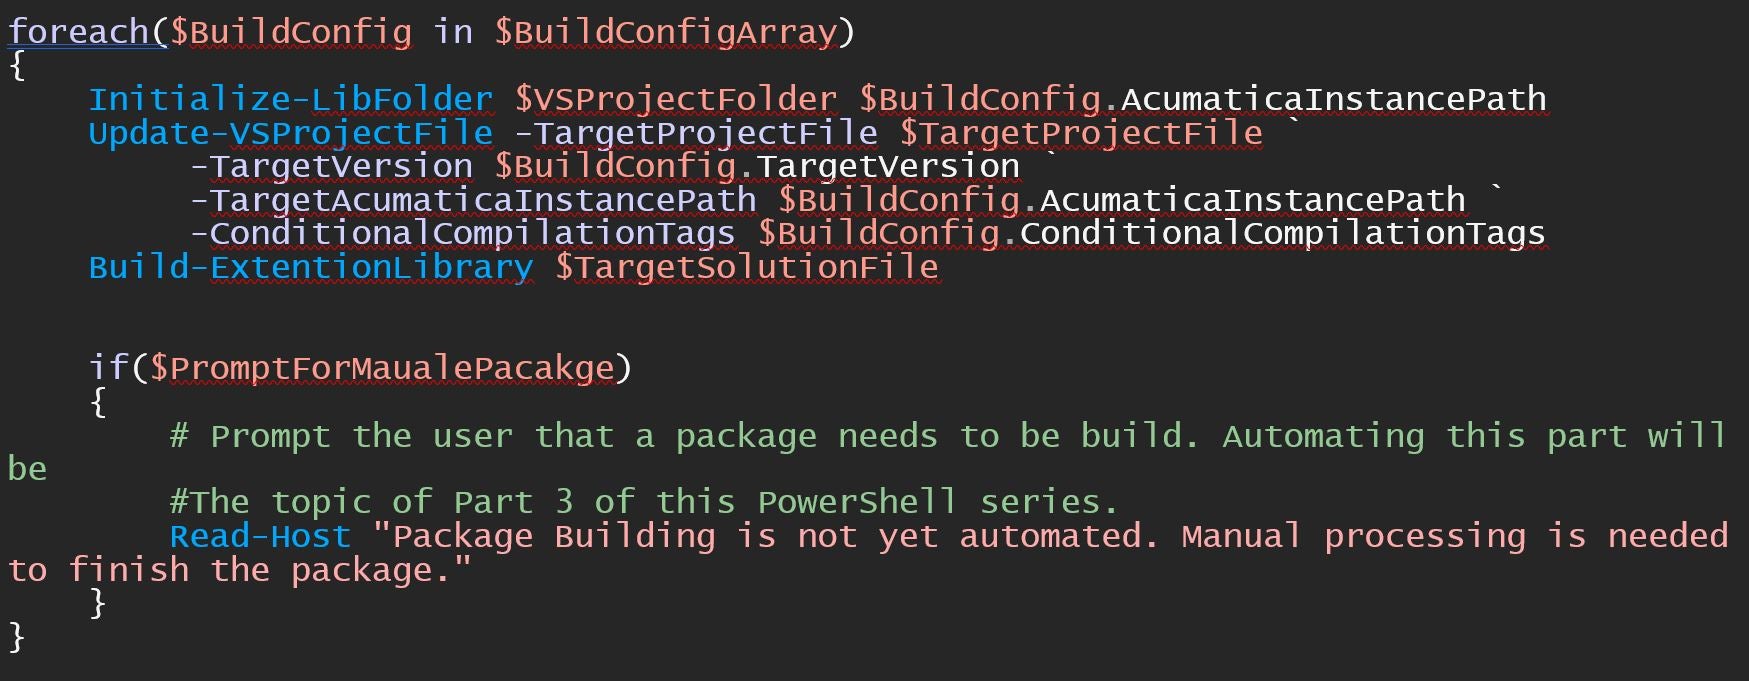
All the code above can be found here in the public GIST here:
https://gist.github.com/RobertWaite/0a1cbc8408a1b3a30017fbf3f80094e6
What’s Next
You might have noticed we put a switch as to whether or not to prompt a user to get the actual Package.zip file out of Acumatica. In Part 3 we are going to explore automating this as well so that we need not have that manual step. That is the beauty of the Read-Host cmdlet. You can iteratively automate distinct pieces over time. You don’t need to have it all automated at once.
Summary
We learned a lot in this part, and it’s not hard to imagine how much time we saved by creating this script. Modifying the XML project file is everyday work for a developer. We have explored how to load and modify this XML file using PowerShell. We have also utilized the MSBuild.exe.
To read part 1 of Useful PowerShell Tidbits to Help Save You Time Every Day, go here: /blog/useful-powershell-tidbits-part-1/
Happy Coding!
 Canada (English)
 Colombia
 Caribbean and Puerto Rico
 Ecuador
 India
India
 Indonesia
 Ireland
 Malaysia
 Mexico
 Panama
 Peru
Peru
 Philippines
 Singapore
 South Africa
 Sri Lanka
 Thailand
 United Kingdom
 United States


