Reviewed: Jun, 2023
Having a consistent user interface is important for users in Acumatica. End-users commonly go to the standard menus on a screen to look for additional actions – Actions, Inquiries, and Reports. Today, I will be reviewing adding the Special Folders as well as adding custom Actions.

You can add a new Action using the screen editor if it is one of three types: Run Report, Navigation: Search records or Navigation: Create record.
You may want to add a Custom Action for your business process or copy one from another screen and add it to a different screen. This can be done in the code, but typically shows up as a button in the toolbar, not under the menu. You can either add it to the Actions menu through the graph extension, or through the screen editor.
In Acumatica 2019 R1, we have the added the benefit of moving Actions into the Special Folders through a customization project. This is beneficial as we may not have access to the code and may want to move an Action to one of the main 3 menus, as in an ISV solution.
For example, we may have a Custom Action on the customer screen, and want to move it to the Actions folder:

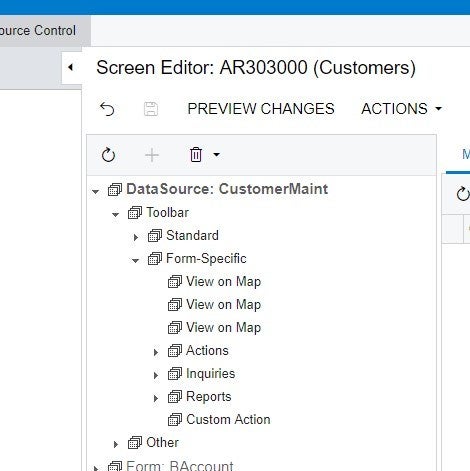
First, open the screen in a customization project; second, expand DataSource: CustomerMaint; and then expand Form-Specific:

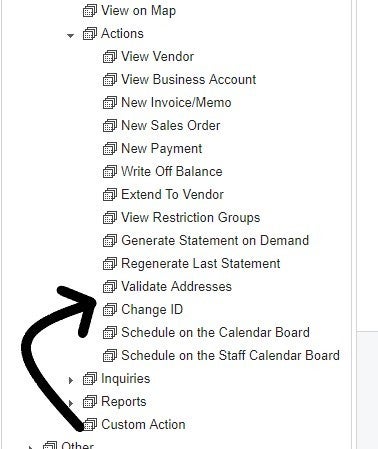
We will see the Custom Action that we want moved. Expand the Actions, and then drag the Action where we want it in the menu:

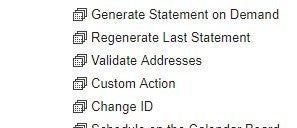
It will highlight where the Action will be placed. In this example, it was moved just above Change ID:

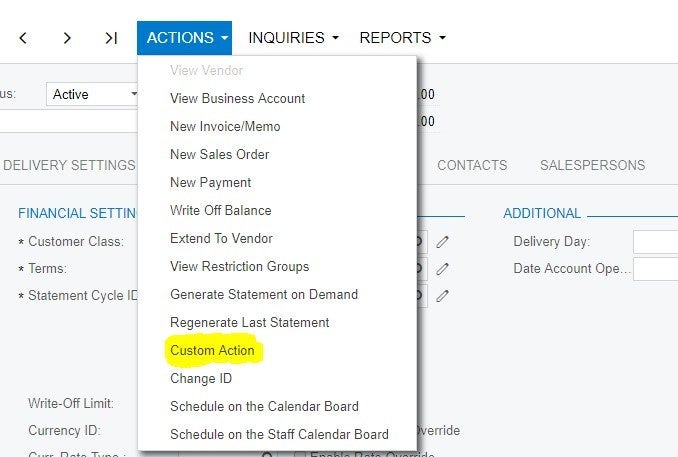
Once we publish our customization project, we will see the Custom Action has been moved to where we placed it in the Actions Menu:

If we want to add an Action programmatically to the Actions Folder, we can do it by overriding the Initialize Function and adding it to the Actions Menu using the AddMenuAction function. For example, adding an action called CustomAction would be as follows:
public override void Initialize()
{
base.Initialize();
this.Base.action.AddMenuAction(CustomAction);
}
We can also specify two additional parameters for the AddMenuAction function if we want to place it in a specific spot in the menu. The first parameter would be a string of the Action Name, and the second would be insertAfter. If insertAfter is false, it would insert the action before the specified action. If true, it would go after in the list. For example, if we want to add another action called AnotherCustomAction, it would go after CustomAction in the menu. In this case, the code would be:
(AnotherCustomAction, "CustomAction", true);
If we are making our own screen and need to add the Actions/Inquiries/Reports folder, we can do so by creating our own actions with the standard names and giving them a special folder designation. To add an actions menu, we would use the following code in our graph:
public PXAction<CYCylinder> action;
[PXUIField(DisplayName = "Actions", MapEnableRights = PXCacheRights.Select, MapViewRights = PXCacheRights.Select)]
[PXButton(SpecialType = PXSpecialButtonType.ActionsFolder)]
protected IEnumerable Action(PXAdapter adapter)
{
return adapter.Get();
}
SpecialType maps to the Actions Folder and looks the same as the standard screen’s Action menu in the customization project editor. You can also specify PXSpecialButtonType.ReportsFolder for reports, and PXSpecialButtonType.InquiriesFolder for inquiries.
We may need to add the Initialize function to our custom graph by inheriting the interface IGraphWithInitialization. We can then override the Initialize function. We would then add menu items without needing this.Base, as our action is in the current graph:
public virtual void Initialize()
{
base.Initialize();
action.AddMenuAction(CustomAction);
}
It’s a good idea to mark our Initialize method as virtual in case the graph needs to be extended and other items may need to be done during the Initialize function.
Summary
It’s important for developers to have a consistent user-interface for their users to navigate applications in general and Acumatica specifically. End-users commonly return to the standard menus on a screen to look for additional actions such as Actions, Inquiries, and Reports. We can build these into our applications, providing the consistency that end-users have come to rely upon.
 Canada (English)
 Columbia
 Caribbean and Puerto Rico
 Ecuador
 India
India
 Indonesia
 Ireland
 Malasya
 Mexico
 Panama
 Peru
Peru
 Philippines
 Singapore
 South Africa
 Sri-Lanka
 Thailand
 United Kingdom
 United States


