Reviewed: Mar, 2023
Introduction
The Formula editor / Expression Builder in Acumatica is a very useful tool for building expressions on Generic Inquiries, Reports, etc. It allows the users to use various operators (such as arithmetic logical etc.) and functions (such as conversion, math, text, etc.) which helps in building rich/complex outputs required for various business needs of the Acumatica users. This article explains how to override this default formula builder to add the custom fields created through customizations to be added to the formula builder to be included in the output of a GI or even use this formula builder on the new screens developed using customizations.
Technical Approach
Acumatica provides a very flexible formula/expression builder for building expressions with various built in functions such as string, logical, arithmetic functions. And, it allows users to add Screen objects to the editor under the Objects based on the selection of the DAC objects in the Generic Inquiry or in the Import/Export scenarios, which is pretty good.
However, this post will focus on adding custom DAC objects to the formula builder and using those custom fields in the formula editor.
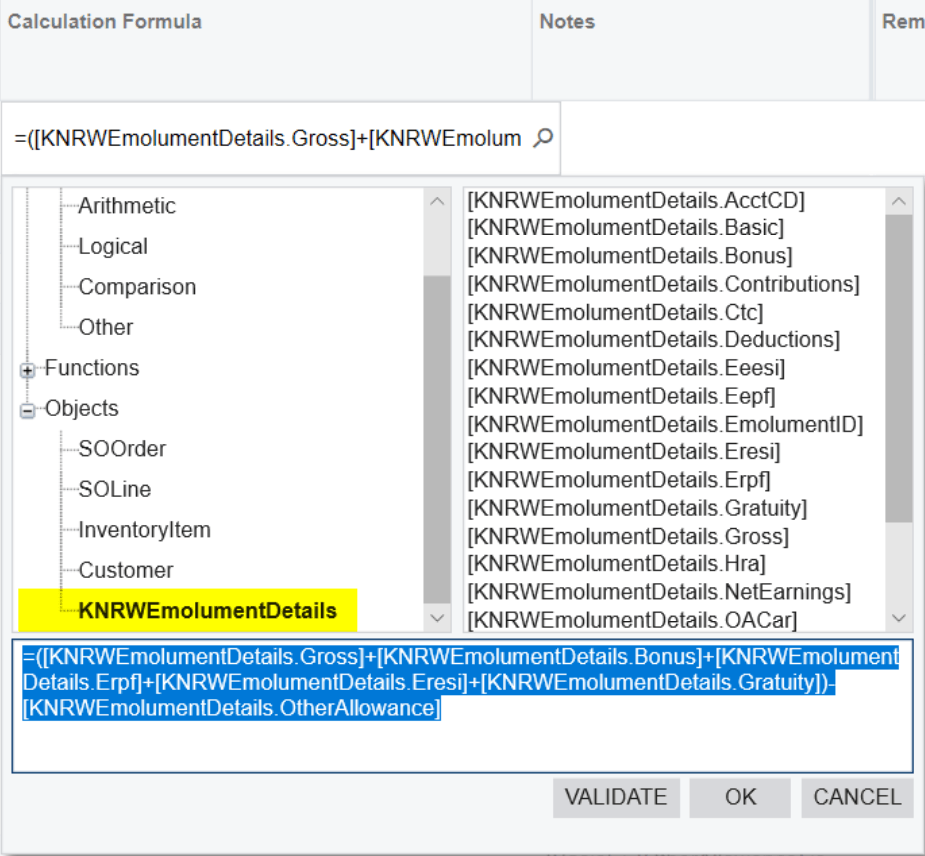
Example screen here for reference:

Below are the steps outlined to achieve this custom expression builder in Acumatica and this can be published as a Customization as well.
Step 1:
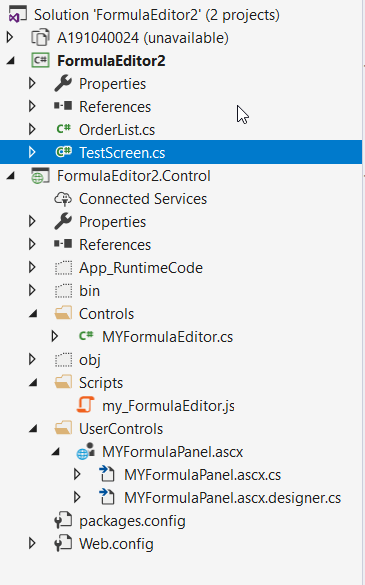
Create two projects one project for creating the “TESTScreen.cs” and 2nd project for MyFormulaEditor.cs file, my_FormulaEditor.js script file and User Controls.

Step 2:
Add the below code in the TestSCreen.cs file.
#region Metadata for MYFormulaEditor
   public PXSelect<KNRWEmolumentDetails> EmolumentDetailsData;
#endregion

Step 3:
In the 2nd project add the below last line of code in “MYFormulaEditor.cs” file.

Step 4:
In the 2nd Project add the following lines of code in the file “my_FormulaEditor.js”.
// the panel show event handler
   this.EmolumentDetailsFields = __win(this).__myEmolumentDetailsFields.split(",");
// Category select event handler
     case 35: list = this.EmolumentDetailsFields; break;
Step 5:
In the 2nd Project “MYFormulaPanel.ascx” file, add the below highlighted new Tree Node.
<px:PXTreeNode Expanded="True" Text="Objects">
<ChildNodes>
   <px:PXTreeNode Text="SOOrder" Value="31">
   </px:PXTreeNode>
   <px:PXTreeNode Text="SOLine" Value="32">
   </px:PXTreeNode>
   <px:PXTreeNode Text="InventoryItem" Value="33">
   </px:PXTreeNode>
   <px:PXTreeNode Text="Customer" Value="34">
   </px:PXTreeNode>
   <px:PXTreeNode Text="KNRWEmolumentDetails" Value="35">
   </px:PXTreeNode>
</ChildNodes>
</px:PXTreeNode>
Step 6:
In the 2nd Project “MYFormulaPanel.ascx.cs” file, add the below lines of code in respective methods mentioned below.
a. Declare myEmolumentDetailsFields as a string
private string myEmolumentDetailsFields = null;
b. In the public void Initialise(MYFormulaEditor control) method add the below line
myEmolumentDetailsFields = control.EmolumentDetailsFields;
c. And in the event protected void handleContentLoad(object sender, EventArgs e) add the following line.
renderer.RegisterClientScriptBlock(this.GetType(), “__myEmolumentDetailsFields”, string.Format(“window.__myEmolumentDetailsFields = ‘{0}’;”, myEmolumentDetailsFields), true);
Step 7:
Create the build and these two DLL’s will be used in the main project like below steps.
a) These two DLL files should be pasted in our project BIN folder. And create a new page and the code in ASPX file as highlighted below.
<%@ Register Assembly="FormulaEditor2.Control" TagPrefix="pxm"
Namespace="FormulaEditor2.Control" %>
<asp:Content ID="cont1" ContentPlaceHolderID="phDS" runat="Server">
   <px:PXDataSource ID="ds" runat="server" Visible="True" Width="100%"
PrimaryView="UsrKNRWSalaryComponents"
TypeName="KN.RW.StaffManagement.KNRWSalaryComponentsMaint">
    <CallbackCommands>
    </CallbackCommands>
   </px:PXDataSource>
</asp:Content>
<asp:Content ID="cont2" ContentPlaceHolderID="phL" runat="Server">
   <script language="javascript" type="text/javascript">
     function ShowPopUp() {
       var ds = px_alls['ds'];
       ds.executeCallback("LinkEmployee");
     };
   </script>
   <style type="text/css">
     .GridRow.ellipsis {
       white-space: normal;
     }
   </style>
b) When use the controls like below code.
<pxm:MYFormulaEditor ID="edStrCalculationFormula" runat="server"
DataSourceID="ds" DataField="CalculationFormula" CssClass="dropDown">
<EditorStyle CssClass="editor" />
</pxm:MYFormulaEditor>
c) In the aspx.cs file write the below code to load the control.
public partial class Pages_RW200301 : PX.Web.UI.PXPage
  {
     static Pages_RW200301()
     {
AssemblyResourceProvider.MergeAssemblyResourcesIntoWebsite<FormulaEditor2.Control.MYFormulaPanel>();
     }
protected void Page_Load(object sender, EventArgs e)
     {
    }
  }
Parsing Formula expression:
With the above steps you will get your custom DAC in the expression builder. Now comes the step to parse the formula string to perform the required calculations from the custom expression that is built in the formula editor.
Dictionary CalculateValues = new Dictionary<string, decimal>();
string sFormula = osalarycomponents.RowCast<KNRWSalaryComponents>().Where(a => a.ComponentCD == "HRA").ToList()[0].CalculationFormula.ToString();
   odetail.Hra = GetCalculationFormulaval(sFormula);
   CalculateValues.Add(FieldName("Hra"), odetail.Hra ?? 0);

public static decimal GetCalculationFormulaval(string CalculationFormula)
   {
     decimal dReturnval = 0;
     try
     {
       if (CalculationFormula.StartsWith("="))
        {
          string sFormular = CalculationFormula.Replace("=", "");
          string[] math = sFormular.Split(new Char[] { '+', '-', '*', '/' });
          string itemsA = sFormular;
          string itemsB = string.Empty;
          foreach (var itm in math)
          {
            if (!string.IsNullOrEmpty(itm))
             {
               double Amount2 = 0;
               if (!double.TryParse(itm, out Amount2))
               {
                 itemsB = CalculateValues[itm.Trim().Replace('(', ' ').Replace(')', ' ').Trim()].ToString();
                 if (itm.Contains("("))
                    itemsB = "(" + itemsB;
                 if (itm.Contains(")"))
                    itemsB = itemsB + ")";
                 itemsA = itemsA.Replace(itm, itemsB.ToString());
               }
            }
          }
          ExpressionNode _descNode = PMExpressionParser.Parse(new KNRWEmolumentHelper(), itemsA);
          var value = _descNode.Eval(new object());
          if (string.IsNullOrEmpty(value.ToString()))
            dReturnval = 0;
          else
            dReturnval = Convert.ToDecimal(value);
          dReturnval = Math.Round(dReturnval, 2);
        }
      }
      catch (Exception ex)
      {
        ex.ToString();
        return 0;
      }
      return dReturnval;
     }

public static string FieldName(string Field)
   {
     PropertyInfo[] properties = typeof(KNRWEmolumentDetails).GetProperties();
     var GetFieldName = properties.Where(a => a.Name == Field).FirstOrDefault();
     return "[" + GetFieldName.ReflectedType.Name + "." + GetFieldName.Name.ToString() + "]";
   }
Summary
My hope is that this article helps you to build custom formula editor integrated into your own custom screens and even override the formula editor on the GI screens, etc.
 Canada (English)
 Columbia
 Caribbean and Puerto Rico
 Ecuador
 India
India
 Indonesia
 Ireland
 Malasya
 Mexico
 Panama
 Peru
Peru
 Philippines
 Singapore
 South Africa
 Sri-Lanka
 Thailand
 United Kingdom
 United States


