Introduction
One of the great and lesser known products that Acumatica ships alongside its product is the Test SDK. It is a “programming framework that provides an easy way to develop automated tests for applications built on top of Acumatica Framework.” It allows developers to build automated testing capability for the Acumatica UI. The Test SDK includes the test engine, an API reference, programming guidelines, and installation and configuration instructions. With these tools you can build more robust applications on the Acumatica platform with more extensive testing.
If you haven’t worked with it, I recommend downloading the SDK and looking through the documentation. The README file is a PDF of the Development Guide for the Acumatica Test SDK. I encourage you to create a test instance and go through the lessons included in the guide to create your own Automation kit. In very basic terms, the kit will allow you to create a software package that will run through a list of instructions which will manipulate the UI as if there was a person on the mouse and keyboard. This is a great resource in terms of automating repetitive tasks, but at first can seem a bit limited. In this entry and subsequent entries, I’ll share some tips and tricks on how to get the most out of the SDK.
Acumatica Test SDK Components
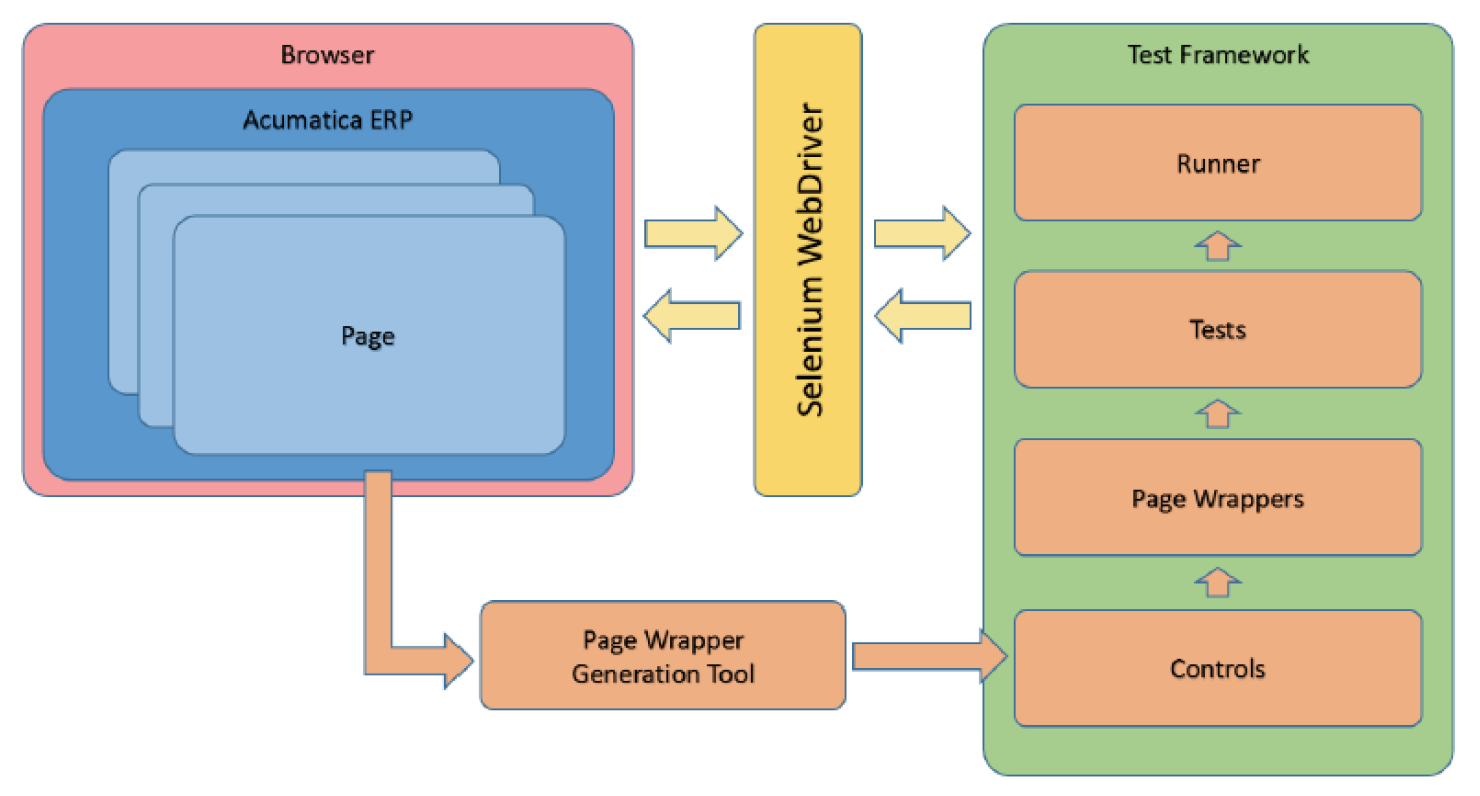
The following components are used to create and run tests for Acumatica ERP or products based on Acumatica Framework:
- A Web Browser to run and test an Acumatica-based product;
- A page wrapper generation tool to create wrappers for the pages of your Acumatica-based product;
- The Test framework to generated page wrappers in your test solution and create the code for your tests; and
- A Selenium WebDriver for interacting with the browser.
The page wrapper generation tool creates an object mapping model for the pages developed using the Acumatica Framework. This allows you access to any of the Acumatica UI elements. For example you will gain access to Forms, Grids, Toolbars, data-fields available on any particular page which you have as a ordinary user in Acumatica or any Acumatica based products. The Test SDK uses a built-in control wrapper to construct complex objects – forms, grids, and pages. For testing, you will need to create wrappers for each page that you want to test.
Below is a visual diagram of the Test SDK Components.

For further background, you can read Sergey Marench’s post on the topic that he wrote back in 2016. Acumatica will continue to support and expand the Test SDK and it would behoove Acumatica Developers to become more familiar with it.
Getting More Inputs
Now that you have a better understanding of the Test SDK, let’s move on.
In order to execute a test, you execute the Project EXE along with a configuration xml file. The example configuration file ‘RunnerExample.xml’ that comes with the SDK is pretty basic. You just enter your site URL, creds, choose your browser, and finally specify which test to execute in the SDK.
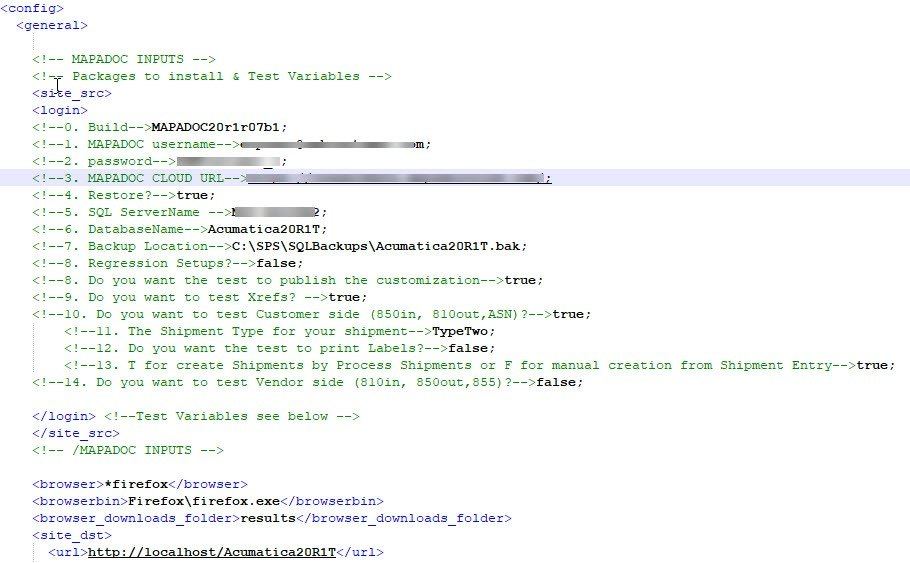
In many cases, this might be all you need to run a test. In my particular case, I need more information. For one thing, I like to have multiple tests within each kit that I can turn on and off. For another, I have various inputs such as credentials for the product that I’m testing. The configuration options for the SDK kit are static. Therefore, I did the next best thing – I hijacked an entry as you can see in the screenshot below.

Below, I share the code of the main script that I use for the Test SDK .
The embedded GibHub GIST for the code viewed above is here: https://gist.github.com/patrick711/e726a91408a43f0475f3ef2082a710ae
And finally, here is an example of my code for pulling in variables.
The embedded GibHub GIST for the code viewed above is here: https://gist.github.com/patrick711/04488e97b49b8bd85b273ebc17532874
You should find the above code useful along with going through the lessons in Acumatica’s Test SDK.
As a bonus, not only do I provide you example code in the form of GISTs – which you have above, but I have created a GitHub Repository with all the working code that you can deploy. This is a sample software kit complete for automated testing of Acumatica 2020R1 . This kit differs from the off-the-shelf SDK in that it adds some code for variable creation and SQL db restore. This toolkit was built with the 20.100 Test SDK.
In Part 2 of my post on the Test SDK, I will I’ll show you code that will allow you to automate refreshing instances to do a clean install.
Summary
Acumatica’s SDK is a very powerful tool that I’ve had a lot of fun playing around with to assist me in testing the software that I build for SPS Commerce. There are all sorts of ways it can help you accomplish your QC tasks. This programming test framework provides an easy way to develop automated tests for the applications you build and maintain, providing a means to build a testing environment for the Acumatica user-interface.
Learn more by downloading the most recent Test SDK and take the sample code I have provided and dig right in and start using it today.
Download the Test SDK Now! Canada (English)
 Columbia
 Caribbean and Puerto Rico
 Ecuador
 India
India
 Indonesia
 Ireland
 Malasya
 Mexico
 Panama
 Peru
Peru
 Philippines
 Singapore
 South Africa
 Sri-Lanka
 Thailand
 United Kingdom
 United States


