As developers, sometimes in our work, we often need to update lists of records of the same type without opening each one in the screen to update. This process can be done with a processing screen. Not long ago, I had a request from a customer to update the purchase receipts that had not yet been released. They have a product that the price changes almost daily and they work with a small margin so is important to keep the product cost in line with current pricing.

To accomplish this, I created a processing screen that would select a list of PO Receipt records and update the Unit Cost field of the line items and scheduled it to run once each day. As the items were released, they would fall off the list of records and no longer be updated.
Creating Custom Processing Screens
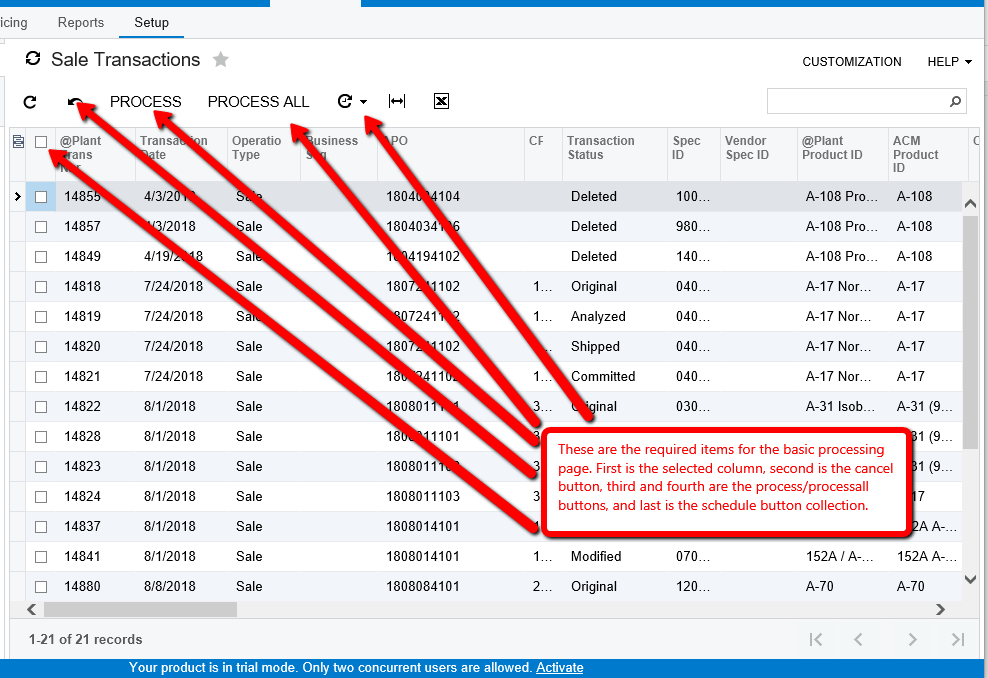
So let’s look at how we can create a custom processing screen. We will cover the items in the screenshot below and discover how you add these to your screen. Then we will look at some basic error handling in the processing screen. The code in the processing helper needs to implement a try catch block then the errors will flow upward.
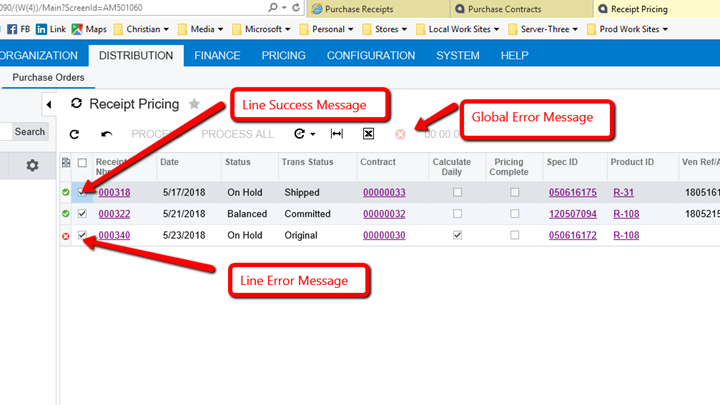
The screenshot below shows how the output from your processing will look after execution – hopefully with no error.
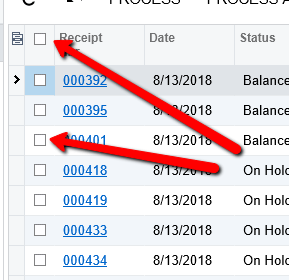
The first item you need to have is the selected column in your screen as the following image shows.
Writing the Code
To accomplish this, you must do two things. First, add this field to the DAC which is the primary class for the processing records. If you are using a built in DAC, the field may be present already. Here is the code for your DAC. Second, make sure it is unbound and add the line of XML code to your aspx page as shown below.
#region Selected

       public abstract class selected : IBqlField { }

       [PXBool]

       [PXUIField(DisplayName = “Selected”)]

       public virtual bool? Selected { get; set; }

 #endregion
Here is the aspx code we need:
Third, we need to add a cancel button as shown in the following screenshot.
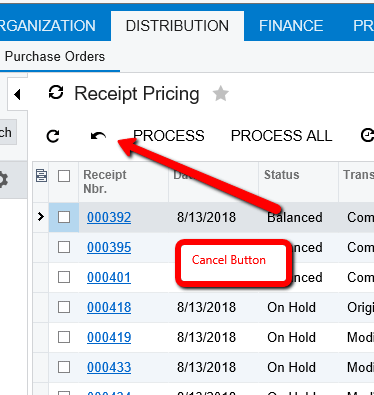
The cancel button will be added with just one line of code.
public PXCancel Cancel;
The rest of the items will come from the PXProcessing, PXProcessingJoin, PXFilterProcessing classes and will be added to the screen by using one of them.
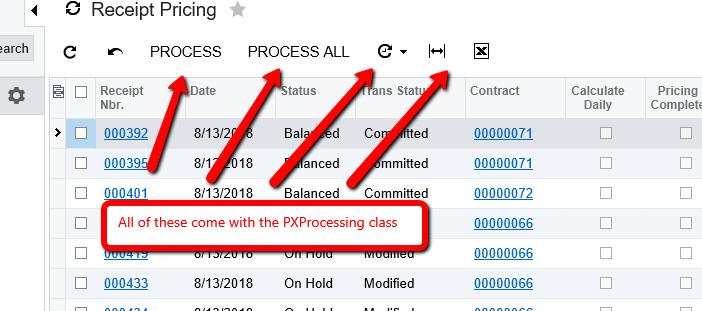
The following is a pattern I use for processing screens. These screens look like they are simple, but they can be very complex. Our first step is to get the list of records to process. I have included an example of the BQL select records below.
public PXProcessing<POReceipt, Where<POReceipt.usrProcessed, NotEqual>> PagePrimaryView;
This is the processing select. It has other variations: PXProcessingJoin, PXFilterProcessing, etc. and has to be your primary view for the page and using this view will add your Process, ProcessAll buttons to the screen.
The code segment I show below is what I use to cycle through the records one at a time, do the processing one record at a time, then if successful, write a success message. If an error occurs, an error message is inserted into the line and the global error flag is set. The process will call a process helper graph for the processing or you can extend a standard graph to include the process code. This method will allow you to use built in methods of the screen and finally mark the record complete in some fashion. The import thing is that this method is marked static or you will not be able to see it in the construtor to link to the record list. This is why you use a second graph to do the processing details and mark your record as complete. Below this is the code to set the process method of the PXProcessing list. This is done in the constructor that is also the set selected which is some of the magic to select all the records when the ProcessAll button is pressed.
Lastly, we add an overridden property for the graph IsDirty, keeping the page from trying to save changes.
#region Process Receipts List

//method is static, list of records from pxprocessing select

private static void ProcessReceiptList(IList records)

{

   //here set variable for global error message.

   var globalError = false;

   //here I have a variable for the po receipt nbr to tie to the lines

   var receiptNbr = string.Empty;

   //here I create the graph that will do the processing, can be custom graph also

   var graph = CreateInstance();

   //here I get a handle to graph extension to be able to use the added methods.

   var graphExt = graph.GetExtension();

   //now cycle through the list of records and process each.

foreach (var record in records)

   {

      //here I have a local variable for each line

   var lineError = false;


  //it is also possible to add transaction support here if only needed for the line item

         try

         {

              //clear the receipt graph of the last record

               graph.Clear();

              //assign the new receipt nbr for messages

                receiptNbr = record.ReceiptNbr;

              //set the next record to be processed to the current of the graph

           graph.Document.Current = record;

              //call the process method that I added to the po receipt entry graph

                graphExt.ProcessPrice();

       //then save the results, including the processed flag or condition

                graph.Save.Press();

      }

      //catch any errors that happen in the receipt graph and format the message here, you can

       also write code to a log or record extension to fix the error

       catch (Exception e)

       {

           //set line error to true so will skip the process correct below

            lineError = true;

           //set globaError flag to true to get the global message

            globalError = true;

           //create a custom error message to post on the grid

     var message = “Error Processing PO Receipt Transaction: “ + receiptNbr +  “: “ +

    e.Message;

//add the custom error message to the grid line PXProcessing.SetError(records.IndexOf(record), message);

       }

           //create a process complete message and assign to the grid line

            var messageTwo = “PO Receipt Transaction: “ + receiptNbr + ” Was Processed.”;

            if (!lineError) PXProcessing.SetInfo(records.IndexOf(record), messageTwo);

        }

       //add last create the global error message that displays at the top of the screen

        if (globalError) throw new PXException(“At Least One PO Receipt Transaction Was Not

       Processed.”);

}

#endregion

#region Constructor

public ProcessPOReceipts()

{

 PagePrimaryView.SetProcessDelegate(ProcessReceiptList);

 PagePrimaryView.SetSelected();

}

#endregion

#region Overridden Properties

public override bool IsDirty => false;

#endregion
So now all you have to do is create your aspx page by using a Form Detail or ListView template.
<%@ Page Language=”C#” MasterPageFile=”~/MasterPages/ListView.master” AutoEventWireup=”true” ValidateRequest=”false” CodeFile=”AM501060.aspx.cs” Inherits=”Page_AM501060″ Title=”Untitled Page” %>

<%@ MasterType VirtualPath=”~/MasterPages/ListView.master” %>

<asp:Content ID=”cont1″ ContentPlaceHolderID=”phDS” runat=”Server”>

   <px:PXDataSource ID=”ds” runat=”server” Visible=”True” Width=”100%” TypeName=”AM.Objects.ProcessPOReceipts” PrimaryView=”PagePrimaryView”>

       <CallbackCommands/>

   </px:PXDataSource>

</asp:Content>

<asp:Content ID=”cont2″ ContentPlaceHolderID=”phL” runat=”Server”>

<px:PXGrid ID=”grid” runat=”server” Height=”400px” Width=”100%” Style=”z-index: 100″ ActionsPosition=”Top” FilesIndicator=”False” NoteIndicator=”False”

       AllowSearch=”True” DataSourceID=”ds” SkinID=”PrimaryInquire” FastFilterFields=”PlantTransNbr”>

<Levels>

<px:PXGridLevel DataMember=”PagePrimaryView”>

               <RowTemplate>

                   <px:PXSelector ID=”edReceiptNbr” runat=”server” DataField=”ReceiptNbr” AllowEdit=”True”/>

                   <px:PXSelector ID=”edUsrPurContractID” runat=”server” DataField=”UsrPurContractID” AllowEdit=”True”/>

                   <px:PXSelector ID=”edUsrSpecID” runat=”server” DataField=”UsrSpecID” AllowEdit=”True”/>

                   <px:PXSegmentMask ID=”edUsrStockItemID” runat=”server” DataField=”UsrStockItemID” AllowEdit=”True” />

                   <px:PXSegmentMask ID=”edVendorID” runat=”server” DataField=”VendorID” AllowEdit=”True” DisplayMode=”Text”/>

               </RowTemplate>

   <Columns>

       <px:PXGridColumn DataField=”Selected” TextAlign=”Center” Type=”CheckBox” Width=”30″ AllowCheckAll=”True” AllowSort=”False” AllowMove=”False”/>

       <px:PXGridColumn DataField=”ReceiptNbr” Width=”90″/>

       <px:PXGridColumn DataField=”ReceiptDate” Width=”90″/>

       <px:PXGridColumn DataField=”Status” Width=”80″/>

       <px:PXGridColumn DataField=”UsrTransStatus” Type=”DropDownList” Width=”110″/>

                   <px:PXGridColumn DataField=”UsrPurContractID” Width=”100″/>

       <px:PXGridColumn DataField=”UsrCalculateDaily” TextAlign=”Center” Type=”CheckBox” Width=”80″/>

       <px:PXGridColumn DataField=”UsrPricingComplete” TextAlign=”Center” Type=”CheckBox” Width=”80″/>

       <px:PXGridColumn DataField=”UsrInvTransfered” TextAlign=”Center” Type=”CheckBox” Width=”90″/>

       <px:PXGridColumn DataField=”UsrInvAdjusted” TextAlign=”Center” Type=”CheckBox” Width=”90″/>

       <px:PXGridColumn DataField=”UsrIsComplete” TextAlign=”Center” Type=”CheckBox” Width=”90″/>

       <px:PXGridColumn DataField=”UsrSpecID” Width=”90″/>

       <px:PXGridColumn DataField=”UsrStockItemID” Width=”100″/>

       <px:PXGridColumn DataField=”InvoiceNbr” Width=”110″/>

       <px:PXGridColumn DataField=”UsrShippedDate” Width=”90″/>

       <px:PXGridColumn DataField=”UsrDeliveredDate” Width=”90″/>

                   <px:PXGridColumn DataField=”VendorID” AllowUpdate=”False” Width=”340px” DisplayMode=”Text”/>

   </Columns>

</px:PXGridLevel>

</Levels>

   <ActionBar PagerVisible=”Bottom”>

       <PagerSettings Mode=”NumericCompact”/>

   </ActionBar>

<AutoSize Container=”Window” Enabled=”True” MinHeight=”200″ />

</px:PXGrid>

</asp:Content>
Only 48 lines of code to create the page, most of the buttons are built in so will not require much coding beyond that.
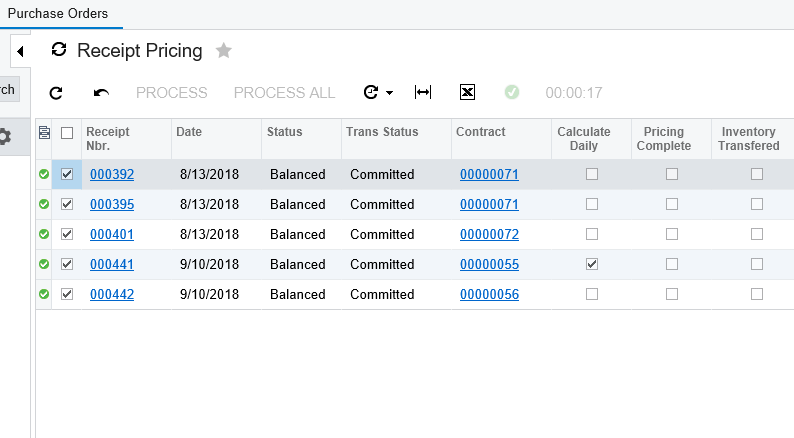
Hopefully all of your pages will look like this in the end. The difficult code for these pages is in the process methods and is outside the scope of this post, as each one is different and has many requirements.
Conclusion
To provide a short recap of what I have demonstrated herein, we have created some C# code to include a new graph with a cancel button, a PXProcessing BQL select, a template loop to process our records, a constructor to link the process method to record list, and an overridden value to cache dirty property.
I hope this will give you a good head start to using processing screens. Happy coding!
 Canada (English)
 Columbia
 Caribbean and Puerto Rico
 Ecuador
 India
India
 Indonesia
 Ireland
 Malasya
 Mexico
 Panama
 Peru
Peru
 Philippines
 Singapore
 South Africa
 Sri-Lanka
 Thailand
 United Kingdom
 United States


