Reviewed: Jun, 2023
Connecting a Website to Acumatica Cloud accounting software is easy to complete process. This article explains how to setup a simple ASPX website with a form that uses web-services to submit a lead to Acumatica Cloud ERP.
Environment: 5.10.0600 (framework not required)
IDE: Visual Studio Express 2013 for Web

Overview
Simple Order Entry Screen
Acumatica Cloud ERP can be configured to meet the needs of users. You can easily deploy different skins to change the look and feel of the site. Administrators can add fields or use authorization rights to simplify screens. Individual users can customize grids and create dashboards.

You can use templates to change the look and feel of Acumatica
You can even create entirely new websites, or simple forms that use web-services to enter data into Acumatica. This article will demonstrate how to create a simple form that creates a lead in Acumatica.
Solution Overview
Acumatica is a web application. All data entry screens have a web services connection so you can pull and push data associated with the ‘schema’ for that screen. An Acumatica schema is a list of objects including database tables, fields, procedures, and functions. Using web services you can access the screen schema to add records, save data, and perform other actions – just as if you were typing into the screen itself.

Connecting a website to Acumatica
In this section we perform the following steps:
- Create a simple website
- Add the Acumatica web services description to the website in Visual Studio
- Create a web page with a form that will collect data to submit
- Add C# code to submit the form data to Acumatica
Create website using Visual Studio
Open Visual Studio and select the option to create a new website. Make sure you select Visual C# and use the ASP.NET Web Forms Site option for rapid site creation. Specify a web directory where you want the site to be created.
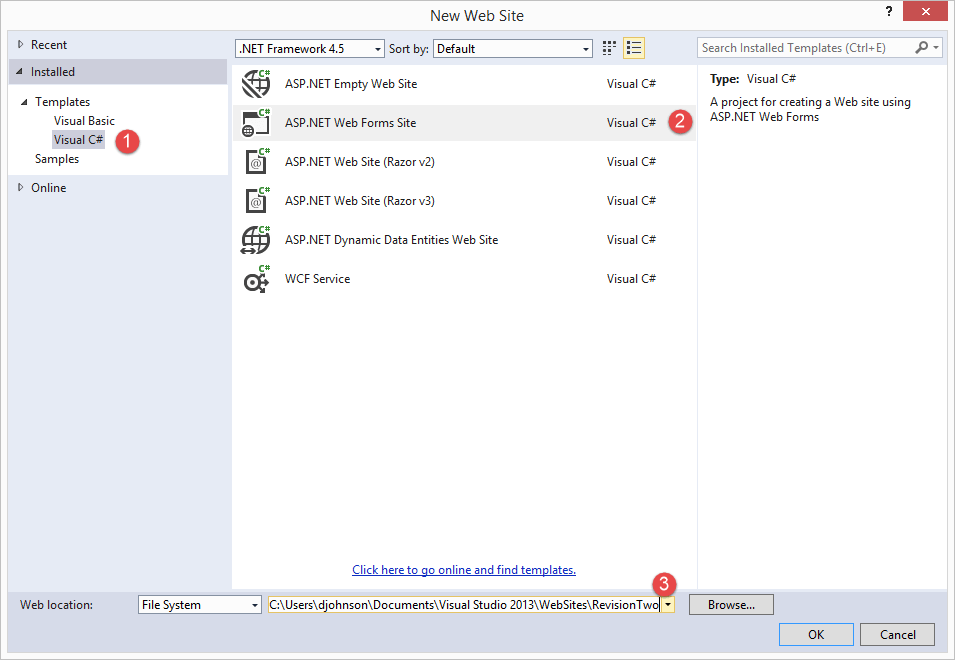
Create a simple website to submit data to Acumatica using web services.
The result is a simple site that we can quickly modify to show how to use web-services to connect to Acumatica. The home page for this site is displayed below. I modified the site text, menus, and images.
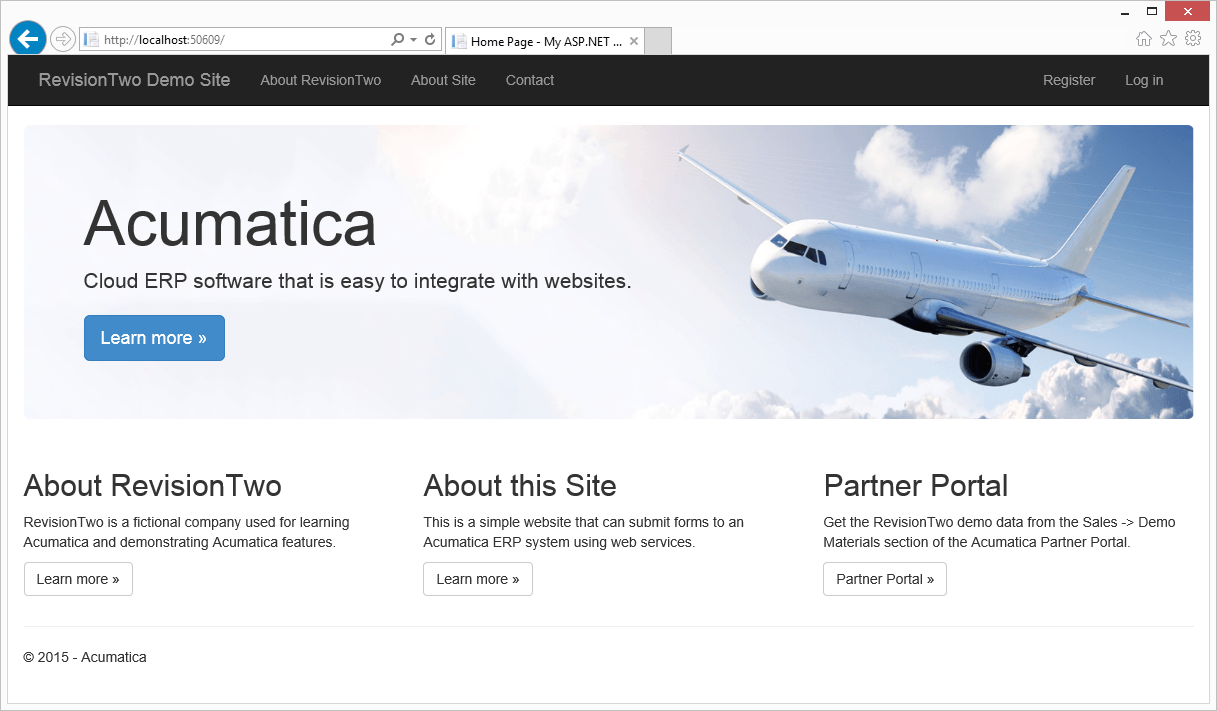
Simple ASPX website created using Visual Studio template with minor modifications
Link Acumatica Web Services
The next step is to bring in the Acumatica web-reference to include in our website. Each Acumatica page has a web-reference that we can use. In this example, we will use the Leads page.
To get the web reference login to the Acumatica application, navigate to the page, click Help, and select the Web Service button.
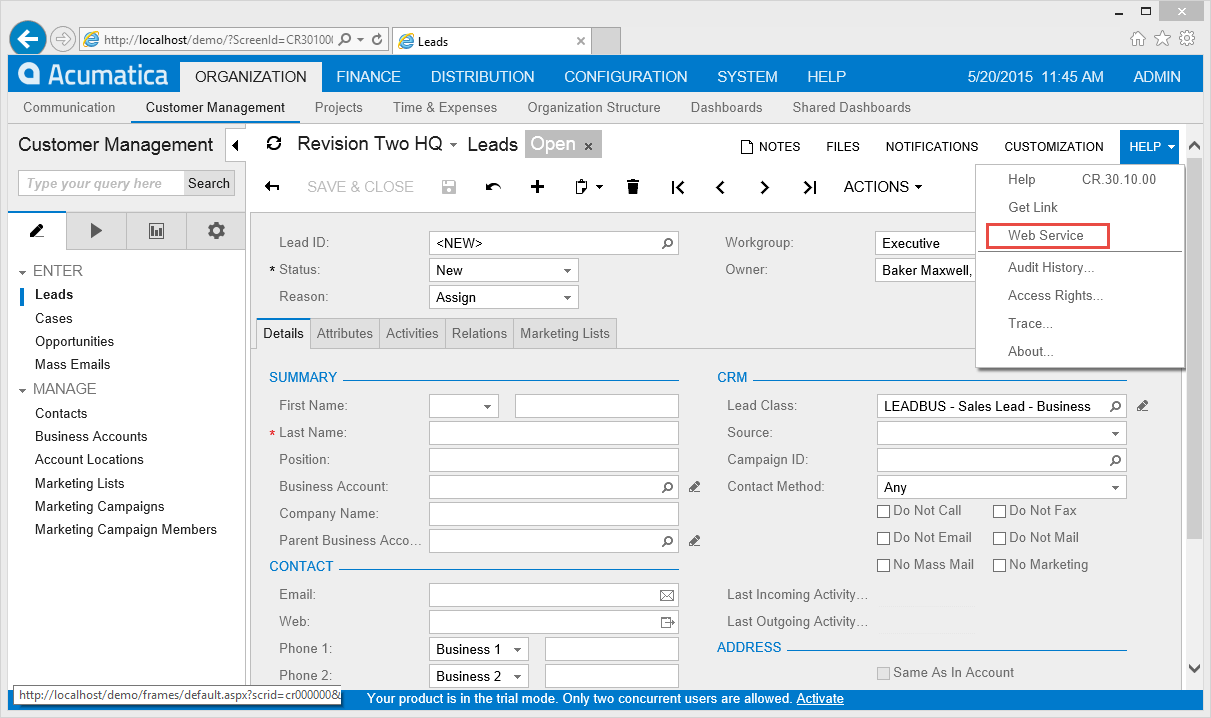
Click Help, and select the Web Service button.
Next select the Service Description link.

Next select the Service Description link.
This will return a URL similar to http://localhost/demo/Soap/CR301000.asmx?WSDL that you can use to import a service reference into the Visual Studio project.
Inside Visual Studio, you can add a service reference by selecting from the top menu Website -> Add Service Reference. This opens a dialog box you see below.
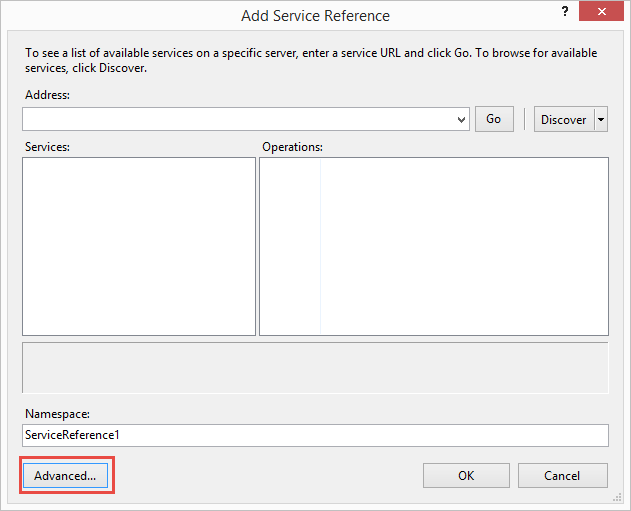
Add a service reference dialog box.
Click “Advanced” to show a button called “Add Web Reference” and click it.
To add a web reference (see screen below)
- Enter the URL that you obtained from the Acumatica services description
- Enter a web reference name (I used the screen ID CR.30.10.00)
- Click the Add Reference button
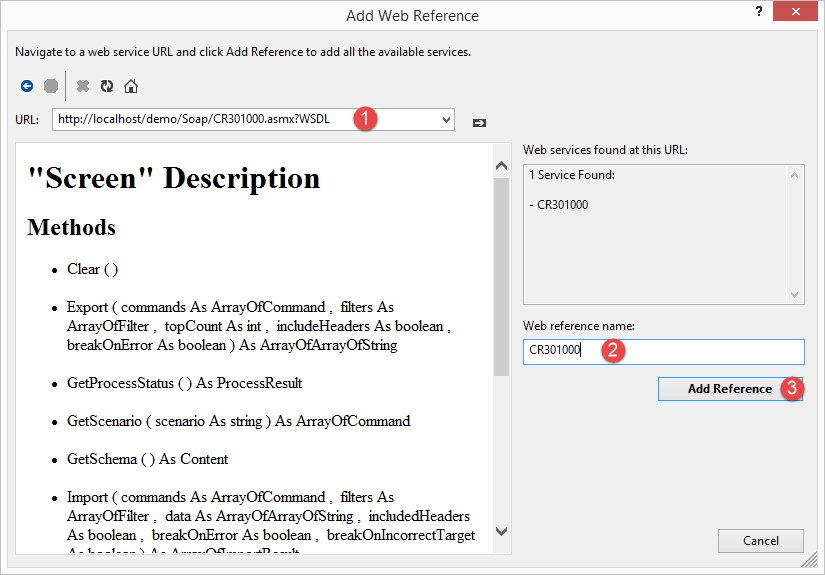
Select the Add Reference button
Now the fields, objects, and methods in the Acumatica lead screen are available to your website.
Add Code to your Website
In this section, some C# coding is required so your web site can:
- Login to Acumatica
- Map website form fields to Acumatica data fields
- Submit the data to Acumatica
Step 1: Create Form Entry in ASPX Page
The first step is to create a form in your website where you can enter data. I added a simple submit form to the contact us page of the website that Visual Studio created. The code for the form is listed below:
Sales Request
| <asp:Label ID=”Label1″ runat=”server” Text=”First Name”></asp:Label>> | <asp:TextBox ID=”FirstName” runat=”server” BackColor=”WhiteSmoke”></asp:TextBox> |
| <asp:Label ID=”Label2″ runat=”server” Text=”Last Name”></asp:Label> | <asp:TextBox ID=”LastName” runat=”server” BackColor=”WhiteSmoke”></asp:TextBox> |
| <asp:Label ID=”Label3″ runat=”server” Text=”Email”></asp:Label> | <asp:TextBox ID=”Email” runat=”server” BackColor=”WhiteSmoke”></asp:TextBox> |
| <asp:Label ID=”Label4″ runat=”server” Text=”Phone”> | <asp:TextBox ID=”Phone1″ runat=”server” BackColor=”WhiteSmoke”></asp:TextBox> |
| <asp:Button ID=”SubmitButton” runat=”server” Text=”Submit Lead to Acumatica” OnClick=”SubmitButton_Click” /> | |
Step 2: Add Business Logic using C#
Next, modify the C# page (content.apsx.cs) to include the code to login, map website fields, and submit data to Acumatica via web services. The code for this is listed below.
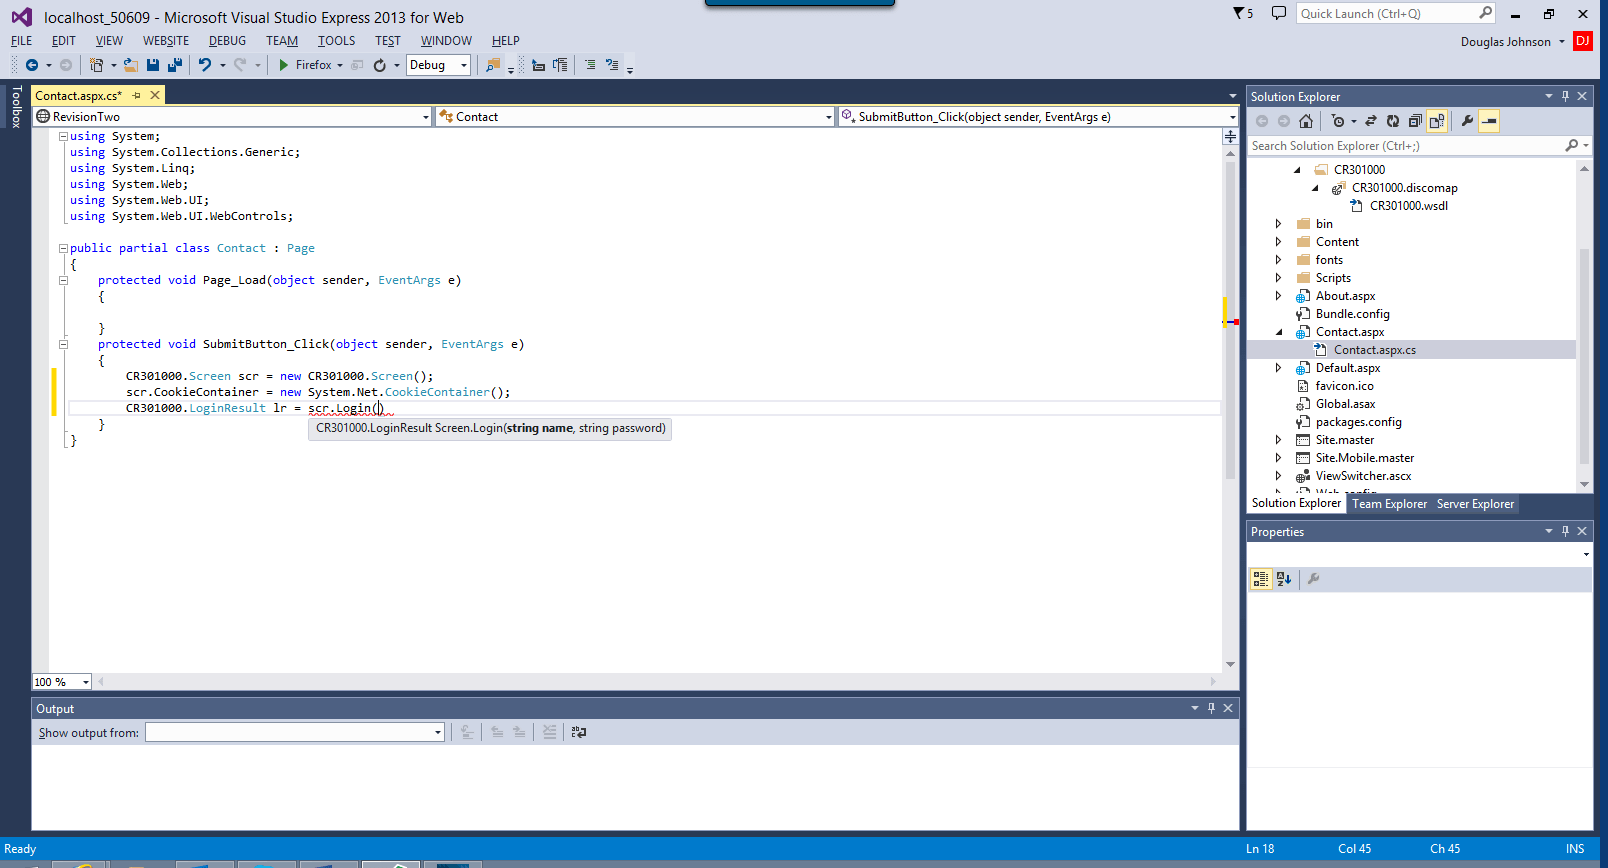
Visual Studio displays the methods associated with Acumatica to simplify programming.
This code (a) logs in to Acumatica, (b) creates a Command that includes actions and data to be inserted, and (c) submits the command to Acumatica.
protected void SubmitButton_Click(object sender, EventArgs e)
{
CR301000.Screen scr = new CR301000.Screen();
scr.CookieContainer = new System.Net.CookieContainer();
CR301000.LoginResult lr = scr.Login(“admin”, “123”);
if (lr != null && lr.Code == CR301000.ErrorCode.OK)
{
CR301000.Content schema = scr.GetSchema();
var commands = new CR301000.Command {
schema.Actions.Insert,
new CR301000.Value {
LinkedCommand = schema.DetailsSummary.FirstName, Value = FirstName.Text },
new CR301000.Value {
LinkedCommand = schema.DetailsSummary.LastName, Value = LastName.Text },
new CR301000.Value {
LinkedCommand = schema.DetailsContact.Email, Value = Email.Text },
new CR301000.Value {
LinkedCommand = schema.DetailsContact.Phone1, Value = Phone1.Text },
schema.Actions.Save
};
scr.Submit(commands.ToArray());
Response.Redirect(“ContactSuccess.aspx”);
}
}
This code assumes that you have created a landing page called ContactSuccess.aspx. Some simple code for this landing page is:
<%@ Page Title=”Thank You” Language=”C#” MasterPageFile=”~/Site.Master” AutoEventWireup=”true” CodeFile=”About.aspx.cs” Inherits=”About” %>
<%@ Page Title=”Thank You” Language=”C#” MasterPageFile=”~/Site.Master” AutoEventWireup=”true” CodeFile=”About.aspx.cs” Inherits=”About” %>
<asp:Content ID=”BodyContent” ContentPlaceHolderID=”MainContent” runat=”server”>
<h2><%: Title %>.</h2>
<h3>Thank you for contacting RevisionTwo sales.</h3>
Somebody from our sales team will contact you within 1 business day.
</asp:Content>
Test Your Work
Open Website and Submit Form
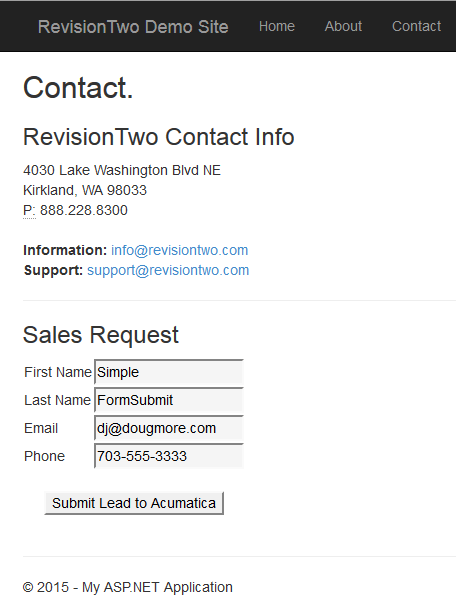
A simple form that was added to our website
Open your website by either publishing it, or running a browser emulator in debug mode within Visual Studio. Go to the contact page and submit your form.
If everything was done correctly, you should be re-directed to the ContactSuccess page.
Behind the scenes, the website submitted the lead to Acumatica.
You can login to Acumatica, navigate to the leads area or enter the name you submitted into the global search area and you should see the lead created in Acumatica.
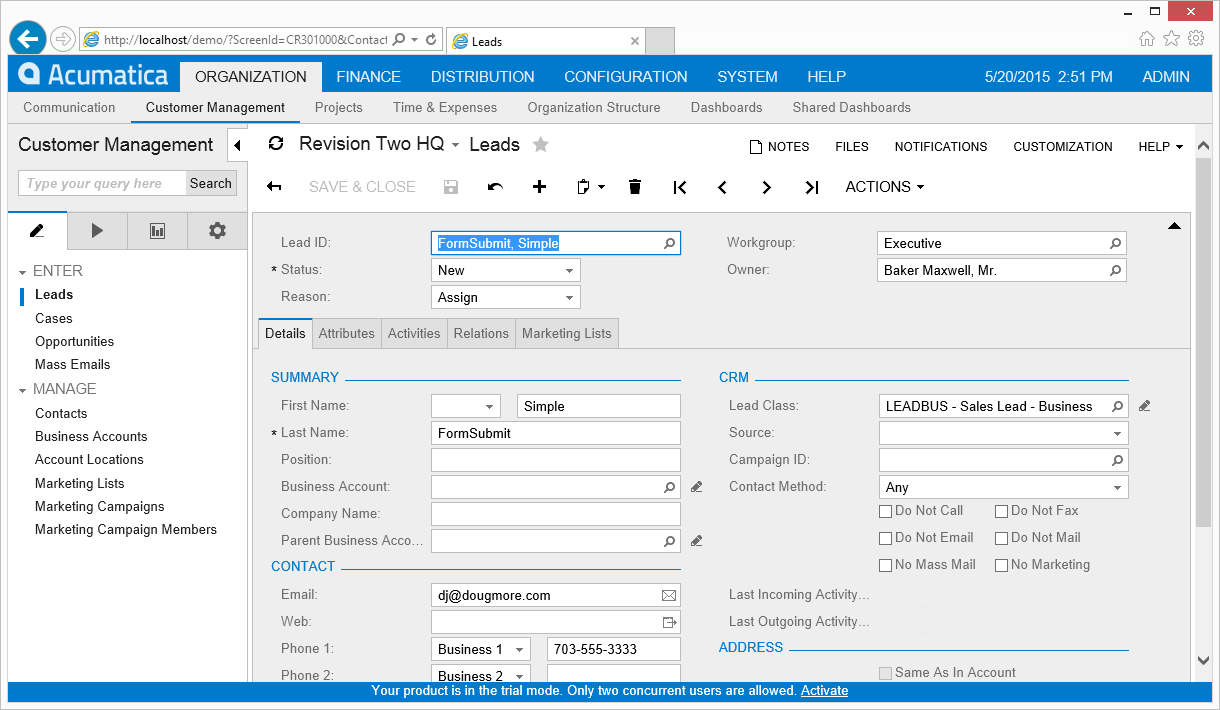
A simple form added to our website.
Don’t Stop Here!
Every page in Acumatica has a webservice. Create pages to create contacts, opportunities, and more.
Build a login capability (provided out of the box with Visual Studio) and login as a user instead of the administrator when submitting forms. This will enforce security controls so you can limit what your website user will submit.
Next Step
Contact Doug Johnson if you want to see how to build an import process for a vendor bill (see screen below). In this example, there is additional functionality to gain:
- Login to our new website and use that login to submit the form to Acumatica
- Add an additional handler (page load & submit form)
- Data conversion (date)
- Error catching
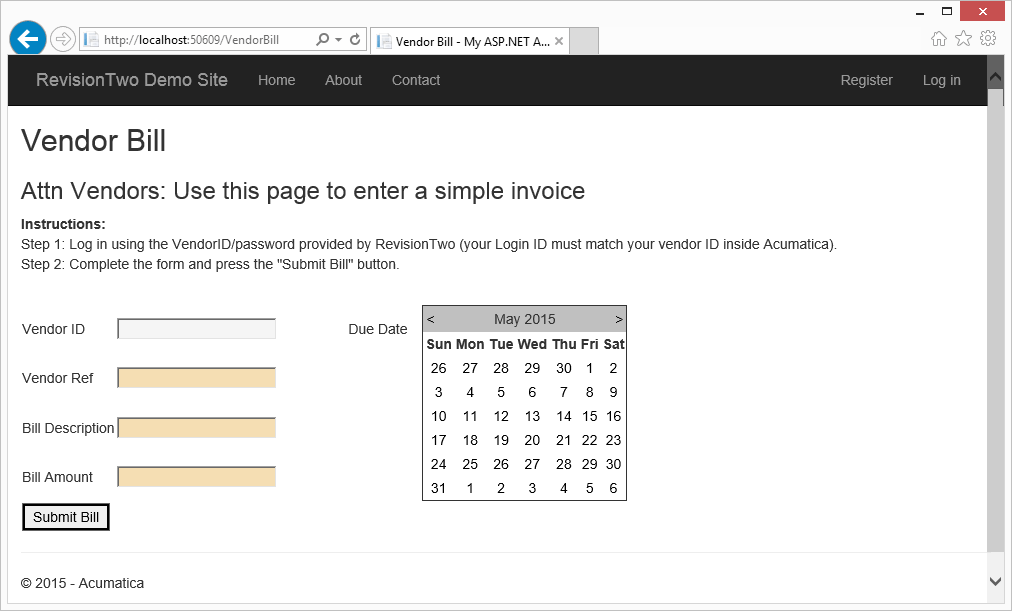
Contact Doug Johnson if you want to see how to build an import process for a vendor bill.
 Canada (English)
 Colombia
 Caribbean and Puerto Rico
 Ecuador
 India
India
 Indonesia
 Ireland
 Malaysia
 Mexico
 Panama
 Peru
Peru
 Philippines
 Singapore
 South Africa
 Sri Lanka
 Thailand
 United Kingdom
 United States


