Acumatica cloud ERP users have options for managing their timecard accounting for projects. Today’s Technical Tuesday post will discuss the advantages of different methods, each one dependent on how payroll is implemented and on reporting requirements.

Acumatica cloud ERP provides different timecard posting options. This allows customers to pass expenses to projects and properly account for activities which are entered onto timecards.
Customers using timecards have different payroll implementations and reporting requirements which influence which implementation option is best for a specific business. This article is designed to help understand the benefits of the different posting options:
- Post transactions to the general ledger and project
- Post transactions to the project only
- Do not post any transactions
Payroll and Reporting Considerations
Timecard data can be used for payroll, project billing, budget tracking, and reporting. Depending on your needs, you can configure Acumatica’s cloud ERP software to post transactions to the general ledger and the project modules.
Situation 1: Your business uses employee timecards to send hours to the payroll system so hourly workers are paid for hours they have worked. This requires that timecard information is posted to the general ledger.
Situation 2: Your business uses employee timecards to capture hours worked on a project for billing purposes. This requires that timecard information is passed to the project.
Situation 3: Your financial reports are required to split payroll wages into cost of goods sold (directly related to revenue) and overhead. This can be accomplished by posting to the general ledger or the project module.
Situation 4: Your business requires employees to log hours on projects and overhead hours in order to produce detailed reports which describe the ratio of time worked on projects versus overhead time. This requires that detailed timecard information is passed to reporting engines via the general ledger.

Implementation and Benefits of Posting to the General Ledger and Project
Post transactions to the general ledger when you need to send timecard data to payroll or when you need financial reports that split project hours from non-project hours.
This scenario is implemented in the SalesDemo data that you can download as a snapshot on the Acumatica portal. The sections below describe the details of setting up this scenario as it appears in the demo data.
Timecard Preferences
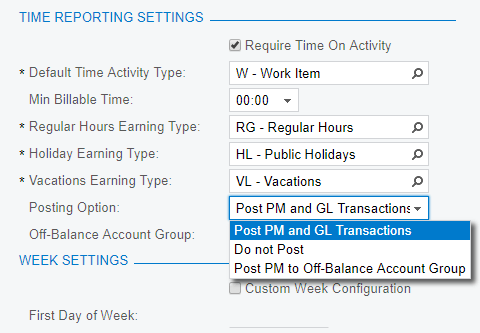
Under the Time Reporting Settings, select the Posting Option: Post PM and GL Transactions as shown.
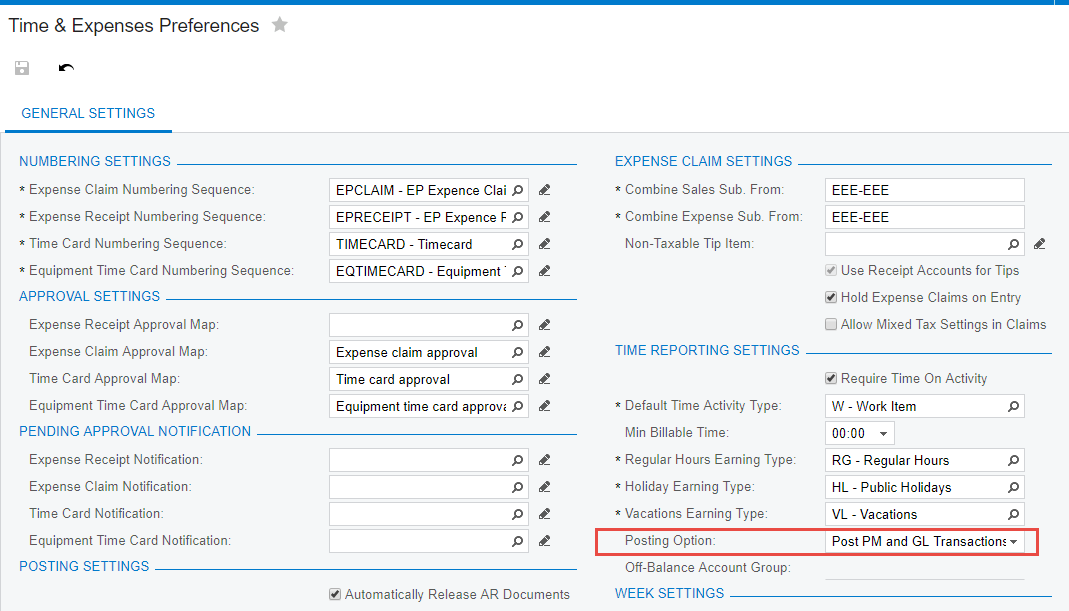
This option causes the system to create general ledger transactions when a project is specified on a time activity. A project transaction will also be created if the general ledger code is mapped to a project account group.
Project Preferences
Within project preferences, you can set the account source for the debit (expense account) and credit (accrual account) transactions for the project transactions. This setting tells the system where to get the debit and credit accounts for each timecard transaction.
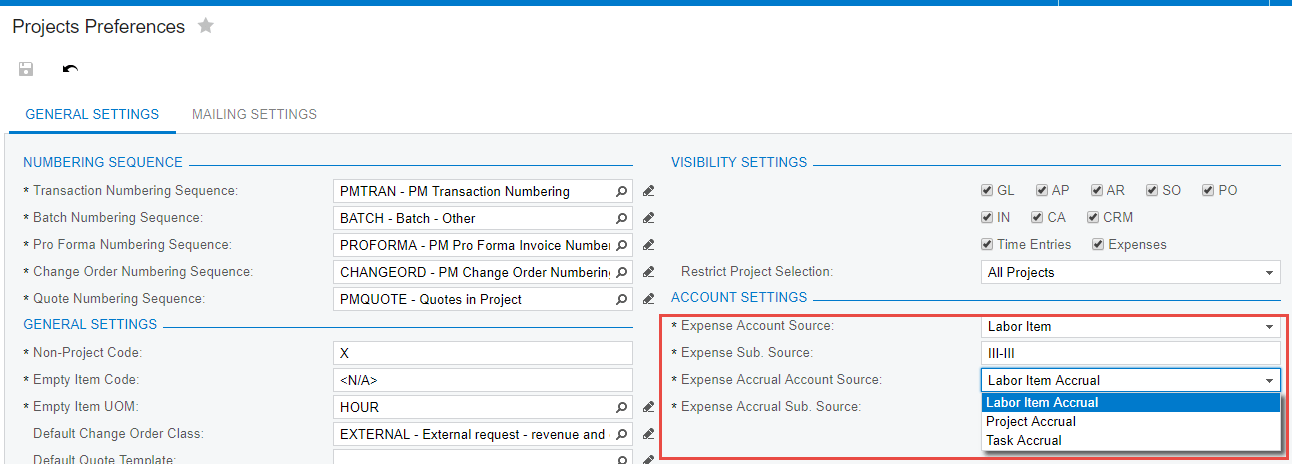
Within the SalesDemo data, the labor item option is selected for both the expense account (expense) and the expense accrual (liability).
The Labor Item selection provides more flexibility than the other options (Project, Project Task, Employee) because different earning types can be entered on a timecard and mapped to different (non-stock items).
Non-Stock Item
When the expense account source in the Project Preferences screen is set to Labor Item, the system takes the accounts from the GL Accounts tab on the Non-Stock Items screen.
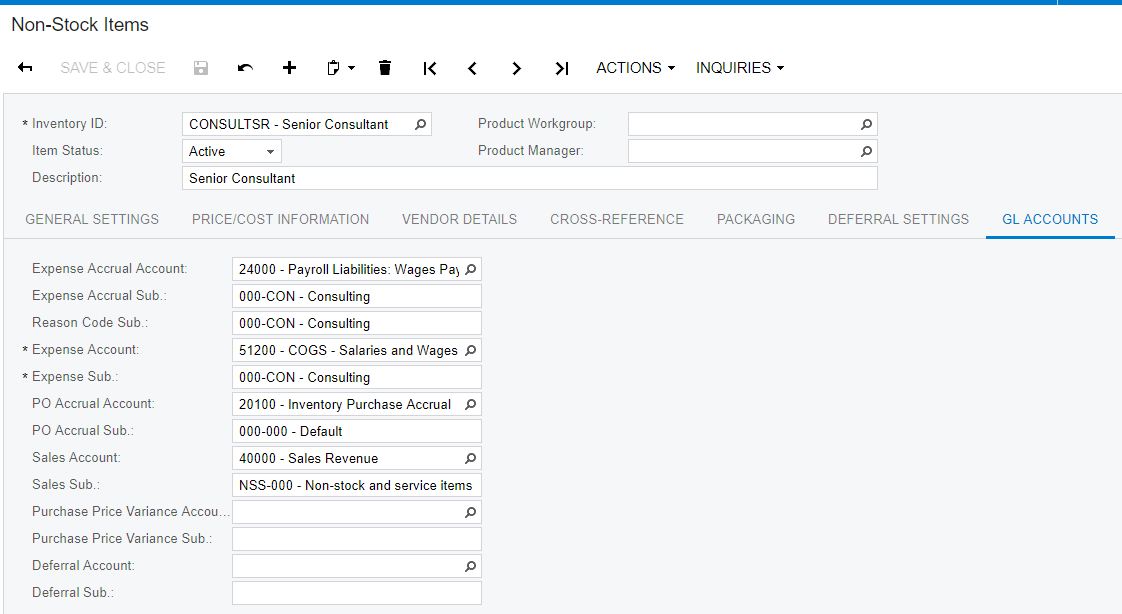
When entering a labor item, the expense account must be set to an expense account that is linked to a project account group. If it is not linked to a project account group, then the system will generate an error when the transaction is released. The expense accrual account can be set to a liability account that tracks wages that are earned, but not paid. If the expense accrual account is not linked to a project account group, then the credit account will be created for the GL entry, but not on the project.
Important posting notes:
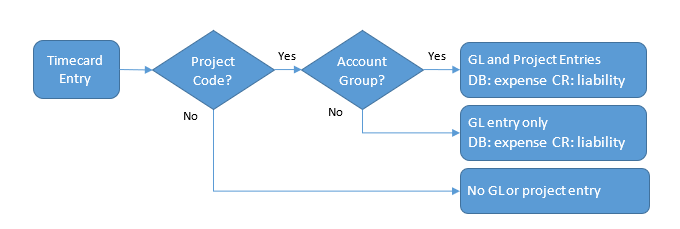
- Timecard entries that reference the non-project code (‘X’ in SalesDemo) do not create project entries or general ledger entries.
- Accounts linked to an account group will create a project transaction. If accounts are not linked to an account group, then a project transaction will not be created.
- The expense (debit) account must be defined in an account group or an error will occur
- The liability (credit) account may or may not be defined in an account group
- Timecards contain several different time activities. Each time activity is used to create project transactions. Costs are retrieved from the Labor Costs Rates table when the activity is released.
Flow diagram for timecard activity entry:
Expense Accruals with Payroll
Expense accrual amounts must be backed out after payroll is run, otherwise, the liability account will continue to grow, and wage expenses will be over-stated (as it was for years in SalesDemo). Here are potential strategies for backing out the accrual account information.
- Modify journal entries received from your payroll system. See the example in the Appendix 1 on how to do this.
- Create a GL Allocation to debit Wages Payable and credit Wages Salaries when payroll is completed and posted to the general ledger. This automates the process described in the first strategy. See Appendix 2 for details on creating this GL allocation.
- Set the expense accrual account on the non-stock item equal to the expense account. This causes the transaction to be net-zero to GL but will still send the transaction to the project module. With this method, you need to create a project allocation to produce transactions to reflect costs on a project. Creating this allocation is not covered in this article.
Benefits of Posting Timecard Entries to the General Ledger
Benefit: COGS versus Overhead wages
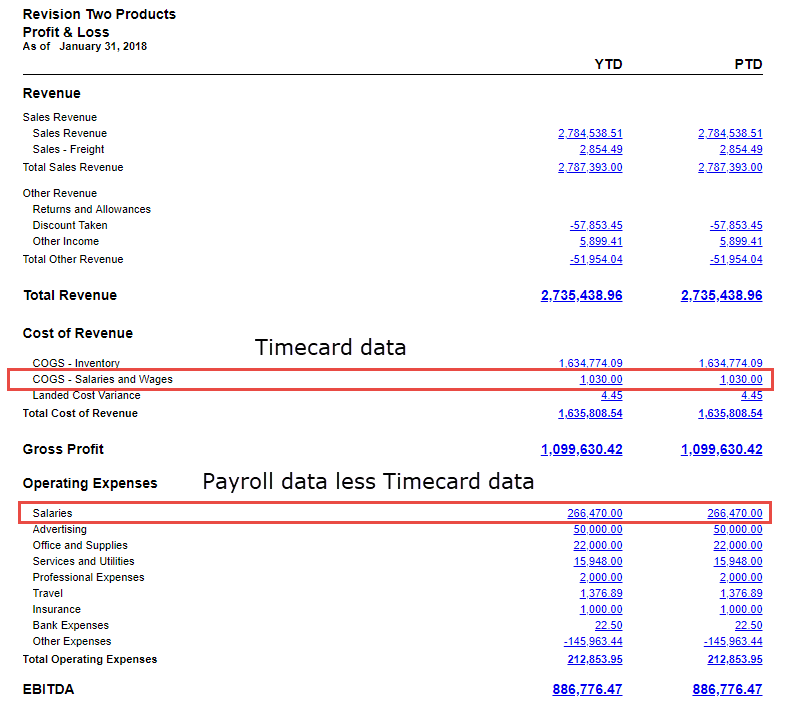
By posting to the general ledger, your timecard entries are available for financial reporting. This allows you to easily split labor between cost of goods sold and operating overhead as illustrated below.
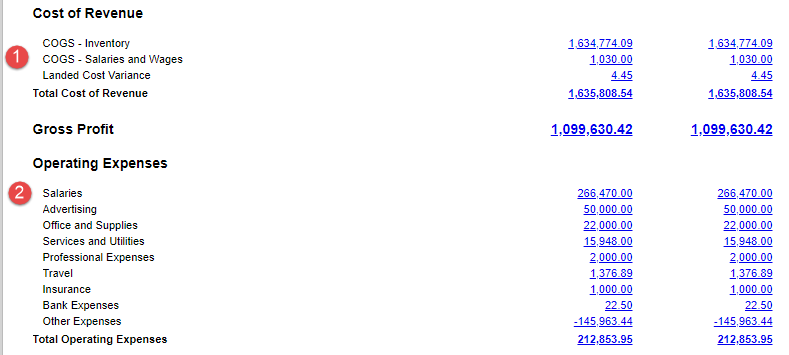
The segment of the profit and loss report above illustrates:
- Timecard data that contains a project code and posted to the general ledger is automatically placed into the cost of goods sold area to reduce gross profits.
- Payroll data is placed below the gross profit line. As discussed, you must implement a strategy to back out the COGS payroll to avoid double-counting.
Benefit: Employee project time
You can configure the system to gather productivity reports and reports which have ratios of project time to non-project time.
Do the following to configure this in SalesDemo:
1. In project preferences set expense account source to project.
Hint: If you require using the entries from the inventory item, then you can use earning types to over-ride the default inventory item for all employees who enter timecards. This allows employees to enter an earning type for non-project time, which sets the appropriate account codes.

2. Create a project for overhead – set GL accounts in the project
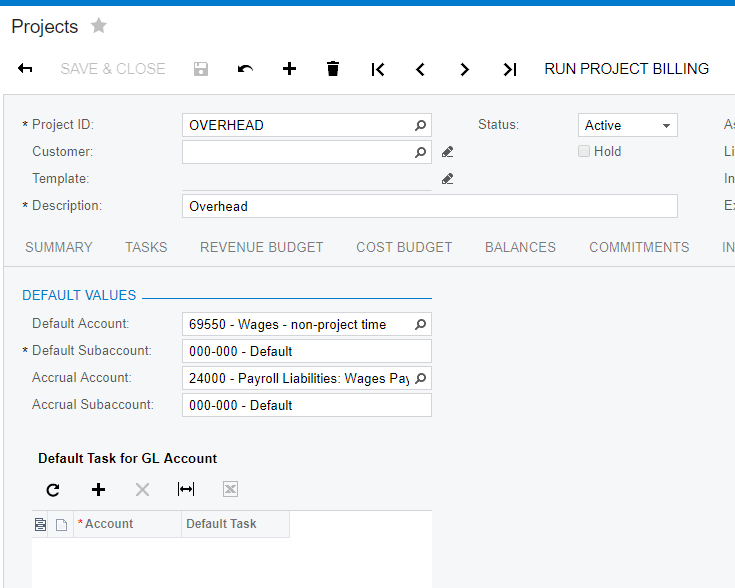
3. Create timecards – when entering data, do not select the non-project code for the project – instead select the overhead project.

4. With the system configured in this way, you can easily build reports to calculate productivity ratios using either generic inquiries or the analytical report manager. Generic inquiries have access to the quantity if you want to compare hours, whereas the ARM tool only has access to financial balances.
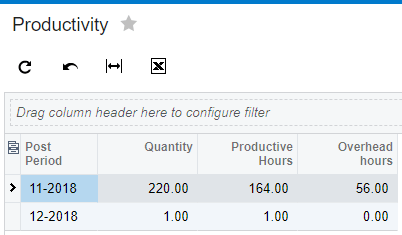
Benefit: Export data to payroll
In addition to the reporting and tracking benefits, posting to the GL allows you to export a file containing employee hours to your payroll system. This allows employees to be paid for hours that are approved on their timecard.
Details of creating this export file are not included in this article.
Implementation and Benefits of posting to the Project Only
Acumatica also provides an option to post information to project without creating journal transactions. This is useful when you need to use timecard data for billing and reporting within projects but want to simplify and reduce the amount of GL entries.
The sections below describe the simple setup scenario.
Account Groups
Create an account group with type Off-Balance, so you can post timecard transactions without having a corresponding GL transaction.
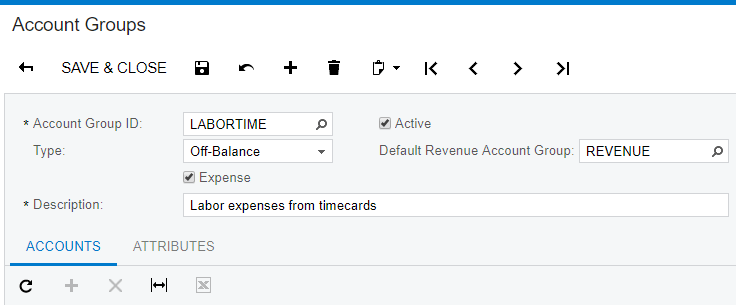
Check the expense box so the time entries can be linked back to the cost budget line for labor.
Timecard Preferences
After creating the account group for expenses, use the Time Reporting Settings to set the Posting Option:
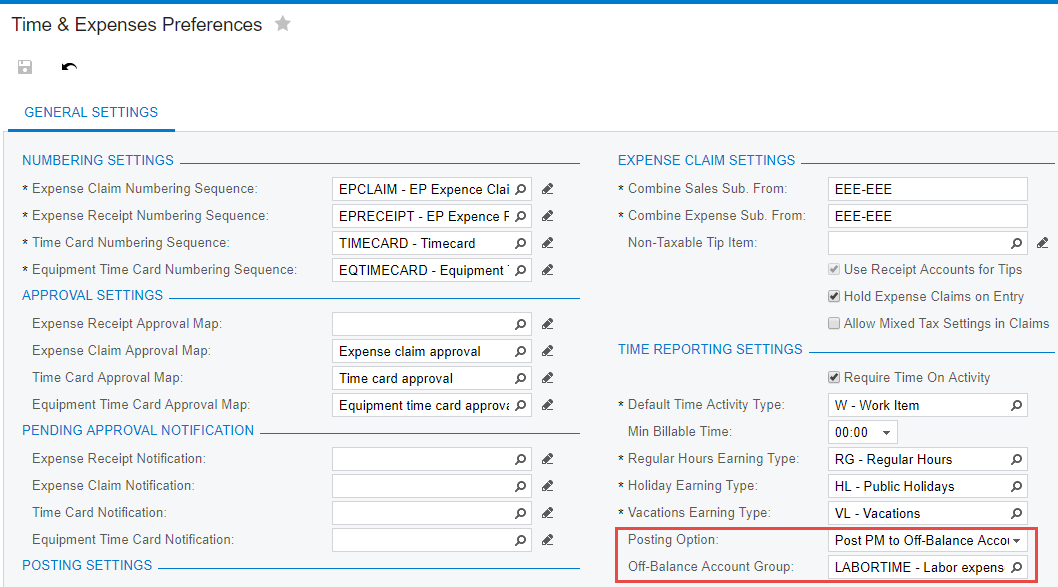
The option Post PM to Off-Balance Account Group causes the system to create project transactions without impacting the general ledger.
Set the Off-Balance Account Group to the account group that you want to use for expenses. This will be the account group that is used for allocation and billing.
Allocation and Billing Rules
The new account group that you created will be utilized by allocation and billing rules. To demonstrate, I modified some of the existing rules in the SalesDemo data.
Billing rule example.
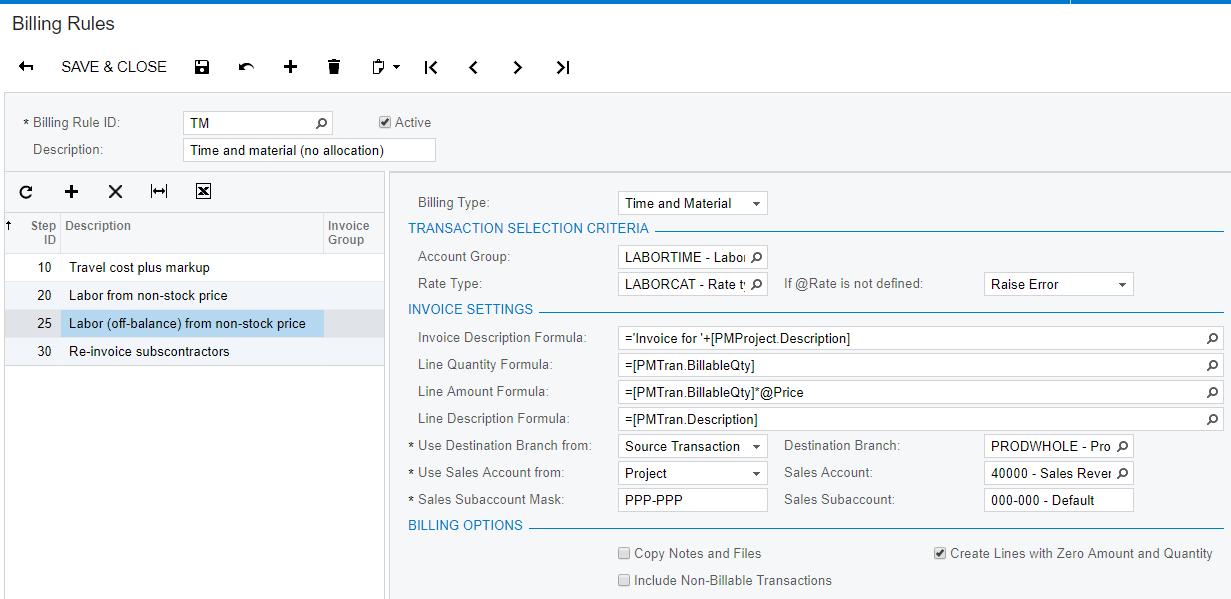
I added a new step ID to the existing TM billing rule. This step does the same thing as the existing labor step 20, except it uses a different account group.
Allocation rule example.
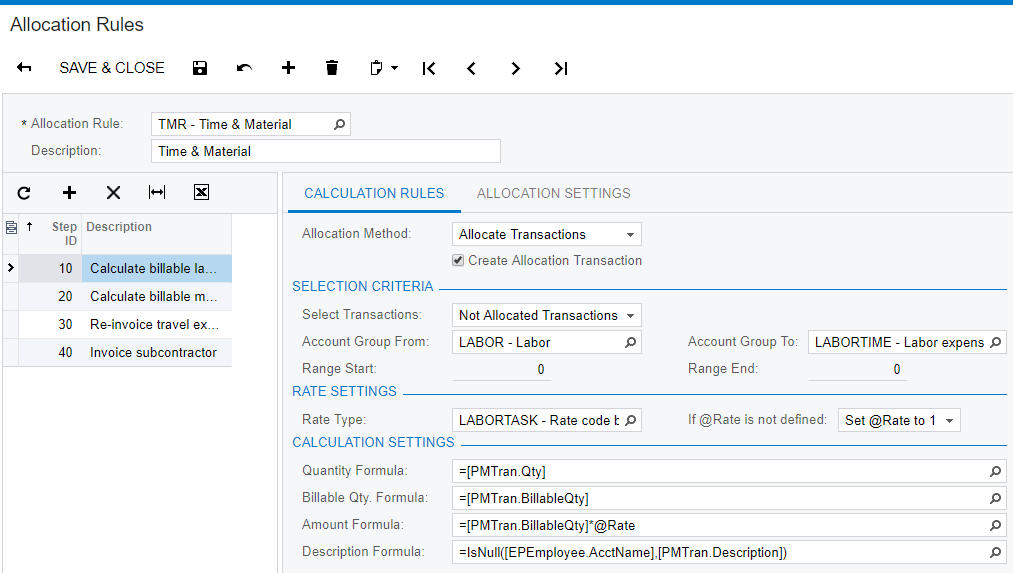
I updated the existing TMR allocation rule by extending the account group selection from LABOR to include a range of account groups.
HINT: By selecting account group name that is alphabetically close, my work was greatly simplified.
Test the Solution
After the simple setup, create a new project that uses one of the allocation or billing rules involving the off-balance account group and post a timecard to it.
Create a simple project without a budget:
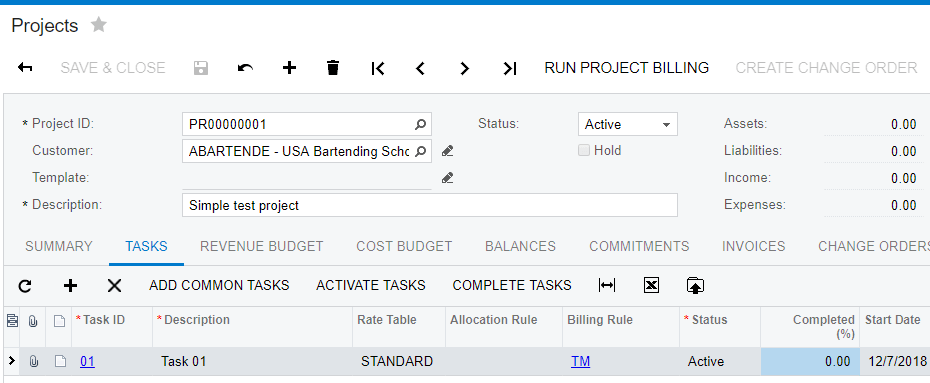
Enter and release time to the project:

View the project balances tab:
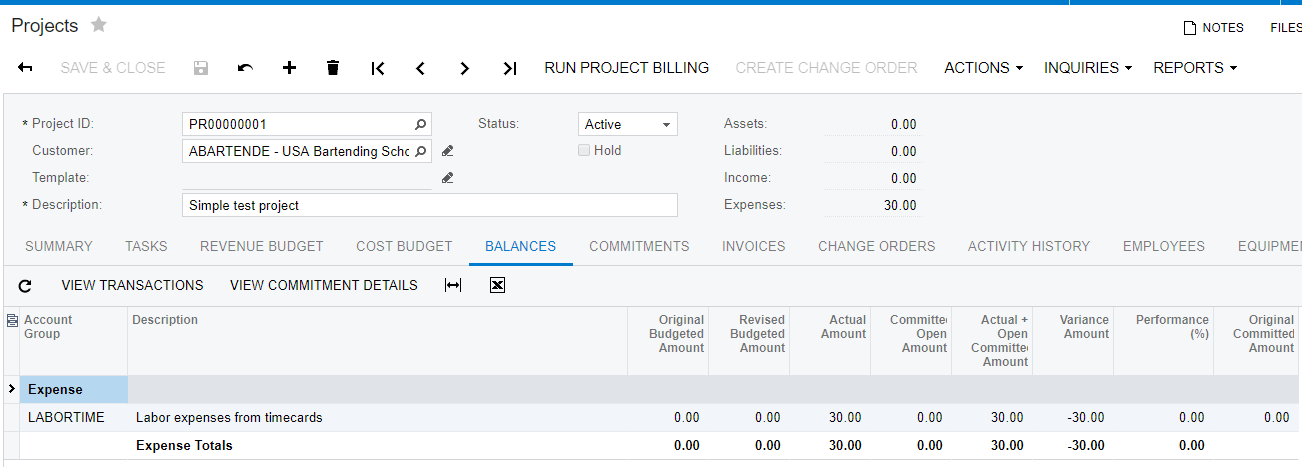
The expense is calculated based on cost entered on the Labor Cost Rates screen. I can drill into the project transaction and see that there is no GL transaction created. This allows us to create a budget and billing event for our project without impacting the GL.

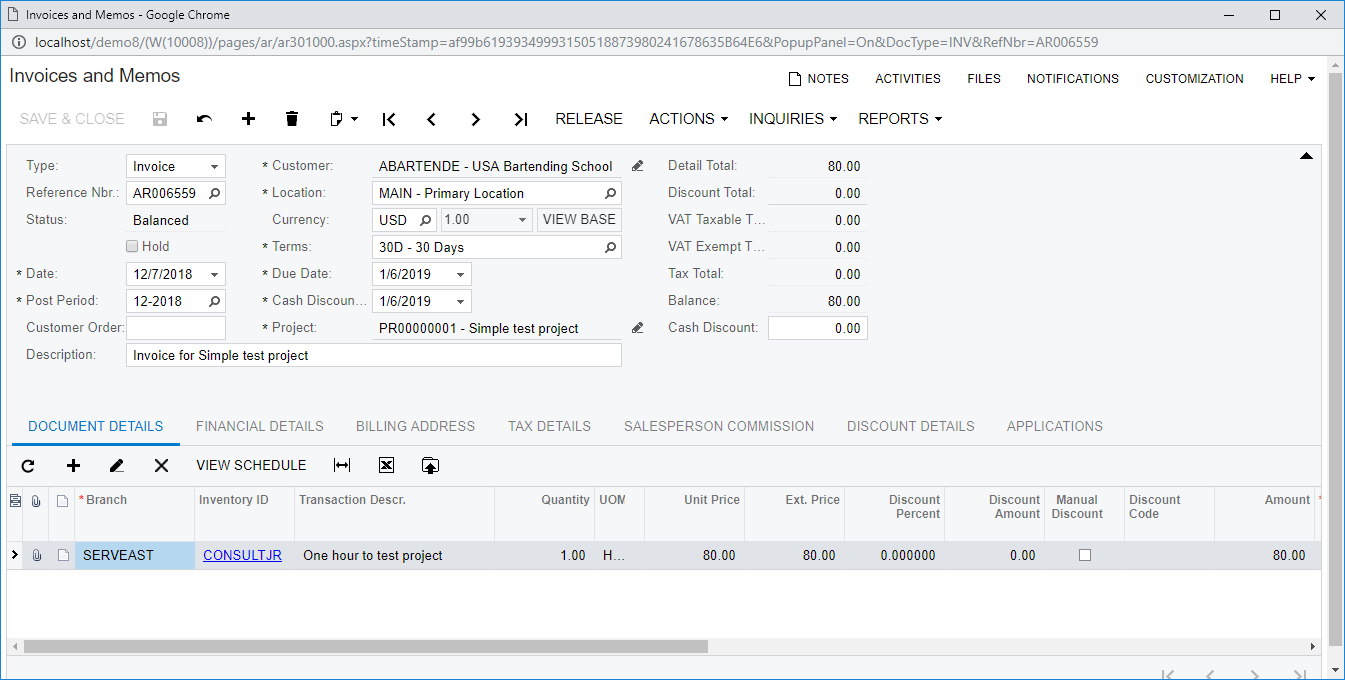
Run project to get an invoice based on the billing rule that I created. When released, the bill creates a journal transaction for the sales revenue and the receivable. The labor cost in the general ledger is zero because all labor costs are recorded from payroll.
Benefits of Posting Timecard Entries to Project Only
Posting to an off-balance account allows companies to simplify system configuration and minimize the number of general ledger transactions. When using this mechanism, detailed labor expense analysis must be done inside the project module.
This method simplifies payroll accounting because all numbers received from the payroll provider can be inserted into Acumatica cloud ERP (Enterprise Resource Planning) without the need to back out timecard data.
Acumatica’s timecard posting options work for every business
Acumatica’s cloud ERP software and ERP platform support different accounting processes for time reporting and project billing. Using a simplified approach, you can post timecard data to the project module for billing and project budget tracking. Clients which require more complex financial reports can retrieve additional details from their payroll system or turn on timecard posting to the general ledger inside Acumatica.
Posting timecard data to the general ledger introduces the potential to double-count labor expenses. This can be managed by posting manual journal entries or by setting up automated general ledger allocations.
Timecard data can also be populated from information generated by the field services and manufacturing modules. Data received from these modules follow the same posting and releasing process, so company-wide data is streamlined through a single process.
If you’d like to learn more about Acumatica cloud ERP, our ERP platform, or about timecard posting options, contact our team. For more tutorials like today’s, check out our Technical Tuesday series. The two most recent focus on multi-factor authentication via single sign-on and using business events to automate processes, but there are many more with detailed information on how to get the most out of Acumatica’s comprehensive solution.
Read More in the Technical Tuesday Series
APPENDIX 1: Example of how to modify payroll accounting to timecard liabilities
In the example below, we modify the payroll accounting information to back out liabilities created from timecard data.
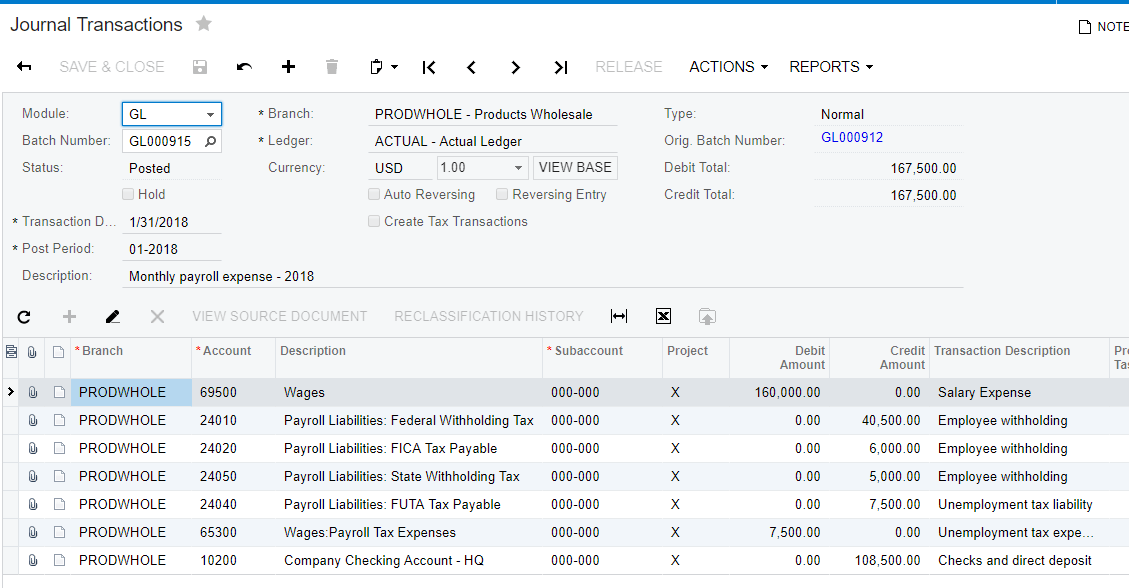
This example assumes that payroll includes salaries, hours included on Acumatica timecards, and hours that are not included in Acumatica timecards. This sample is SalesDemo data from January 2018:
Input 1: Payroll Data
Input 2: Report containing timecard liabilities (wages payable)
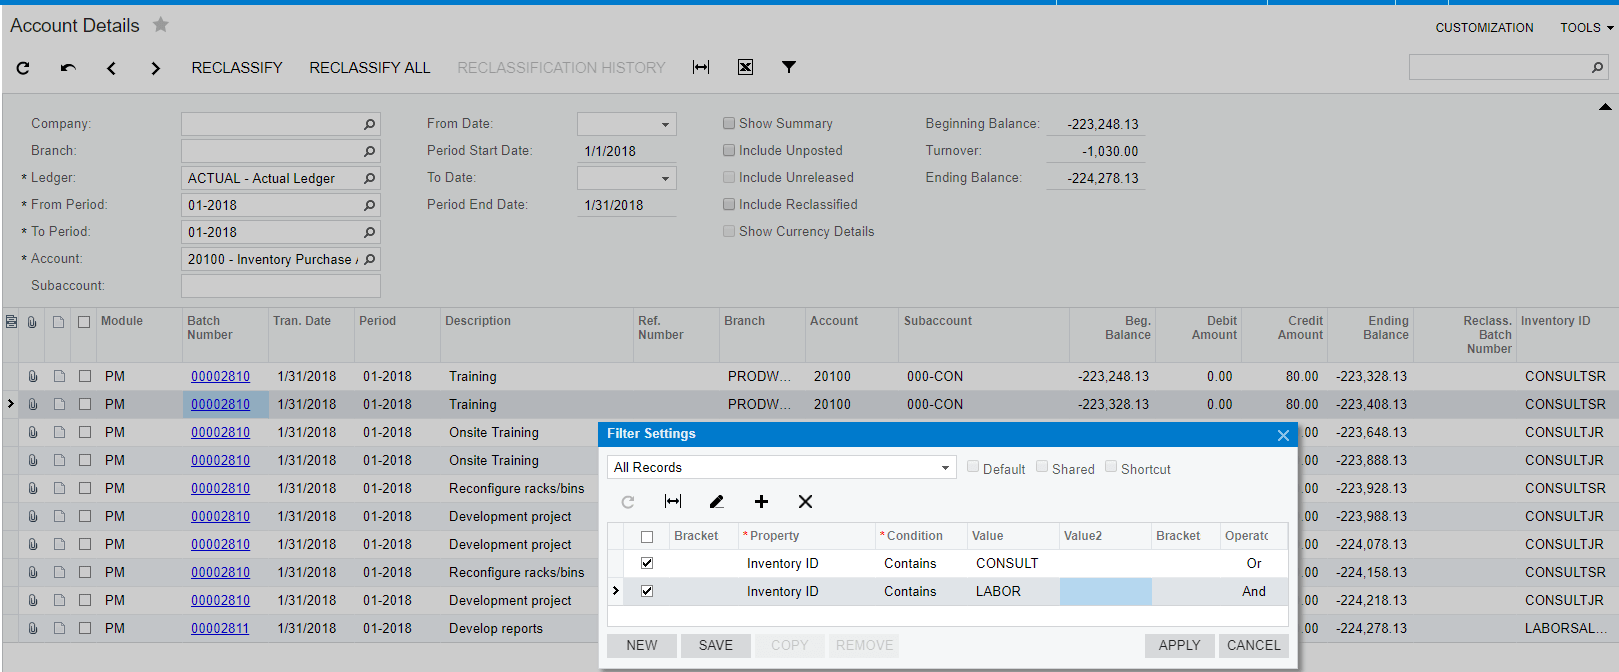
In this example I applied a filter to select only labor transactions because all inventory and non-stock items had the same expense accrual account (20100).
Process
The goal is to eliminate wages payable and reduce the double counted wages.
Step 1: Retrieve data (see above).
Step 2: Locate GL batch entry for payroll and select Action > Reclassify
Step 3: Split the line containing Salary expense – use the turnover amount from above to debit the liability account as pictured below.

In SalesDemo, this results in the following:
- Wages (which were previously double-counted) is reduced
- Wages Payable (called Inventory Purchase Accrual prior to July 2018 and 12400 prior to Dec 2018) is eliminated
- COGS Wages remains untouched. The COGS were created from the timecard entries.
Result
The new Profit and Loss report accurately reflects salaries and wages in two different locations – a COGS location which contains timecard data and a Salaries area which reflects overhead or Operating Expenses.
APPENDIX 2: GL Allocation to automate eliminating wage liabilities and expenses
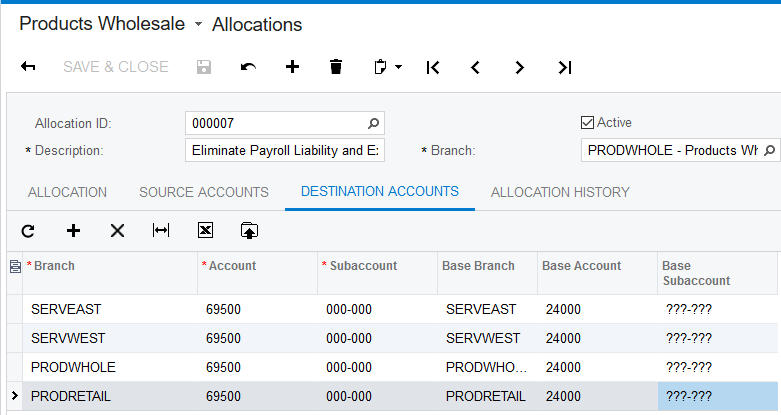
The manual process in the previous appendix can be automated by creating a GL allocation. The allocation retrieves all wages payable entries and allocates them to payroll expense.
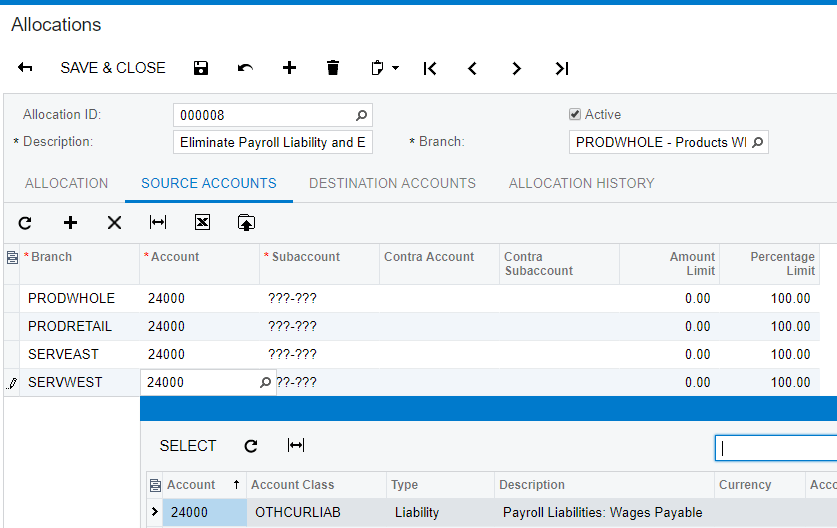
After payroll account entries are made, running this allocation removes the excess wages and eliminates the wages payable liability.
 Canada (English)
 Colombia
 Caribbean and Puerto Rico
 Ecuador
 India
India
 Indonesia
 Ireland
 Malaysia
 Mexico
 Panama
 Peru
Peru
 Philippines
 Singapore
 South Africa
 Sri Lanka
 Thailand
 United Kingdom
 United States


