Today’s Technical Tuesday post shows how to print a check on check stock which does not contain pre-printed banking information on the bottom of the check. The benefits of MICR Check printing through Acumatica cloud ERP (Enterprise Resource Planning)? Saved time, reduced errors, and more.

While the reports and process in this paper are for demonstration purposes only and are not guaranteed to comply with banking standards, this article provides details about creating the report so Acumatica cloud ERP partners and customers can easily implement a bank compliant solution. The appendix provides a one-minute tutorial on demonstrating this feature using SalesDemo data.
MICR check printing in Acumatica
Warning: The checks printed from this demonstration may not comply with banking standards.
Companies may purchase checks with a pre-printed bank information or utilize Acumatica to print the MICR line at the bottom of the check. The MICR (Magnetic Ink Character Recognition) line typically contains a routing number, an account number, and a check number.
For companies using multiple bank accounts, there are several advantages to purchasing checks without pre-printed bank information.
Companies using multiple bank accounts can save time and reduce errors when an AP clerk needs to print checks. If you have pre-printed banking information, the company needs to maintain supplies of different checks which are linked to different bank accounts. When the AP clerk begins to print a check, he needs to remember to insert the pre-printed checks that correspond to the bank account specified in their financial system. If the banking information is printed on-the-fly, then you can reduce the complexity of maintaining different check stock and eliminate printing errors.
Implementation Summary
In this article, we describe how to demonstrate this feature using the SalesDemo data. The following components are required.
- The Acumatica server you are accessing from must have a MICR font installed. All Acumatica SaaS environments include pre-installed MICR fonts, but you may have to install one if you are using a local environment.
- MICR line report. This report in SalesDemo is designed to take the remittance details from the cash account and payment method you are using to print your check.
- Check report. The modified check report contains a sub-report which passes the appropriate parameters to the MICR line report to display the MICR line in the appropriate place.
There are alternative implementations provided by several Acumatica resellers. In this paper, we demonstrate this solution to provide insights into the Report Designer tools.
Implementation
Follow the steps below to understand how to implement MICR check printing in Acumatica.
Step 1: Install Font on the Windows Server running Acumatica
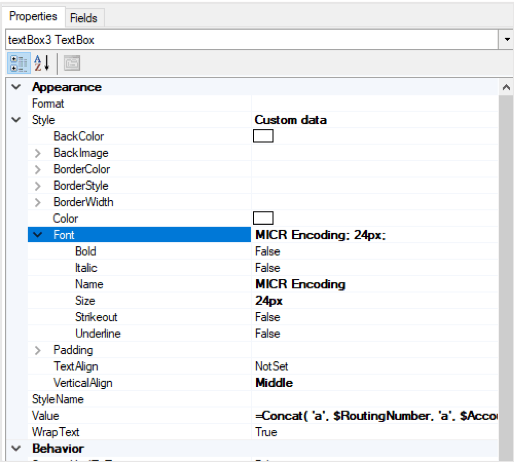
Use a MICR font approved for use by your bank.
For demonstrations, you should use the MICR font that is automatically included in Acumatica SaaS environments. If you are using a local environment, you can download and install the free MICR Encoding font at https://www.fontspace.com/digital-graphics-labs/micr-encoding.
If you use this font, then you can use the default MICR line report in SalesDemo. If you use a different font, then you will have to change the Font Name (pictured to the right) to match the name of the MICR font you installed.
Where do I install the font?
The Acumatica reporting engine runs on the server where the Acumatica application is running, but the report is rendered on the computer running the browser that you use to access Acumatica. Therefore, you need to install the font both on the server and on the computer you are using to access the report.
Compare the results of running the MICR line report on a computer with the font installed versus on a phone that does not have the font installed.
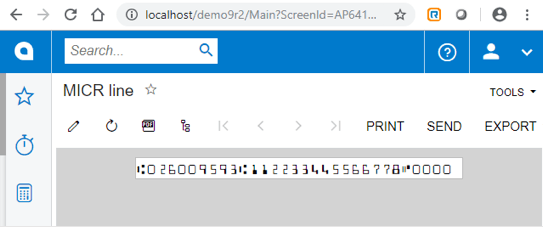
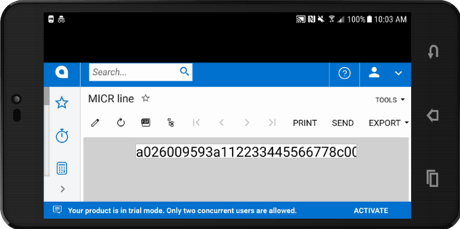
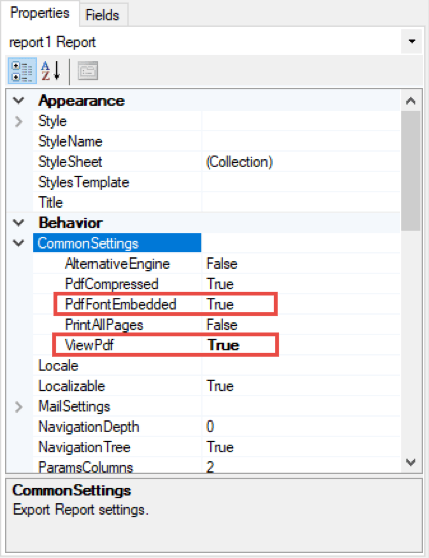
If you do not want to force users to install the font on their computer, then you can render the report as a PDF with the fonts embedded by selecting two options in the Common Settings area on the MICRline report (see step 2, problem 3 for details).
How do I install a font?
Consult Windows help for installing fonts. I utilized the process below to install the font on my computer.
- Download the ZIP file from https://www.fontspace.com/micr-encoding-font-f5090
- Unpack or simply open the ZIP file to reveal micrenc.ttf
- Open the micrenc.ttf file – a Window should open similar to what I displayed below. I am using a Windows 10 machine.
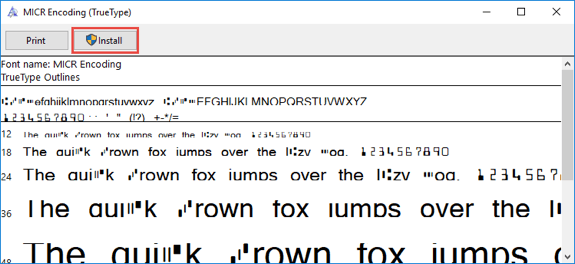
- Click Install as illustrated above
Step 2: Build the MICR Line Report
The latest SalesDemo data includes a Report Designer report called MICRline. This report gathers three pieces of information and displays them in a single text box with appropriate MICR formatting.
- Bank Routing Number
- Bank Account Number
- Check Number
I retrieved the format from the Troy Group document entitled MICR Basics Handbook. This handbook also contains additional details about MICR line placement requirements as well as MICR history.
The report contains no other details. It simply writes a 4 inch by 0.25-inch box containing bank data in MICR format.
Report Details – Schema
The report contains a single TextBox that displays three parameters and the appropriate MICR codes.
=Concat( ‘a’, $RoutingNumber, ‘a’, $AccountNumber, ‘c’, [@CheckNumber] )
All three fields are defined as parameters so this report can be embedded in a check report which will pass this information. The letters a, b, c, and d are special codes for MICR line printing. The RoutingNumber and AccountNumber are declared as variables in the details section of the report.

The implementation is complex because of the way Routing Number and Account Number are setup within SalesDemo. In order to retrieve these fields, you need to utilize the following tables:
- CashAccount: screen location of the data (see image below)
- PaymentMethodAccount: required because each cash account can have multiple payment methods defined. This table links cash accounts to user entered payment methods.
- CashAccountPaymentMethodDetail: required to link multiple remittance details with a single payment method that is associated with a single cash account.
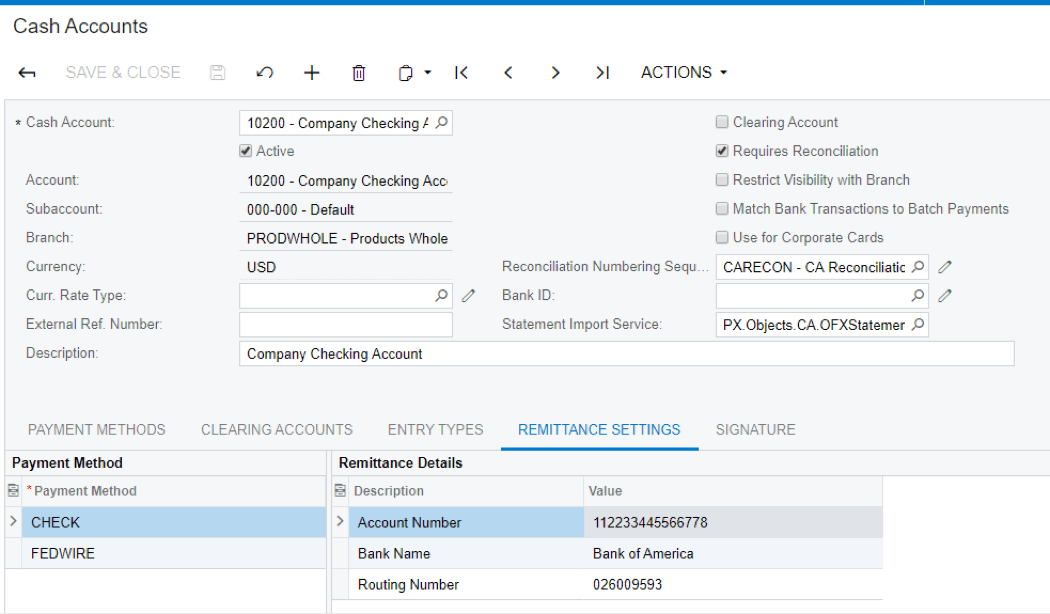
The payment method is where we define the remittance settings that we include on our cash account for a specific payment method. In case you were wondering, the tab called settings for use in AP is used to define payment method details that are different for each vendor.
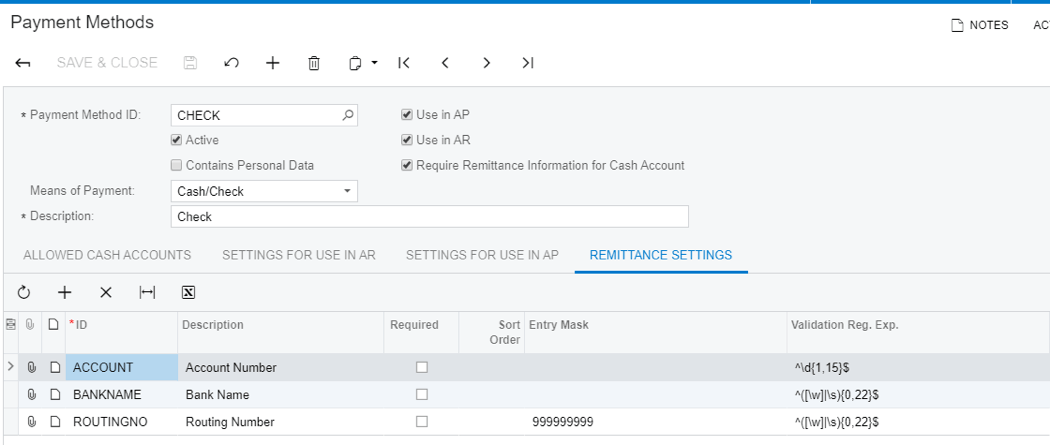
Report Details – Grouping and Variables and Formatting
I used a generic inquiry to create the schema for the MICR line report. In order to gather the information about the account number and bank number, I retrieve multiple rows as shown in the results of the generic inquiry below.

Problem 1
I need a single line that contains both the account number and the routing number so I can display them on my check.
- Solution 1: define two ‘value’ fields and use if statements so values are only populated when the ID is a specific value. Use group by to merge the rows together. I tried this first. The problem is that this does not translate well to Report Designer because the calculated fields in the results grid are not available. Back to the drawing board.
- Solution 2: Define variables in the detail section of the report. Set the variable to the detail value only when the detail ID is the value you want. For example, I defined a variable $RoutingNumber and populate it only when the DetailID = ROUTINGNO. After running through all three records above, the Routing Number and Account Number variables are populated. The expression is provided here:
=IIf( [CashAccountPaymentMethodDetail.DetailID]=’ROUTINGNO’, CStr([CashAccountPaymentMethodDetail.DetailValue]), $RoutingNumber )
Now I can use the variables to print build my MICR string in a groupFooter or pageFooter.
Problem 2
I could not get the pageFooter to print inside a sub-report.
- Solution: I defined two groupings using Payment Method ID and Cash Account ID. I placed the TextBox in the second grouping footer and defined the value according to this formula:
=Concat( ‘a’, $RoutingNumber, ‘a’, $AccountNumber, ‘c’, [@CheckNumber] )
I set the size of the report and textbox to 4 inches and 0.25 inches per the MICR requirements. With some trial and error, I determined that a font size of 24px was about right.
Problem 3
Each client computer needs to have the MICR font installed to see the proper result.
- Solution: The Report properties contains a Common Settings area where you can define the output format to be a PDF file. When the report is defined as a PDF file, you can embed the font within the file so the user does not need to install the fonts. The settings for this are shown below.
Step 3: Insert the MICR line report into your check reports
The last part involves inserting the MICR line report into check reports that you want to include your MICR line. In SalesDemo, I inserted the MICR line into the Check Form with Remittance report (AP.64.10.00) that is the default printing option for vendor check payments.
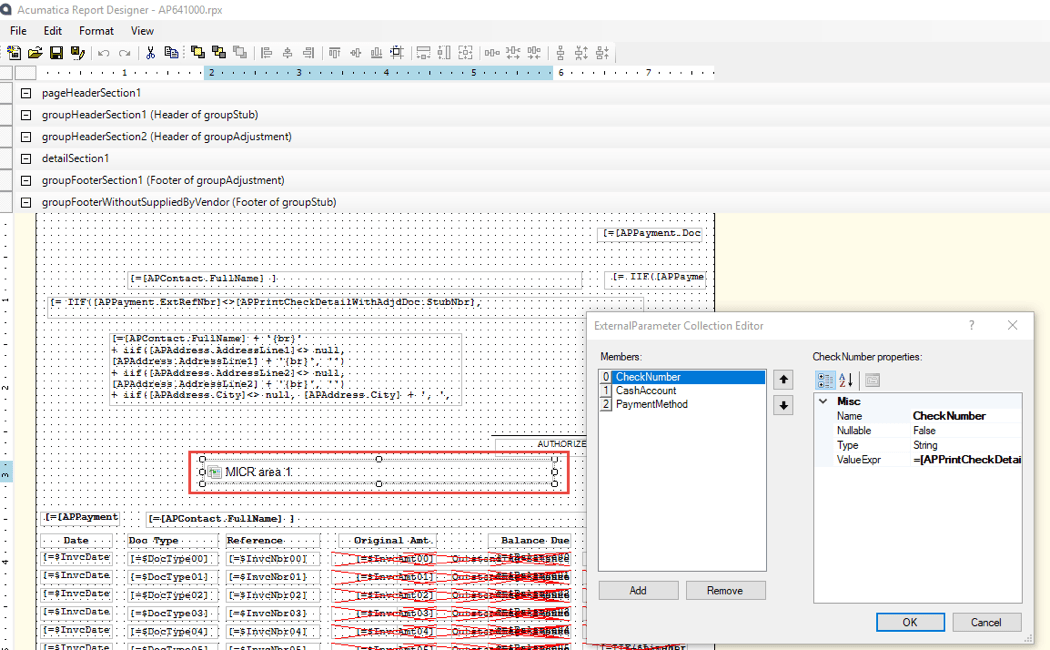
In this report there are two printing options depending on vendor attributes, so I inserted my sub-report into both places. The image below shows the first of the two locations.
Passing Parameters
After inserting a sub-report, I needed to specify the three variables that the MICR line report is expecting.
- The check number can a field called the StubNbr that is automatically incremented for each check. =[APPrintCheckDetailWithAdjdDoc.StubNbr]
- The cash account is available on the APPayment table. =[APPayment.CashAccountID]
- The payment method ID (usually check) is available on the APPayment table as well. =[APPayment.PaymentMethodID]
Step 4: Check the Result
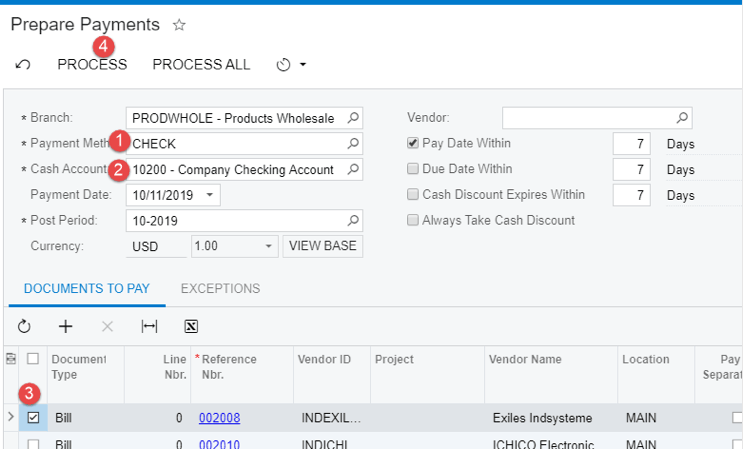
To test, go to the Prepare Payments screen (AP.50.30.00), set the Payment Method to CHECK, and set the Cash Account to 10200.
Check a box in front of the bill you want to pay and press the Process button.
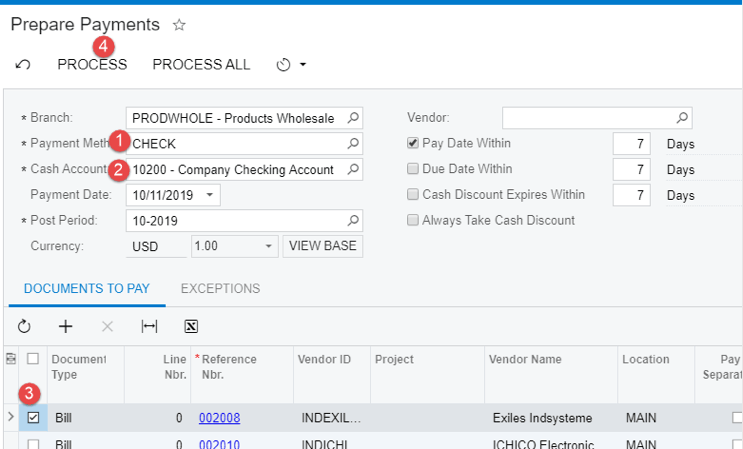
You will automatically be taken to the Process Payments / Print Check screen (AP.50.50.00) where you can process all.
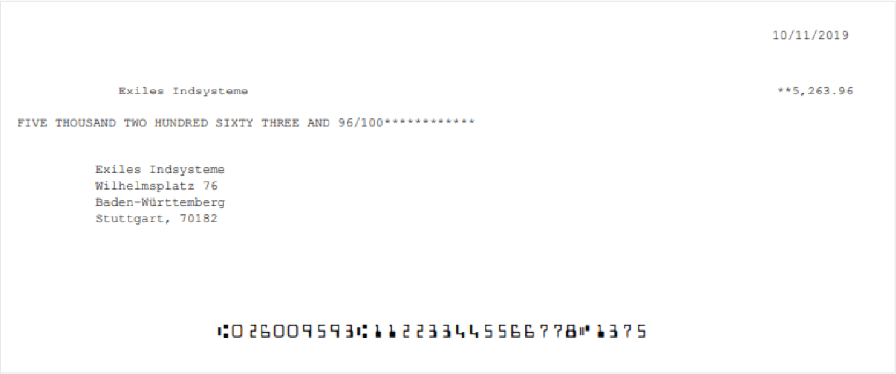
The check form will automatically open and you should see a result like the one below.
Conclusion
Acumatica supports multiple check printing options including the ability to print checks with a MICR line so companies with multiple checking accounts can maintain a single stock of checks and save time and eliminate errors when printing checks.
In this paper, we reviewed how to build the MICR check report while illustrating some of the capabilities of the Acumatica Report Designer. In the appendix, we show how pre-sales personnel can quickly and easily demonstrate the MICR check printing process using the SalesDemo data.
As a reminder, the MICR reports in SalesDemo data are not guaranteed to meet banking standards. This information should be a good starting point for partners and customers who want to implement a solution that meets banking standards.
For more step-by-step tutorials, such as editing the Acumatica portal home page or timecard accounting for projects, check out Acumatica’s Technical Tuesday series. Any questions regarding this article or about our comprehensive cloud ERP software can be directed to our experts who are standing by.
Read More Technical Tuesday Posts
APPENDIX: Demo the Feature
If you want to see how it works without learning the details, follow the steps below.
- Install the MICR font from https://www.fontspace.com/digital-graphics-labs/micr-encoding on the server that is running Acumatica.
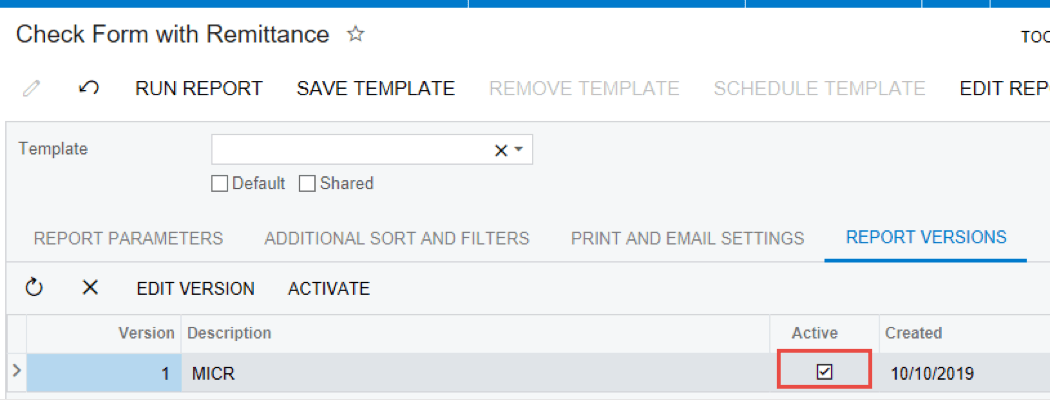
- Inside Acumatica, open the Check Form with Remittance report (AP.64.10.00), navigate to the Report Versions tab, and check the box to activate the MICR version of the report.
- Pay a bill using a check. Go to Prepare Payments screen, set the Payment Method to CHECK, set Cash Account to 10200. Check the box in front of the bill(s) you want to pay and press the Process button.
You will automatically be taken to the Process Payments / Print Check screen (AP.50.50.00) where you can process all. This will automatically open the check and you can see a MICR line on the bottom of the check.


